Erhalten Sie Zugang zu diesem und mehr als 300000 Büchern ab EUR 5,99 monatlich.
- Herausgeber: epubli
- Kategorie: Lebensstil
- Sprache: Englisch
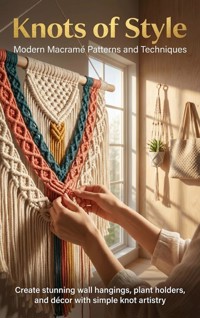
Rediscover the timeless craft of macramé with a fresh, modern twist in Knots of Style. This beautifully designed guide teaches you the essential knots, cords, and creative techniques to design eye-catching pieces for every space. From minimalist wall art and elegant plant hangers to detailed patterns for bags and home décor, Knots of Style walks you through each project with clear, illustrated instructions. You'll also learn how to choose materials, mix textures, and adapt classic designs for contemporary aesthetics. Relaxing, creative, and immensely satisfying, macramé is more than a craft—it's modern art made by hand.
Sie lesen das E-Book in den Legimi-Apps auf:
Seitenzahl: 199
Veröffentlichungsjahr: 2025
Das E-Book (TTS) können Sie hören im Abo „Legimi Premium” in Legimi-Apps auf:
Ähnliche


Table of Contents
Chapter 1: Introduction to Macramé
The History of Macramé
Tools for Macramé
Types of Macramé Cords
Macramé Techniques
Chapter 2: Essential Knots for Your Projects
The Square Knot
The Half Knot
The Lark's Head Knot
The Double Half Hitch
The Spiral Knot
Chapter 3: Choosing the Right Materials
Understanding Cord Types
Cord Sizes and Thicknesses
Color Selection
Exploring Textures
Chapter 4: Basic Techniques to Get You Started
Setting Up Your Workspace
Measuring and Cutting Cords
Understanding Basic Knots
Practicing Your First Project
Chapter 5: Crafting Minimalist Wall Hangings
Understanding Minimalism in Macramé
Essential Knots for Minimalist Wall Hangings
Choosing the Right Materials
Designing Your Minimalist Wall Hanging
Step-by-Step Project: Creating a Minimalist Wall Hanging
Chapter 6: Making Elegant Plant Hangers
Understanding Plant Holder Styles
Choosing the Right Materials
Basic Knots for Plant Hangers
Step-by-Step Plant Hanger Project
Chapter 7: Decorative Side Projects
Keychains: Crafting Functional Art
Coasters: Protect and Decorate
Wall Pockets: Organize with Style
Chapter 8: Combining Textures and Colors
Understanding Textures in Macramé
The Basics of Color Theory
Creating Color Palettes
Mixing Textures in Projects
Adapting Classic Designs with Modern Colors
Experimenting with Color and Texture
Chapter 9: Adapting Classic Designs for Modern Aesthetics
The Essence of Classic Macramé Designs
Analyzing Modern Trends in Home Décor
Incorporating Contemporary Shapes and Styles
Textural Variety: Combining Materials
Customizing Patterns to Reflect Your Style
Inspiration from Nature and the Urban Environment
Chapter 10: Creating Large-Scale Art Pieces
Understanding Scale in Macramé Art
Material Selection for Large Projects
Planning Your Project
Techniques for Large-Scale Knots
Displaying Your Art
Chapter 11: Troubleshooting Common Problems
Uneven Knots: Causes and Fixes
Dealing with Cord Tangles
Insufficient Tension: Recognizing and Correcting
Incorrect Knot Techniques
Chapter 12: Final Touches and Finishing Techniques
Understanding Finishing Techniques
Trimming and Shaping
Fringing Techniques
Securing Knots
Presenting Your Finished Work
Chapter 13: Sharing Your Art with the World
Showcasing Your Art
Selling Your Creations Online
Hosting Workshops
Connecting with the Community
Chapter 14: Beyond Home Décor: Functional Macramé Items
The Beauty of Functional Macramé
Practical Projects: Bags and Pouches
Creating Hammocks for Outdoor Relaxation
Handy Household Items: Key Holders and Organizers
Chapter 15: Sustainability in Macramé
Understanding Sustainable Materials
Eco-Friendly Techniques
The Impact of Sustainable Crafting
Transitioning to a Carefree and Sustainable Mindset
Chapter 16: The Future of Macramé Art
The Evolution of Macramé
Current Trends in Macramé Design
Technological Innovations in Craft
The Role of Community and Collaboration
Chapter 1: Introduction to Macramé
Welcome to the world of macramé, where creativity knows no bounds! In this chapter, we will explore the history and significance of this beautiful craft. From its ancient origins to its resurgence in modern design, macramé has been a favored technique for those looking to create stunning pieces by hand. You will learn about the tools needed, the different types of cords available, and how this art can transform your living space.
The History of Macramé
Macramé has a rich history that dates back centuries. Understanding its origins can enhance the appreciation for this craft. As we explore the story of macramé, we'll see how it evolved across different cultures and time periods.
Ancient Roots
Macramé, a craft that interlaces beauty with functionality, finds its origins in ancient civilizations. Evidence suggests that the Babylonians and Egyptians practiced knotting techniques, showcasing a deep understanding of textile manipulation. Archaeologists have discovered artifacts adorned with intricate knots, indicating that these early craftspeople were not only skilled but also creative in their use of materials.
These ancient knotting methods laid the foundation for macramé as we know it today. Over millennia, various cultures adapted and evolved these techniques, incorporating them into their own textile practices. This rich tapestry of history not only highlights the versatility of macramé but also emphasizes its importance as a cultural expression through textiles.
Arab Influences
The term 'macramé' is believed to derive from the Arabic word 'migramah', which translates to 'fringe'. This etymology underscores the significant influences of Arab weavers on the craft. In medieval times, Arab artisans contributed to the spread of intricate knotting techniques, which were then exchanged through trade routes, particularly during the Islamic Golden Age.
As these methods traveled across the Mediterranean, they intertwined with European textile artistry, leading to a rich fusion of styles and techniques. The lasting impact of Arab weavers has helped macramé maintain its relevance, as many original knotting techniques are still utilized in modern designs.
European Adoption
Macramé began to gain popularity in Europe during the 13th century, particularly in England and France. Here, the craft was embraced primarily for its decorative applications, particularly in creating fringes and laces that adorned garments and household items. Skilled artisans began to experiment with various knotting techniques, pushing the boundaries of creativity.
The aesthetic appeal of macramé caught the attention of the nobility and eventually permeated all levels of society. As the craft evolved, macramé pieces transitioned from functional items to luxurious decorative art, showcasing the intricacy and beauty of knot artistry across Europe.
20th Century Resurgence
After a period of dormancy, macramé experienced a significant revival in the 1970s, largely fueled by the bohemian lifestyle that celebrated handmade crafts and natural aesthetics. During this time, macramé found its way into the homes of many, with plant hangers, wall hangings, and decorative accents becoming symbols of the era's artistic expression.
This resurgence allowed artists and hobbyists to experiment with new materials and contemporary designs, leading to a modern interpretation of the craft. Today, macramé continues to thrive, blending traditional techniques with contemporary aesthetics, making it a beloved choice for home décor and personal expression.
Tools for Macramé
To get started with macramé, having the right tools is crucial. This section will introduce you to the basic equipment needed for successful knotting.
Macramé Cord
The type of cord you choose significantly impacts the overall aesthetic and durability of your macramé projects. Cotton is a popular choice for beginners and seasoned crafters alike, primarily due to its softness, versatility, and ease of handling. It knits beautifully, allowing for clean, crisp knots that can bring your designs to life.
Cotton cords come in various thicknesses, and their natural texture adds a warm, organic feel to your creations. Additionally, while cotton is great for indoor projects, consider using synthetic cords for outdoor items due to their resistance to moisture and fading. Other options include jute, hemp, and nylon, each offering unique characteristics that can enhance your designs. Exploring different types of cords not only broadens your project possibilities but also lets you experiment with textures and colors, further elevating your artistic flair.
Scissors
Sharp scissors are a fundamental tool in your macramé toolkit. They play a crucial role in ensuring precise cuts, which helps you achieve a clean finish on your cords and prevents fraying—a common hiccup when working with fibrous materials.
Investing in a good pair of fabric or craft scissors can make a significant difference in your crafting experience, making cutting a simple and swift process. It’s essential to keep your scissors well-maintained and sharp. Regularly sharpening your scissors not only prolongs their lifespan but also enhances accuracy, thereby dramatically improving the quality of your knots. As you work on your projects, remember to cut your cords according to the lengths specified in your patterns. This attention to detail ensures that your macramé pieces turn out beautifully constructed and true to design.
Tape Measure
A measuring tool is indispensable when it comes to macramé, as accuracy is vital for creating balanced and visually appealing designs. A tape measure helps you ascertain that your cords are cut to the correct lengths for various knots and patterns, which is essential for maintaining symmetry in your macramé piece.
Using a flexible tape measure allows you to easily manipulate the tool around curves and angles, which is particularly advantageous when working on complex projects. Additionally, understanding how to measure and mark your cords properly will minimize waste and improve efficiency. For the best results, always refer to your pattern for specific measurements, ensuring that each piece is perfectly suited for assembly. With a reliable tape measure on hand, you can confidently tackle any macramé project while enhancing the overall quality of your creations.
Wooden Dowel or Anchor
Using a wooden dowel or a sturdy anchor point is essential for stabilizing your work during the knotting process. A dowel provides a firm base that allows you to keep your cords taut, which is crucial for achieving neat knots and an overall polished look in your finished piece.
When choosing a dowel, consider its size and thickness; it should be appropriate for the scale of your project. You can also create DIY anchors using hooks or fixed points in your crafting area, which helps keep the work secure while allowing for easy adjustments. This stability not only simplifies the knotting technique but also enhances your control over the craft, making the process more enjoyable. As you progress, experimenting with different anchor methods can lead to unique creations that reflect your personal style and enhance the functionality of your macramé projects.
Types of Macramé Cords
Choosing the right cord is a fundamental step in macramé. Different types offer distinct looks and textures, which can greatly impact your projects.
Cotton Cords
Cotton cords are the quintessential choice for macramé enthusiasts, particularly for beginners. Their soft, pliable texture makes them easy to knot and manipulate, allowing for a more enjoyable crafting experience. Cotton is also readily available in various thicknesses, so you can choose the right size based on your project's requirements.
The natural fibers provide a beautiful finish and can be dyed or left in their natural color, adding versatility to your creations. When using cotton cords, you will find that they hold knots well, which is essential for maintaining the structure and design of your pieces. Additionally, cotton is eco-friendly, making it a sustainable choice for those who are environmentally conscious.
Jute and Hemp Cords
Jute and hemp cords are fantastic for those looking to infuse a rustic or bohemian flair into their macramé projects. These materials offer a more textured, natural appearance, which can beautifully complement indoor plants or earthy home décor. Jute’s coarse texture adds character, making it ideal for projects like plant holders and wall hangings that require a bit of an organic touch.
While jute and hemp cords are strong, they can be more challenging to work with compared to cotton. When knotting, you may need to exert a bit more effort to achieve the desired tension. However, the end results are often stunning, providing a unique aesthetic appeal that is perfect for capturing the essence of nature in your designs.
Polyester Cords
Polyester cords are an excellent choice when durability and weather resistance are priorities. This type of cord is designed to withstand the elements, making it perfect for outdoor macramé projects like patio décor, garden hangers, or even porch accessories. Polyester is also incredibly strong, which means that your creations will hold up over time, even in harsher environments.
Mixed Textures
Exploring the combination of different cord types can elevate your macramé projects to new heights. By mixing textures, colors, and materials, you can create visually dynamic pieces that stand out. For instance, pairing soft cotton with rustic jute can yield a beautiful contrast, adding depth and interest to your wall hangings or plant holders.
Using mixed textures not only enhances visual appeal but also offers functional benefits. Different fibers complement each other's strengths and weaknesses, resulting in a well-balanced final product. Experimenting with mixed textures encourages creativity, allowing you to design unique items that reflect your personal style while showcasing the versatility of macramé as an art form.
Macramé Techniques
Mastering a variety of macramé techniques will enhance your skills and broaden your creative possibilities. This section outlines some fundamental knotting methods.
The Square Knot
The square knot is one of the most fundamental and widely used knots in macramé. It serves as a vital foundation for many projects, providing both strength and aesthetic appeal. Essentially, the square knot consists of two sets of half-hitches tied in opposite directions. This creates a symmetrical pattern, making it a favorite among crafters.
To begin, position two cords together, ensuring they are of equal length. Then, take the left cord over the right cord, followed by bringing it underneath and back through the loop created. Repeat this step in the reverse direction to complete the knot. Mastering the square knot opens the door to a variety of designs, from basic wall hangings to more intricate patterns.
Its versatility allows it to be paired with other knots to create dynamic textures and designs. As you practice, you'll find that the square knot not only strengthens your work but also enhances its visual interest, making it a crucial element in your macramé toolkit.
The Lark's Head Knot
The lark's head knot is a key technique in macramé, predominantly used to attach cords to a dowel, ring, or other fixture. This knot is particularly praised for its strength and ease of use, making it an essential skill for all macramé enthusiasts. To tie a lark's head knot, fold a cord in half and place the loop behind your support structure.
Next, pull the two loose ends of the cord through the loop, tightening it against the support. This method not only secures your working cords but also enables you to create striking hanging designs, such as plant holders and wall decorations. The lark's head knot is incredibly adaptable, allowing for various cord arrangements to achieve different visual effects.
Whether starting a new project or enhancing an existing one, mastering the lark's head knot is crucial for crafting professional-looking macramé pieces. Its straightforward technique forms the backbone of many designs, making it a valuable addition to your macramé repertoire.
The Half Hitch Knot
The half hitch knot is a simple yet powerful technique in macramé that can transform your projects with its distinctive finish. By repeating half hitch knots along a base cord, you can create beautiful patterns and textures. To execute the half hitch, take one cord and wrap it around the base cord, then pass it through the loop created and pull to tighten.
This knot can be adjusted to achieve tightness or looseness, allowing for varied patterns and looks. Repeating this process along the length of your project introduces a unique rhythm and design element. Its simplicity makes the half hitch an ideal choice for both beginners and advanced macramé crafters.
As you experiment with the half hitch, consider varying the spacing and tension for different textures. You'll discover how this unassuming knot can contribute richly to your designs, adding depth and intricacy to your macramé creations.
Fringe Techniques
Incorporating fringes into your macramé pieces can significantly enhance their overall appeal. Fringe techniques add dimension and a touch of artistic flair, transforming simple designs into striking focal points. To create fringes, you'll typically leave extra length at the bottom of your cords, which can be cut and styled to the desired length and shape.
A common method is to braid or twist the fringe, creating an eye-catching blend of textures and movement. Additionally, you can experiment with layering different cord types or colors within the fringes for a more personalized effect. Fringes can be applied on various projects, from wall hangings to table runners, making them an incredibly versatile design element.
As you develop your fringe skills, you’ll find that they not only enhance the aesthetic of your work but also reflect your unique creative expression. Embracing fringe techniques allows you to push the boundaries of traditional macramé, making each piece a reflection of your artistry.
Chapter 2: Essential Knots for Your Projects
Understanding the fundamental knots is crucial for any macramé enthusiast. This chapter introduces you to the essential knots that form the backbone of this craft. From the simple square knot to more intricate variations, we’ll provide clear instructions and illustrations to help you master each technique. With these knots, you'll be equipped to bring your ideas to life.
The Square Knot
The square knot is one of the most fundamental knots in macramé, serving as a building block for many designs. It is a versatile and easy-to-learn knot that provides both strength and decorative appeal. In this section, we will break down the square knot into manageable steps, providing you with the foundation needed for various projects.
Step-by-step guide to creating a square knot
The square knot is formed by intertwining two strands of cord into an elegant and sturdy knot. Begin by taking two lengths of cord and placing them parallel to each other. Next, take the left cord and place it over the right cord, then bring it under and through the loop, pulling it taut to secure the knot. After that, take the right cord, place it over the left cord, and bring it underneath, pulling it through the loop you created in the first step. Gently tighten both sides to form a neat square knot. This knot can be repeated to create rows or sections in your project, giving it a cohesive and structured appearance.
Practice this knot several times to enhance your technique and confidence. Once you master the basic square knot, you can experiment by altering the lengths of your cords for varied designs, or combining it with other knots for more complex creations. The versatility of this foundational knot makes it an essential skill in your macramé toolkit.
Important tips for tension and spacing
Maintaining consistent tension and spacing is critical for achieving a professional finish with your square knots. When tying your knots, ensure that you pull the cords equally on both sides. Uneven tension can lead to lopsided knots and an unbalanced overall look. It's helpful to practice tying a few knots with a relaxed grip at first, then gradually increase your firmness until you find a balance that works for you.
Additionally, leaving a consistent amount of space between each square knot will enhance the visual appeal of your work. Use a measuring tool or your fingers as a guide to keep spacing uniform. Over time, paying attention to these details will ensure that your knots appear uniform and aesthetically pleasing, making your macramé pieces stand out beautifully.
Common uses of the square knot in projects
The square knot is widely used in various macramé projects, from simple wall hangings to intricate plant holders. Its strength makes it an ideal choice for load-bearing applications, such as creating the top or bottom rows of a macramé plant hanger. This knot is also commonly used as a decorative element in jewelry, where it can add texture and character.
Moreover, the square knot serves as a building block for more complex knotting techniques. You'll often find it incorporated into designs like decorative fringe, keychains, and bags, showcasing its versatility. As you explore different projects, you'll discover that the square knot is an indispensable tool in your macramé repertoire, allowing you to create functional and stylish pieces that are sure to impress.
How to adjust knot size for different effects
Customizing the size of your square knot can yield different visual effects, enhancing your overall design. The size of your knot is primarily influenced by the length of the cord you use and the tension applied when tying the knot. For larger knots, use longer lengths of cord and allow a looser tension when pulling it tight. This technique generates a more pronounced and chunky appearance, perfect for bold designs.
Conversely, shorter cords tied tightly will produce smaller, more delicate knots, suited for intricate patterns or finer details. Experimenting with these adjustments not only develops your knotting skills but also ensures that your macramé pieces are varied and tailored to your specific project needs. Keep in mind that differing knot sizes can transform the overall aesthetic of your work, giving you creative freedom in your macramé journey.
The Half Knot
The half knot is another essential knot in macramé, often used in combination with the square knot. It's a simple yet effective way to add texture to your work. In this section, we will explore the half knot and its variations, helping you understand how it can enhance your designs.
How to tie a half knot
The half knot is a fundamental technique in macramé that's easy to learn and incredibly versatile. To tie a half knot, begin with two working cords positioned parallel to each other. Select one cord to act as the anchor, while the other will be the working cord. Cross the working cord over the anchor cord, then pull it behind and through the loop created at the intersection. Finally, pull both cords taut to secure the knot in place.
It's important to maintain even tension when tightening the knot to ensure a clean and consistent appearance. Practice with different materials to get a feel for how the cord behaves. The half knot can be tied horizontally or vertically, depending on the intended design, making it an excellent choice for varied projects. Mastering this knot will lay the groundwork for creating more complex macramé patterns.
Using half knots to create patterns
Additionally, consider alternating half knots with other types of knots, such as square knots, to introduce diversity in your patterns. This combination enriches your designs and adds layers of visual interest. As you practice, experiment with the placement and spacing of your half knots to develop unique styles that reflect your personal aesthetic.
Understanding the placement of half knots in projects
The placement of half knots plays a crucial role in determining the overall look and feel of your macramé piece. Often, half knots are used at key junction points, such as where different sections of a design meet. For example, they can bridge the gap between larger knots or connect multiple strands of cord.
When planning your project, visualize how half knots will interact with other elements. This will help you create symmetry or asymmetry, depending on your artistic vision. If you’re working on a wall hanging, consider using half knots to create horizontal or vertical lines that enhance the piece's structure. Thoughtful placement of half knots can elevate the professionalism of your work and make your designs stand out.
Experimenting with half knot variations
Half knot variations can take your macramé creations to new heights by introducing different textures and styles. One such variation is the alternating half knot, where you tie a half knot with one working cord, and on the next round, switch to the other cord. This creates a dynamic look that adds depth to your work.
Additionally, you can incorporate different cord sizes or materials when tying half knots. Using a thicker cord can create a bolder appearance, while a thinner cord will result in a more delicate finish. Don't hesitate to experiment with colors and textures—multicolored cords can make the half knots pop and draw attention to your designs. Embracing these variations will help you find your unique voice in the world of macramé.
The Lark's Head Knot
The lark's head knot is another versatile knot often used to attach cords to rods or rings in macramé. This decorative knot not only serves a functional purpose but also adds visual interest to your work. In this section, you will learn how to tie the lark's head knot and where to incorporate it into your designs.
Instructions for tying the lark's head knot
The lark's head knot is a straightforward yet essential knot in macramé, perfect for beginners and experienced crafters alike. To tie this knot, start with a length of cord and create a loop in the middle. Hold this loop against your chosen rod or ring, which will serve as the anchor point. Next, take the two ends of the cord and thread them through the loop you just created.


