0,91 €
Mehr erfahren.
- Herausgeber: Seltzer Books
- Kategorie: Für Kinder und Jugendliche
- Sprache: Englisch
How-to book about carpentry, first published in 1914., with over 300 illustrations. "A book which treats, in a most practical and fascinating manner all subjects pertaining to the "King of Trades"; showing the care and use of tools; drawing; designing, and the laying out of work; the principles involved in the building of various kinds of structures, and the rudiments of architecture. It contains over two hundred and fifty illustrations made especially for this work, and includes also a complete glossary of the technical terms used in the art. The most comprehensive volume on this subject ever published for boys."
Das E-Book können Sie in Legimi-Apps oder einer beliebigen App lesen, die das folgende Format unterstützen:
Seitenzahl: 182
Veröffentlichungsjahr: 2018
Ähnliche


![Tintenherz [Tintenwelt-Reihe, Band 1 (Ungekürzt)] - Cornelia Funke - Hörbuch](https://legimifiles.blob.core.windows.net/images/2830629ec0fd3fd8c1f122134ba4a884/w200_u90.jpg)


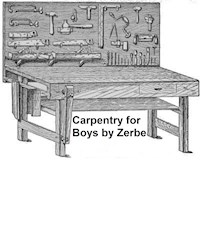
Fig. 1. A Typical Work Bench.
CARPENTRY FOR BOYS BY J. S. ZERBE, M.E.
AUTHOR OF ELECTRICITY FOR BOYS, PRACTICAL MECHANICS FOR BOYS
A PRACTICAL COURSE, WHICH TELLS IN CONCISE AND SIMPLE FORM "HOW TO DO IT"
including chapters on drawing, laying out work, designing and architecture
WITH 250 ORIGINAL ILLUSTRATIONS
from: THE "HOW-TO-DO-IT" BOOKS
Published by Seltzer Books
established in 1974, as B&R Samizdat Express
offering over 14,000 books
feedback welcome: [email protected]
Books for Boys, from Seltzer Books:
Anecdotes for Boys by Harvey Newcomb
The Boy Mechanic
The Boy Scout and Other Stories for Boys by Richard Harding Davis
Camping for Boys by Gibson
Carpentry for Boys by Zerbe
Electricity for Boys by Zerbe
English Literature for Boys and Girls by Marshall
Healthful Sports for Boys (c. 1900) by Rochefort
Practical Mechanics for Boys by Zerbe
THE NEW YORK BOOK COMPANY, New York
Copyright, 1914, by THE NEW YORK BOOK COMPANY
INTRODUCTORY
CHAPTER I TOOLS AND THEIR USES
CHAPTER II HOW TO GRIND AND SHARPEN TOOLS
CHAPTER III HOW TO HOLD AND HANDLE TOOLS
CHAPTER IV HOW TO DESIGN ARTICLES
CHAPTER V HOW WORK IS LAID OUT
CHAPTER VI THE USES OF THE COMPASS AND THE SQUARE
CHAPTER VII HOW THE DIFFERENT STRUCTURAL PARTS ARE DESIGNATED
CHAPTER VIII DRAWING AND ITS UTILITY
CHAPTER IX MOLDINGS, WITH PRACTICAL ILLUSTRATIONS IN EMBELLISHING WORK
CHAPTER X AN ANALYSIS OF TENONING, MORTISING, RABBETING AND BEADING
CHAPTER XI HOUSE BUILDING
CHAPTER XII BRIDGES, TRUSSED WORK AND LIKE STRUCTURES
CHAPTER XIII THE BEST WOODS FOR THE BEGINNER
CHAPTER XIV WOOD TURNING
CHAPTER XV ON THE USE OF STAINS
CHAPTER XVI THE CARPENTER AND THE ARCHITECT
CHAPTER XVII USEFUL ARTICLES TO MAKE
CHAPTER XVIII SPECIAL TOOLS AND THEIR USES
CHAPTER XIX ROOFING TRUSSES
CHAPTER XX ON THE CONSTRUCTION OF JOINTS
CHAPTER XXI SOME MISTAKES, AND A LITTLE ADVICE IN CARPENTRY
GLOSSARY OF WORDS USED IN TEXT OF THIS VOLUME
INTRODUCTORY
Carpentry is the oldest of the arts, and it has been said that the knowledge necessary to make a good carpenter fits one for almost any trade or occupation requiring the use of tools. The hatchet, the saw, and the plane are the three primal implements of the carpenter. The value is in knowing how to use them.
The institution of Manual Training Schools everywhere is but a tardy recognition of the value of systematic training in the use of tools. There is no branch of industry which needs such diversification, in order to become efficient.
The skill of the blacksmith is centered in his ability to forge, to weld, and to temper; that of the machinist depends upon the callipered dimensions of his product; the painter in his taste for harmony; the mason on his ability to cut the stone accurately; and the plasterer to produce a uniform surface. But the carpenter must, in order to be an expert, combine all these qualifications, in a greater or less degree, and his vocation may justly be called the King of Trades. Rightly, therefore, it should be cultivated in order to learn the essentials of manual training work.
But there is another feature of the utmost importance and value, which is generally overlooked, and on which there is placed too little stress, even in many of the manual training schools. The training of the mind has been systematized so as to bring into operation the energies of all the brain cells. Manual training to be efficient should, at the same time, be directed into such channels as will most widely stimulate the muscular development of the child, while at the same time cultivating his mind.
There is no trade which offers such a useful field as carpentry. It may be said that the various manual operations bring into play every muscle of the body.
The saw, the plane, the hammer, the chisel, each requires its special muscular energy. The carpenter, unlike the blacksmith, does not put all his brawn into his shoulders, nor develop his torso at the expense of his other muscles, like the mason. It may also be said that, unlike most other occupations, the carpenter has both out-of-door and indoor exercise, so that he is at all times able to follow his occupation, summer or winter, rain or shine; and this also further illustrates the value of this branch of endeavor as a healthful recreation.
It is the aim of this book to teach boys the primary requirements—not to generalize—but to show how to prepare and how to do the work; what tools and materials to use; and in what manner the tools used may be made most serviceable, and used most advantageously.
It would be of no value to describe and illustrate how a bracket is made; or how the framework of a structure is provided with mortises and tenons in order to hold it together. The boy must have something as a base which will enable him to design his own creations, and not be an imitator; his mind must develop with his body. It is the principal aim of this book to give the boy something to think about while he is learning how to bring each individual part to perfection.
If the boy understands that there is a principle underlying each structural device; that there is a reason for making certain things a definite way, he is imbued with an incentive which will sooner or later develop into an initiative of his own.
It is this phase in the artisan's life which determines whether he will be merely a machine or an intelligent organism.
This work puts together in a simple, concise form, not only the fundamentals which every mechanic should learn to know, but it defines every structural form used in this art, and illustrates all terms it is necessary to use in the employment of carpentry. A full chapter is devoted to drawings practically applied. All terms are diagrammed and defined, so that the mind may readily grasp the ideas involved.
Finally, it will be observed that every illustration has been specially drawn for this book. We have not adopted the plan usually followed in books of this class, of taking stock illustrations of manufacturers' tools and devices, nor have we thought it advisable to take a picture of a tool or a machine and then write a description around it. We have illustrated the book to explain "how to do the work"; also, to teach the boy what the trade requires, and to give him the means whereby he may readily find the form of every device, tool, and structure used in the art.
CHAPTER I TOOLS AND THEIR USES
Knowledge of Tools.—A knowledge of tools and their uses is the first and most important requirement. The saw, the plane, the hatchet and the hammer are well known to all boys; but how to use them, and where to use the different varieties of each kind of tool, must be learned, because each tool grew out of some particular requirement in the art. These uses will now be explained.
A Full Kit of Tools.—A kit of tools necessary for doing any plain work should embrace the following:
1. A Hatchet. 2. A Claw Hammer—two sizes preferred. 3. Cross-cut Saw, 20 inches long. 4. Rip Saw, 24 inches long. 5. Wooden Mallet. 6. Jack Plane. 7. Smoothing Plane. 8. Compass Saw. 9. Brace. 10. Bits for Brace, ranging from ¼ inch to 1 inch diameter. 11. Several small Gimlets. 12. Square. 13. Compass. 14. Draw-knife. 15. Rule. 16. Two Gages. 17. Set of Firmer Chisels. 18. Two Mortising Chisels. 19. Small Back Saw. 20. Saw Clamps. 21. Miter Box. 22. Bevel Square. 23. Small Hand Square. 24. Pliers. 25. Pair of Awls. 26. Hand Clamps. 27. Set Files. 28. Glue Pot. 29. Oil Stone. 30. Grindstone. 31. Trusses. 32. Work Bench. 33. Plumb Bob. 34. Spirit Level.
The Hatchet.—The hatchet should be ground with a bevel on each side, and not on one side only, as is customary with a plasterer's lathing hatchet, because the blade of the hatchet is used for trimming off the edges of boards. Unless ground off with a bevel on both sides it cannot be controlled to cut accurately. A light hatchet is preferable to a heavy one. It should never be used for nailing purposes, except in emergencies. The pole of the hammer—that part which is generally used to strike the nail with—is required in order to properly balance the hatchet when used for trimming material.
Fig. 2.
The Claw Hammer.—This is the proper tool for driving nails and for drawing them out. Habits should be formed with the beginner, which will be of great service as the education proceeds. One of these habits is to persist in using the tool for the purpose for which it was made. The expert workman (and he becomes expert because of it) makes the hammer do its proper work; and so with every other tool.
Fig. 3.
Fig. 4.
About Saws.—There are four well-defined kinds. First, a long, flat saw, for cross-cutting. Second, a slightly larger saw for ripping purposes. Third, a back saw, with a rib on the rear edge to hold the blade rigid, used for making tenons; and, fourth, a compass or keyhole saw.
Cross-cuts.—The difference between a cross-cut and a rip saw is, that in the latter the teeth have less pitch and are usually larger than in the cross-cut saw. The illustrations (Figs. 13 and 14) will distinctly show the difference in the teeth. When a cross-cut saw is used for ripping along the grain of the wood, the teeth, if disposed at an angle, will ride over the grain or fiber of the wood, and refuse to take hold or bite into the wood. On the other hand, if the rip saw is used for cross-cutting purposes, the saw kerf will be rough and jagged.
Fig. 5.
The back saw is used almost exclusively for making tenons, and has uniformly fine teeth so as to give a smooth finish to the wood.
Planes.—The plane may be called the æsthetic tool in the carpenter's kit. It is the most difficult tool to handle and the most satisfactory when thoroughly mastered. How to care for and handle it will be referred to in a subsequent chapter. We are now concerned with its uses only. Each complete kit must have three distinct planes, namely, the jack plane, which is for taking off the rough saw print surface of the board. The short smoothing plane, which is designed to even up the inequalities made by the jack plane; and the long finishing plane, or fore plane, which is intended to straighten the edges of boards or of finished surfaces.
Fig. 6. Jack plane bit
The Jack Plane.—This plane has the cutting edge of its blade ground so it is slightly curved (Fig. 6), because, as the bit must be driven out so it will take a deep bite into the rough surface of the wood, the curved cutting edge prevents the corner edges of the bit from digging into the planed surface.
On the other hand, the bits of the smoothing and finishing planes are ground straight across their cutting edges. In the foregoing we have not enumerated the different special planes, designed to make beads, rabbets, tongues and grooves, but each type is fully illustrated, so that an idea may be obtained of their characteristics. (Fig. 6a).
Gages.—One of the most valuable tools in the whole set is the gage, but it is, in fact, the least known. This is simply a straight bar, with a sharpened point projecting out on one side near its end, and having an adjustable sliding head or cheekpiece. This tool is indispensable in making mortises or tenons, because the sharpened steel point which projects from the side of the bar, serves to outline and define the edges of the mortises or tenons, so that the cutting line may readily be followed.
Fig. 6a. Fore-plane bit
This is the most difficult tool to hold when in use, but that will be fully explained under its proper head. Each kit should have two, as in making mortises and tenons one gage is required for each side of the mortise or tenon.
Chisels.—Two kinds are found in every kit—one called the firmer (Fig. 7) and the mortising chisel. The firmer has a flat body or blade, and a full set ranges in width from three-eighths of an inch to two inches. The sizes most desirable and useful are the one-half inch, the inch and the inch-and-a-half widths. These are used for trimming out cross grains or rebates for setting door locks and hinges and for numerous other uses where sharp-end tools are required.
Fig. 7.
The Mortising Chisel.—The mortising chisel (Fig. 7a), on the other hand, is very narrow and thick, with a long taper down to the cutting edge. They are usually in such widths as to make them stock sizes for mortises. Never, under any circumstances, use a hammer or hatchet for driving chisels. The mallet should be used invariably.
Fig. 7a.
Fig. 8.
Trusses.—There should be at least two, each three feet in length and twenty inches in height.
Saw Clamps.—These are necessary adjuncts, and should be made of hard wood, perfectly straight and just wide enough to take in the narrow back saw. The illustration shows their shape and form.
The Grindstones.—It is better to get a first-class stone, which may be small and rigged up with a foot treadle. A soft, fine-grained stone is most serviceable, and it should have a water tray, and never be used excepting with plenty of water.
An Oil Stone is as essential as a grindstone. For giving a good edge to tools it is superior to a water stone. It should be provided with a top, and covered when not in use, to keep out dust and grit. These are the little things that contribute to success and should be carefully observed.
The Miter Box.—This should be 14 inches long and 3" by 3" inside, made of hard wood ¾" thick. The sides should be nailed to the bottom, as shown.
Fig. 9.
The Work Bench.—In its proper place we show in detail the most approved form of work bench, fitted with a tool rack to hold all the tools, conveniently arranged. In this chapter we are more particularly concerned with the uses of tools than their construction; and we impress on boys the necessity of having a place for everything, and that every tool should be kept in its proper place. A carpenter's shop filled with chips, shavings and other refuse is not a desirable place for the indiscriminate placing of tools. If correct habits are formed at the outset, by carefully putting each tool in its place after using, it will save many an hour of useless hunting and annoyance.
One of the most important things in laying off work, for instance, on trusses, is the disposition of the saw and square. Our illustration shows each truss with side cleats, which will permit the user temporarily to deposit the saw or the square so that it will be handy, and at the same time be out of the way of the work and prevent either of the tools from being thrown to the floor.
In the same way, and for the same purpose, the work bench has temporary holding cleats at the end and a shelf in front, which are particularly desirable, because either a saw or a square is an encumbrance on a work bench while the work is being assembled, and tools of this kind should not be laid flat on a working surface, nor should they be stood in a leaning position against a truss or work bench.
Strictly observe these fundamentals—Never place a tool with the cutting edge toward you. Always have the racks or receptacles so made that the handle may be seized. Don't put a tool with an exposed cutting edge above or below another tool in such a manner that the hand or the tool you are handling can come into contact with the edge. Never keep the nail or screw boxes above the work bench. They should always be kept to one side, to prevent, as much as possible, the bench from becoming a depository for nails. Keep the top of the bench free from tools. Always keep the planes on a narrow sub-shelf at the rear of the bench.
If order was Heaven's first law, it is a good principle to apply it in a workman's shop, and its observance will form a habit that will soon become a pleasure to follow.
CHAPTER II HOW TO GRIND AND SHARPEN TOOLS
Care of Tools.—Dull tools indicate the character of the workman. In an experience of over forty years, I have never known a good workman to keep poorly sharpened tools. While it is true that the capacity to sharpen tools can be acquired only by practice, correct habits at the start will materially assist. In doing this part of the artisan's work, it should be understood that there is a right as well as a wrong way.
There is a principle involved in the sharpening of every tool, which should be observed. A skilled artisan knows that there is a particular way to grind the bits of each plane; that the manner of setting a saw not only contributes to its usefulness, but will materially add to the life of the saw; that a chisel cannot be made to do good work unless its cutting edge is square and at the right working angle.
First Requisite.—A beginner should never attempt a piece of work until he learns how the different tools should be sharpened, or at least learn the principle involved. Practice will make perfect.
Saws.—As the saw is such an important part of the kit, I shall devote some space to the subject. First, as to setting the saw. The object of this is to make the teeth cut a wider kerf than the thickness of the blade, and thereby cause the saw to travel freely. A great many so-called "saw sets" are found in the market, many of them built on wrong principles, as will be shown, and these are incapable of setting accurately.
Fig. 10. Fig.10a.
How to Set.—To set a saw accurately, that is, to drive out each tooth the same distance, is the first requirement, and the second is to bend out the whole tooth, and not the point only.
In the illustration (Fig. 10), the point is merely bent out. This is wrong. The right way is shown in Fig. 10a. The whole tooth is bent, showing the correct way of setting. The reasons for avoiding one way and following the other are: First, that if the point projects to one side, each point or tooth will dig into the wood, and produce tooth prints in the wood, which make a roughened surface. Second, that if there are inequalities in setting the teeth (as is sure to be the case when only the points are bent out), the most exposed points will first wear out, and thereby cause saw deterioration. Third, a saw with the points sticking out causes a heavy, dragging cut, and means additional labor. Where the whole body of the tooth is bent, the saw will run smoothly and easily through the kerf and produce a smooth-cut surface.
Fig. 11.
Fig. 12.
Our illustration (Fig. 11) shows a very simple setting block, the principal merit of which is that any boy can make it, and in the use of which he cannot go wrong in setting a tooth.
Simple Saw Setter.—Take a block of wood, a 4 by 4 inch studding, four inches long. Get a piece of metal one-half inch thick and two inches square. Have a blacksmith or machinist bore a quarter-inch hole through it in the center and countersink the upper side so it may be securely fastened in a mortise in the block, with its upper side flush with the upper surface of the block. Now, with a file, finish off one edge, going back for a quarter of an inch, the angle at A to be about 12 degrees.
Fig. 13. Rip-Saw
Filing Angles.—In its proper place will be shown how you may easily calculate and measure degrees in work of this kind. Fig. 12 shows an approximation to the right angle. B, B (Fig. 11) should be a pair of wooden pegs, driven into the wooden block on each side of the metal piece. The teeth of the saw rest against the pegs so that they serve as a guide or a gage, and the teeth of the saw, therefore, project over the inclined part (B) of the metal block. Now, with an ordinary punch and a hammer, each alternate tooth may be driven down until it rests flat on the inclined face (A), so that it is impossible to set the teeth wrongly. When you glance down the end of a properly set saw, you will see a V-shaped channel, and if you will place a needle in the groove and hold the saw at an angle, the needle will travel down without falling out.
Fig. 14. cross-cut


