4,99 €
Mehr erfahren.
- Herausgeber: Luca Berton
- Kategorie: Wissenschaft und neue Technologien
- Sprache: Englisch
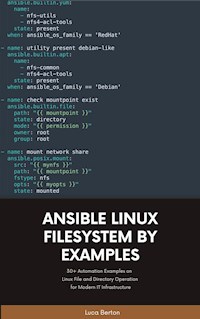
Looking to learn Ansible Playbook code from scratch or update an existing project? Automate your Linux Filesystem day-to-day tasks in Linux and Windows with the Ansible Open Source IT automation tool. Learn how to use 30+ Examples to easily provision and manage the filesystem of your servers.
Das E-Book können Sie in Legimi-Apps oder einer beliebigen App lesen, die das folgende Format unterstützen:
Veröffentlichungsjahr: 2022
Ähnliche

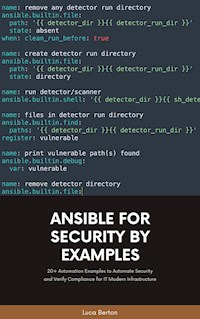


Ansible Linux Filesystem By Examples
30+ Automation Examples on Linux File and Directory Operation for Modern IT Infrastructure
Luca Berton
This book is for sale at http://leanpub.com/linuxfileanddirectorybyansibleexamples
This version was published on 2022-04-08
* * * * *
This is a Leanpub book. Leanpub empowers authors and publishers with the Lean Publishing process. Lean Publishing is the act of publishing an in-progress ebook using lightweight tools and many iterations to get reader feedback, pivot until you have the right book and build traction once you do.
* * * * *
ISBN for EPUB version: 978-80-908536-9-0
ISBN for MOBI version: 978-80-908536-9-0
Table of Contents
Introduction
Whois Luca Berton
Ansible For Beginners With Examples
What is Ansible
Getting Started
Inventory
Playbook
Variables
Facts and Magic Variables
Vault
Conditional
Loop
Handler
Role
Ansible Best Practices
Install Ansible
Ansible terminology - ansible vs ansible-core packages
How to install Ansible in RedHat Enterprise Linux (RHEL) 8 with Ansible Engine
How to install Ansible in Ubuntu 20.04
How to install Ansible in Fedora 35
How to install Ansible in CentOS 9 Stream
How to install Ansible in Windows 11 WSL Windows Subsystem for Linux
How to install Ansible in SUSE Linux Enterprise Server (SLES) 15 SP3
How to install Ansible with PIP
How to install Ansible in RedHat Enterprise Linux 9 Beta
How to install Ansible in Amazon Linux 2 (AWS EC2)
How to install Ansible in Debian 11
Ansible For Linux
Ansible terminology - ansible_hostname vs inventory_hostname vs ansible_fqdn
Three options to Safely Limit Ansible Playbooks Execution to a Single Machine
Ansible modules - command vs shell
Test host availability - Ansible module ping
How to print a text or a variable during the execution with Ansible
Ansible Code reuse: Roles and Collections with Ansible Galaxy
Download and Use Ansible Galaxy Role - ansible-galaxy and requirements.yml
Download and Use Ansible Galaxy Collection - ansible-galaxy and requirements.yml
Ansible for Linux Filesystem
Create an empty file - Ansible module file
Create a text file - Ansible module copy
Check if a file exists - Ansible module stat
How to create a directory with Ansible?
How to check if a directory exists in Ansible?
How to rename a file or directory using an Ansible task on a remote system?
Change file permission - Ansible module file
Add Execute Permission 755 Linux file - Ansible module file
Delete file or directory - Ansible module file
Download a file - Ansible module get_url
Extract an archive - Ansible module unarchive
Create a symbolic link (also symlink or soft link) in Linux - Ansible module file
Create a hard link in Linux - Ansible module file
Mount a Windows share in Linux SMB/CIFS - Ansible module mount
Mount an NFS share in Linux - Ansible module mount
Concatenate multiple files in a specific order - Ansible module template and YAML
Backup With Rsync - Local to Remote - Ansible module synchronize
Thank you
Guide
Begin Reading
Introduction
This book provides an introduction to the Ansible language.
Ansible is a popular open source IT automation technology for scripting applications in a wide variety of domains.
It is free, portable, powerful, and remarkably easy and fun to use.
This book is a tool to learn the Ansible automation technology with some real-life examples.
Whenever you are new to automation or a profession automation engineer, this book’s goal is to bring you quickly up to speed on the fundamentals of the core Ansible language.
Every successful IT department needs automation nowadays for bare metal servers, virtual machines, cloud providers, containers, and edge computing. Automate your IT journey with Ansible automation technology.
I’m going to teach you example by example how to accomplish the most common System Administrator tasks.
You are going to start with the installation of Ansible in Red Hat Enterprise Linux, Ubuntu, and macOS using the most command package manager and archives.
Each of the 100+ lessons summarizes a module: from the most important parameter to some live demo of code and real-life usage. Each code is battle proved in the real life. Console interaction and verification are included in every video. A mundane activity like creating a text file, extracting and archiving, fetching a repository using HTTPS or SSH connections could be automated with some lines of code and these are only some of the long lists included in the course.
There are some Ansible codes usable in all the Linux systems, some specific for RedHat-like, Debian-like, and Windows systems.
The 20+ Ansible troubleshooting lesson teaches you how to read the error message, how to reproduce, and the process of troubleshooting and resolution.
Are you ready to automate your day with Ansible?
Whois Luca Berton
I’m Luca Berton and we’re going to have a lot of fun together.
First of all, let me introduce myself.
I’ve been Ansible Technical Support Engineer of Red Hat, based in the Czech Republic, even if I’m Italian.
I’ve been more than 15 years System Administration, working with infrastructure, either on-premise or on the major cloud providers.
I’m an enthusiast of the Open Source support the community by sharing my knowledge in different events of public access.
I’m also a co-founder of my hometown Linux Users Group, visited by Richard Stallman, the founder of the Free Software Movement.
I consider myself a lazy person so I always try new ways to automate the repetitive task of my work.
After years of Perl, Bash, and python scripting I landed in Ansible technology. I took the certification and worked for more than a year with the Ansible Engineer Team.
I consider Ansible the best infrastructure automation technology nowadays, it’s human-readable, the learning curve is accessible, and very requested by the recruiters in the market.
This ultimate guide contains all of the obvious and not-so-obvious solutions using Ansible automation.
In every lesson of this course, I’m going to share with you one specific use case, the possible solution, the code, the execution, and the verification of the target system.
All these solutions are battle-tested and used by me in my everyday automation.
You could easily jump between lessons and review again all the times that you need.
Awards & Recognition
2022
Ansible Anwendertreffen - From Zero to Hero: How to build the Ansible Pilot Community - by Luca Berton (Red Hat CZ) 15:15 - 16:00 15 Feb 2022Red Hat Ansible Playbook included in RHSB-2021-009 Log4Shell - Remote Code Execution - log4j (CVE-2021-44228) 12 Jan 2022AWS Tip Set sysctl kernel parameters — Ansible module sysctl 12 Jan 2022The Ansible Bullhorn #41 - A Newsletter for the Ansible Developer Community 7 Jan 20222021
The Ansible Bullhorn #34 - A Newsletter for the Ansible Developer Community 17 Sep 2021The course is going to keep track of the evolution of the Ansible technology adding more content whenever is needed.
Are you ready to have fun?
Ansible For Beginners With Examples
In this chapter you’re going to discover the Ansible Basics, Architecture and Terminology.
What is Ansible
In this chapter, I’ll explain to you what is Ansible and why it is so powerful for your IT department.
Ansible
Infrastructure Automation toolOpen Source infrastructure as codeFirst of all, let’s begin our adventure with the fabulous Open Source technology named Ansible. It is classified as an Infrastructure Automation tool, so you could automate your System Administrator tasks very easily. Infrastructure as code is the process of managing and provisioning computer data centers through machine-readable definition files, rather than physical hardware configuration or interactive configuration tools. Ansible follows the DevOps principles. With Ansible you could deploy your infrastructure as code on-premise and on the most well-known public cloud provider.
Ansible three Use Cases
ProvisionConfig managementApplication deploymentThe three main use cases of Ansible are provision, configuration management, and app deployment. But after touching the technology I’m sure you could invent some more ways to use it!
Provisioning
The process of setting up the IT infrastructureLet’s start talking about provisioning: all the System Administrator know how important is to manage a uniform fleet of machines. Some people still rely on software to create workstation images. But there is a drawback, with imaging technology you’re only taking a snapshot in time of the machine. So every time you need to reinstall software because of the modern key activation systems or update manually to the latest security patches. Ansible is very powerful to automate this process being able to create a more smooth process.
Configuration management
The process for maintaining systems and software in a desired and consistent stateThe second key use case is “configuration management”: maintain up-to-date and in a consistent way all your fleet, coordinating rolling updates and scheduling downtime. With Ansible you could verify the status of your managed hosts and take action in a small group of them. A huge variety of modules is available for the most common use cases. Not to mention the common use case to check the compliance of your fleet to some international standard and apply resolution plans.
Application deployment
The process to publish your software between testing, staging and production environmentThe third key use case where Ansible is useful is Application deployment. It could automate the continuous integration / continuous delivery workflow pipeline of your web application for example. Your DevOps team will be delighted!.
Ansible in DevOps
Ansible is used to apply the DevOps principles in worldwide organizations. Let me quickly summarize.DevOps is a set of practices that combines software development (Dev) and IT operations (Ops). As DevOps is intended to be a cross-functional mode of working, those who practice the methodology use different sets of tools referred to as “toolchains” rather than a single one. These toolchains are expected to fit into one or more of the following categories, reflective of key aspects of the development and delivery process. The seven categories:Code: code development and review, source code management tools, code merging.Build: continuous integration tools, build status.Test: continuous testing tools that provide quick and timely feedback on business risks.Release: artifact repository, application pre-deployment staging.Deploy: change management, release approvals, release automation.Operate: infrastructure configuration and management, infrastructure as code tools.Monitor: applications performance monitoring, end-user experience.
Four key tenets of Ansible
1. DeclarativeYou declare what you want rather than how to get to.
2. AgentlessYou don’t need to install an agent. It takes advantage of OpenSSH.
3. IdempotentAn operation could be run multiple times without changing beyond the initial operation.
4. Community drivenPublished in Ansible Galaxy as collections and roles.
The four key tenets of ansible are: declarative, agentless, idempotent, and community-driven. With “declarative” it means that you could use in a way very similar to a programming language apply sequencing, selection, and iteration to the code flow. With “agentless” it means that you don’t need to install and update any agents on the target machine, it uses the SSH connection and python interpreter. The language itself is “idempotent”, which means that the code will check a precise status on the managed machine. It means that for example the first time your code will change something, the following runs it only verify that nothing changed and move forward. The last tenet is “community-driven”, which means that exists a public archive called “Ansible Galaxy” where you could download the code made by other open source contributors. This code is organized in roles and collections, but we’ll see it in the future.
Ansible six values
SimpleYAML human readable automation.
PowerfulConfiguration management, workflow orchestration, application deployment.
Cross-platformAgentless support for all major OS, physical, virtual, cloud and network.
Work with existing toolsHomogenize existing environment.
“batteries included”Come bundled with 750+ modules.
Community poweredDownload \250k/months People \3500 contributors, 1200 users on IRC.
Now let’s talk about the six values of Ansible. The first is that is “simple: the code is written in YAML language, that is a human-readable data serialization language. It is well known and easy to learn, it is commonly used for configuration files and in applications where data is being stored or transmitted. Ansible is Powerful, it is battle-tested as Configuration management, workflow orchestration, application deployment. The third value is “cross-platform” by nature, the Agentless support for all major Operating Systems, physical, virtual, cloud, and network provider. Another value of Ansible is that it works with existing tools, it easy to homogenize the existing environment. The “batteries included” means that Ansible included bundled more than 750 modules to automate the most common tasks. The last value is that Ansible is “community-powered”, every month has more than 250000 downloads, an average of 3500 contributors, and more than 1200 users on IRC.
Ansible history
2012Developed by Michael DeHaan
2015Acquired by Red Hat
2016AnsibleFest events
2020Red Hat Ansible Automation Platform 1.0
2021Red Hat Ansible Automation Platform 2.1
The main events in Ansible history are the following.The first release of Ansible was public on the 20th of February 2012. The Ansible tool was developed by Michael DeHaan. Ansible Inc., originally AnsibleWorks Inc., was the company set up to commercially support and sponsor the project.On the 16th of October 2015 Red Hat acquired Ansible Inc., and evaluate Ansible as a “powerful IT automation solutions” designed to help enterprises move toward friction less IT.AnsibleFest is an annual conference of the Ansible community of users, contributors since 2016 in London and the USA.
Ansible & Ansible Tower & Ansible Automation Platform
AnsibleCommunity driven project fast-moving innovations Open Source but only command line tools.
Red Hat Ansible Tower / Ansible Automation PlatformIt is a framework designed by RedHat. It provides a web UI to manage your infrastructure.
Ansible is a community-driven project with fast-moving innovations Open Source but only command-line tools. Enterprise needs more services and some stable releases. For example, they need an SLA for support. Red Hat offers this service to companies namely under the Ansible Tower umbrella, now re branded as Ansible Automation Platform.Ansible Tower is a REST API, web service, and web-based console designed to make Ansible more usable for IT teams with members of different technical proficiency and skill-sets. It is a hub for automation tasks. The tower is a commercial product supported by Red Hat Inc. but derived from AWX upstream project, which is open source since September 2017.Red Hat maintains also Ansible Engine. With Ansible Engine, organizations can access the tools and innovations available from the underlying Ansible technology in a hardened, enterprise-grade manner. Ansible Engine is developed by Red Hat with the explicit intent of being used as an enterprise IT platform.
Getting Started
In this chapter, I’ll explain you how to move the firsts steps with Ansible technology. How to connect to the managed hosts and how to execute some simple tasks using the command line.
Ansible architecture
Let’s Begin a talking about Ansible architecture. The node where Ansible is actually installed is called “control node” and it manages all your fleet of nodes. The controlled node on the other hand is called “managed node”. The target nodes could be Linux, Mac, Windows and several network equipment. Each target has some specificity like different Linux distribution and module usage. We will discuss of the specificity the in the next sections.
Connection with managed nodes
The connection between “control node” and “managed nodes” is managed by SSH protocol without any requirement of specific client on the target machine. Other competitor require a client software often called “agent”. With SSH connection the only requirements are a username and a certificate to access the target machine. There are some way to automate also this first script step. After completing SSH connection another requirement is “python” interpreter, witch come out-of-the-box for modern operating systems. By default Ansible uses SFTP to transfer files but you could switch to SCP in configuration. The Windows target could be connected using WinRM technology and uses PowerShell as interpreter.
Create a basic inventory
/etc/ansible/hostsThe list of managed hosts is stored in /etc/ansible/hosts. In this example it contain only one host named host1.example.com.
Run your first Ansible command
Now we’re ready to run your first Ansible command. The Ansible command is called module in Ansible slang. The first line executed Ansible ping module on all hosts. The response is a pong. Please note that this means that Ansible is able to connect with SSH username, identify using public key and execute the local python executer. So it’s completely different from any ping in networking.
Run ad-hoc command on Ansible
Ansible could also execute some command on the target host and report the status on the console of “control node”. In this example “/bin/echo hello” command was executed on “all” hosts. “host1.example.com” replied with a changed code and print “hello” on standard output. Please note that you would receive a “changed” state every time you run a command on the remote machine.
Run ad-hoc command with privilege escalation on Ansible
In this example I run the “ping” module against “all” host as user “root” after login with user “devops”. “host1.example.com” replied with a changed code and print “hello” on standard output.
Recap
In this module we learned the basic concept of Ansible architecture, how to write the list of managed hosts and how to execute some simple commands against it.
Inventory
In this chapter, I’ll explain to you what is an Ansible inventory, why do you need, the different types how to edit and use it in your day to day journey.
The list of multiple hosts managed by Ansible is called “inventory”. It is fundamentally the list of nodes or hosts in your infrastructure at the same time, using a list or group of lists known as inventory. You could organize your inventory with “groups” or “patterns” to select the hosts or group you want Ansible to run against.
“all” keywordThe special keyword “all” include all the hosts of the inventory used. It will be very useful in the following lessons. The only exception is localhost that you need to specify.
Simple INI inventory
./ini_simple_inventoryThe simplest inventory type is the INI inventory, by the type of the file. The default location is “/etc/ansible/hosts” but you could use your customized with “-i” parameter. In this example host “one.example.com” is ungrouped and “two.example.com” and “three.example.com” are grouped as “webserver”.
Simple YAML inventory
./simple_yaml_inventory.ymlYou could express the same inventory using YAML syntax In this example In this example host “one.example.com” is ungrouped and “two.example.com” and “three.example.com” are grouped as “webserver”.
Add ranges of hosts
./ini_range_inventoryGroup members could be defined also using ranges by numbers or letters. In the range by numbers you could also specify a stride the increment between a sequence of number. In this INI example “webservers” group contains all hosts from “www01.example.com” to “www99.example.com”. “databases” group contains all hosts from “db-a.example.com” to “db-f.example.com”.
Host in multiple groups
./ini_groupsmultiple_inventoryHosts could be present in multiple groups. In this INI example hosts “two.example.com” and “three.example.com” are grouped as “webserver”. “two.example.com” is present in “webserver” as well as “prod” group. “three.example.com” is present in “webserver” and “dev” group.
Host variables
./ini_hostinventoryIn inventory you might would like to store variable values that relate to a specific host or group. This example scenario is common because it defines different connection with different hosts. For example to use “local” connection for the localhost and “ssh”, default, for all the other hosts. For each hosts you could customize also the login user “devops for “one.example.com” and “ansible” for “two.example.com”.
Group variables
./ini_groupsvariables_inventoryAs well as per single host is possible to define group variables. This two inventory files in the example (INI and YAML format) the variables “ntp_server” has assigned the value “europe.pool.ntp.org” for all the hosts of the group.
Inheriting variable values
./ini_variableinheriting_inventoryHosts and group could be combined together. In this example the group “webserver” has two members “asia” and “europe”. This two elements are defined as a single host “host1.example.com” and “host2.example.com”, respectively, but could contains more hosts as well. “ntp_server” variables is defined at “webservers” level. So in the end “ntp_server” variable is available for “webserver”, “asia” and “europe” group. “ntp_server” variable is available as well in “host1.example.com” and “host2.example.com” hosts.
Use multiple inventory sources
Is possible to use multiple inventory files for each execution. In this example is going to be executed ansible playbook named “playbook.yml” against “production” and “development” inventories.
localhost inventory
./ini_local_inventoryOne special case in inventory is with localhost. You need to specify the connection type as “local”, otherwise Ansible presume to use the default SSH connection.
Recap
Now you know more about Ansible INI and YAML inventory files, host and group variable.
Playbook
In this chapter, I’ll explain to you what is an Ansible Playbook and why do you need. We’ll cover how to start with a simple playbook, from the basic syntax and how to add more tasks.
YAML syntax
Every playbook is based on YAML syntax so the file is easy and human readable. YAML is a text format and you could easy recognize by the presence of the three dash symbols at the beginning and three dots in the end. The three dots are not mandatory so a lot of people simply omit them. This file type is very sensitive to spacing between elements. It’s strictly important that elements of the same level are in the same indentation, despite some programming languages. You could use the symbol “#” for comments, even on the lines with some previous code. String are very important and you could specify directly or with single or double quote. I recommend you to use a double quote as a general rule. Using the pipe and major statement you could define multi-line strings. The first statement will keep the newlines, the second not. Others useful data structures are dictionaries and lists that you could see in action in the grayboard.
helloworld.yml
helloworld.ymlThis is the output of the execution of the “helloworld.yml”. I’d like you to note the command used is “ansible-playbook”. The first parameter is the inventory file and the second is the playbook.In this execution the play is executed against the “host1.example.com” node. The output is very clear of the step by step execution. When the command is successful the output is highlighted with green color. A warning will be presented in orange and an error in red. The most attent of you have noticed an extra task executed called “Gathering Facts” that is performed by Ansible to acquire some information of the managed node. We’ll discuss more about facts gathering in the following lesson. Try by yourself the execution of this code and become confident with this output summary. It will be very useful. Two tasks are being executed.
Tip1: ansible-playbook –check option
A very useful option of “–check” for ansible-playbook command. This option to perform a dry run on the playbook execution. This causes Ansible to report what changes would have occurred if the playbook were executed, but does not make any actual changes to managed hosts.
Tip2: debug day-to-day usage
helloworld_debug.ymlThis tip allow you to keep the debug code in your playbook and enable the execution only when you need. For example the message is printed only when Ansible is invoked with output level two.
helloworld_debug.yml - execution - part 1
This is the output of “helloworld_debug.yml” when is executed normally, which means not in debug mode. As you could notice the hello message is skipped.
helloworld_debug.yml - execution - part 2
This is the output of “helloworld_debug.yml” when is executed in debug level two mode, please notice the two “V” in the command line. As you could notice the hello message is printed.
Idempotency
One important characteristics of most of Ansible modules is to be “idempotent”. It means that before executing any actions on the target node, the module is going to check the actual status. If the actual status match the desired once, no action is going to be performed. If the current status divert from the expected once an action will take place. Please note that if you execute another time the playbook the desired status will be found and no further actions will be performed. This property is called “idempotency” and you’re young to take advantage of it.
multipleplays.yml
Two plays inside to be execute against of web.example.com and database.example.com
The “multipleplays.yml” playbook contains two plays. The first play is executed against the “web.example.com” host and install and apache web server and enable on boot. The second play is going to be executed against “database.example.com” and enable on boot the execution of “madiadb” database management system. As you could see using multiple play is very powerful to execute different tasks in different hosts. Now the definition of playbook make more sense.
privilege_escalation.yml
“become” specify that privilege escalation is necessary “become_method” specify the escalation method “become_user” specify the destination user (default “root”)
Some action need to be taken by a user with administrative power. In Linux typically is the “root” user. Some distribution allow the privilege escalation using “sudo” command using the “wheel” group. In this example I’m going to install a software so I need the privilege escalation. The “yum” module need to perform some action on the managed node. In playbook when is not necessary you could disable.
Most common Ansible modules
Files modulescopy: copy a local file to the managed hostfetch: copy files from remote nodes to localfile: set permissions and other properties of fileslineinfile: ensure a particular line is or is not in a filesynchronize: synchronize content using rsync
Software package modulespackage: manage packages using autodetected package manager native to the operating systemyum: manage packages using the YUM package managerapt: manage packages using the APT package managerdnf: manage packages using the DNF package managergem: manage Ruby gemspip: manage Python packages from PyPI
System modulesfirewalld: manage arbitrary ports and services using firewalldreboot: reboot a machineservice: manage servicesuser: add, remove, and manage user accounts
Net tools modulesget_url: Download files in HTTP, HTTPS, and FTPnmcli: Manage networkinguri: Interact with web services
Recap
In this module we put the foundation of the following operation on Ansible Playbook. Keep going and soon you will be able to automate all your System Administrator tasks.
Variables
In this chapter, I’ll explain to you what are Ansible variables, why do you need, the different types how to edit and use it in your day to day journey.
In your Playbook is a good practice to use Variables to store all the dynamic value that you need. Editing variables you could reuse your code in the future only parameterize accordingly your business needs.
Not permitted variables names
no white spaces my varno dots my.vardon’t starts with number 1stvardon’t contain special character myvar$1Ansible allow all the combination of letters and numbers in variables names. If you plan to use numbers be aware that you can’t use at the beginning, but this is a general rule in information technology world.The four main limitations in variable names are: no white spaces are allowed, no dots, don’t starts with numbers, don’t contain special characters. So on the right you see some example of invalid variables names.
variableprint.yml
./variableprint.ymlThe “variableprint.yml” playbook is similar to “helloworlds.yml” playbook. The syntax and the structure of the element is very similar except for the presence of the variable “fruit”. Variables store information like strings, numbers and more complex data structures like lists, dictionaries, etc. In this case the variable has name “fruit” and value “apple”. The “debug” module in this case will concatenate the text “Print the value of variable” with the value of the variable “fruit”. Please note the double bracket that means the values of the variable. It’s a best practice always to include the double brackets within double quote in the code.
variableprint.yml - execution
This is the output of the execution of the “variableprint.yml” is very similar to the one of “helloworld.yml” file. Please note print of the message “Print the value of variable apple” obtained combining the string with the value of the variable. Also this execution is successful as you could see in the play recap area and the green color. Two tasks are being executed.
variableprint.yml - extra variables
You could override the playbook variables specify the value from the command line. Variables set on the command line are called extra variables.This is the output of the execution of the “variableprint.yml” is very similar to the previous one. Please note print of the message “Print the value of variable banana” obtained combining the string with the value of the variable. The value passed from the command line override any playbook value.
Host Variables and Group Variables
inventory_host_variablesHost and group variables could be defined in your inventory file. In the left column you could see an example of host variable. The variable “ansible_user” is assigned the value “devops”. This host variable is available for host1.example.com. On the right column you see an example of group variable. The variable “user” is assigned the value “alice”. This group variable will be available for host1.example.com and host2.example.com with the same value.
inventory_host_dirYou can achieve the same result also using using directories to populate host and group variables. As you could see the result will be the same of the previous slide but using more files. In the left column you could see an example of host variable. The variable “ansible_user” is assigned the value “devops”. This host variable is available for host1.example.com. On the right column you see an example of group variable. The variable “user” is assigned the value “alice”. This group variable will be available for host1.example.com and host2.example.com with the same value.
Array variables
array.ymlA very useful data structure is the Array. You could organize the information in a hierarchical data structure. In the example it’s easy readable the list of users: alice and bob. Each element of the list has some two properties: firstname and homedir. You could access to the data with dot notation or square brackets. In both cases you obtain the same result as you could see in the slide.
array.yml - execution
This is the output of the execution of the “array.yml” is very similar to the previous one. You could notice the output of “Print Alice’s firstname: Alice”. Ansible accessed the array variable value and show in the output message as expected.
Registered Variables
registeredvariables.ymlAnother very useful data structure are registered variables. You could save inside registered variables the output of any commands. In this example will be printed on screen.
registeredvariables.yml - execution
This is the output of the execution of the “registeredvariables.yml” is like expected. At first the yum module verify the presence of the package, if missing proceed with the installation. The output of the setup process is stored inside a registered variable that is printed on screen.
Recap
In this module we explored the variable usage inside the Ansible Playbook. You now are aware about the use of tools like the user defined, Host, Group and registered variables.
Facts and Magic Variables
In this chapter, I’ll explain to you what are Ansible facts and magic variables, why do you need, the different types how to edit and use it in your day to day journey.
Ansible Facts
Variables related to remote systems are called facts. With facts, you can use the behavior or state of one system as configuration on other systems. They are so powerful because you could obtain a very comprehensive vision of the current host, the operating system, the distribution used, the ip address, the networking configuration, the storage configuration, etc.
List all facts of a machine ad-hoc
The best way to understand Ansible facts is to list by yourself using this simple ad-hoc command. You will be surprised by the amount of information you’re going to obtain by the host. For example the current hardware configuration: architecture, processor, ram, available memory, storage configuration, etc. There are also more information about the software configuration: operating system, the distribution used, the ip address, the networking configuration, the storage configuration, etc.
List all facts of a machine playbook
facts_printall.ymlYou could access the same amount of data from the Ansible playbook. In this simple example you’re going to list all the ansible facts for all the hosts of the inventory. The expected result will be the same of the previous ad-hoc execution.
facts_printall.yml - execution
This is the output of the execution of the “facts_printall.yml”. In this execution the play is executed against the “host1.example.com” node. The output is very long with all the facts re obtained in automatically by Ansible in the task “Gathering Facts”. I encourage you to run this code and be confident with Ansible Facts.
Reference a fact
facts_printone.ymlYou could easily interact with facts specifying the fact name. In this example we’re listing the architecture of all the managed nodes. Feel free to customize the code to the ansible facts that better fit your needs.
Magic variables
Variables related to remote systems are called facts. With facts, you can use the behavior or state of one system as configuration on other systems.
Most common magic variables
hostvarsgroupsgroup_namesinventory_hostnameansible_versionThe most common magic variables are “hostvars”, “groups”, “group_names”, “inventory_hostname” and “ansible_version”. With “hostvars” magic variable you could access variables defined for any host in the play. It is very useful when you would like to access the property of one host from another one. You could combine “hostvars” with ansible facts to access property of another hosts. “groups” magic variable list all the groups in the inventory. You could use “groups” and “hostvars” magic variables together to list all the IP addresses of the hosts in a group. “group_names” is a list of which groups is the current host part of. “Inventory_hostname” magic variable contains the name of the host configured in the inventory. “ansible_version” magic variable contains the version information about Ansible.
Recap
Ansible Facts and Magic Variables are very useful in your Ansible Playbook especially when you need to execute some operations that impacts all hosts in the inventory. For example to generate a custom /etc/hosts file for all hosts involved in the inventory. You could apply loop or other statements that you’re going to explore in the next lessons.


