Erhalten Sie Zugang zu diesem und mehr als 300000 Büchern ab EUR 5,99 monatlich.
- Herausgeber: Fox Chapel Publishing
- Kategorie: Lebensstil
- Sprache: Englisch
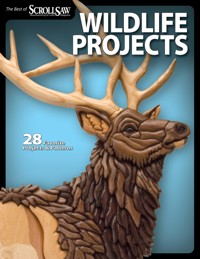
Best of Scroll Saw Woodworking & Crafts: Wildlife Portraits is jam packed full of 28 extraordinary animal scroll saw projects. These tried and true favorites are plucked from the archives of Scroll Saw Woodworking & Crafts, the foremost periodical on scroll sawing. Join your favorite authors, including Kathy Wise, Gary Browning, Charles Dearing, and Lora Irish, as they scroll handsome projects from the animal kingdom. Scroll saw patterns include birds, pets, sea life, North American wildlife, and African big cats in wood. Here's a selection of the animals you'll find inside: rooster, blue jay, cat, rabbit, crab, turtle, bear, elk, wolf, tiger, and lion.
Sie lesen das E-Book in den Legimi-Apps auf:
Seitenzahl: 95
Veröffentlichungsjahr: 2016
Das E-Book (TTS) können Sie hören im Abo „Legimi Premium” in Legimi-Apps auf:
Ähnliche

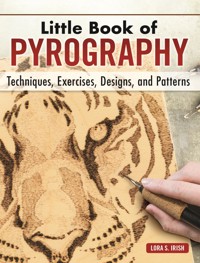


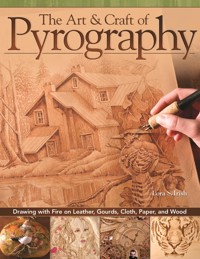


Table of Contents
What You Can Make
Introduction
Birds
America’s Symbol of Freedom
Break of Dawn
Birds and Boughs Fretwork
Blue Jay Intarsia
Pets
Intarsia Cat Portrait
Man’s Best Friend
Easter Bunny Intarsia
Horse
Water Life
Brown Trout
Sea Turtle Intarsia
On the Ocean Floor
Catch of the Day
Build a Realistic Crab
North American Wildlife
Howling Wolf Trivet
Majestic Elk
Buffalo Layerscape
Bear Layerscape
Lighted Woodland Shadowbox
Pack Mates
Majestic Moose Coat Rack
Hunter’s Pride Display Shelf
Grizzly Bear
Loons
Big Cats
Roaring Lion Segmentation
Stalking Leopard Portrait
Tiger Portrait
Hangin’Out With Mom
Jaguar Cub
Contributors
Index
What You Can Make
Fretwork
Bald Eagle, page 12
Rooster, page 15
Birds, page 20
Boxer, page 34
Horse, page 42
Ocean Scenery, page 56
Fish, page 58
Buffalo, page 72
Bear, page 76
Woodland Shadowbox, page 79
Wolves, page 82
Moose, page 84
Display Shelf, page 88
Grizzly Bear, page 91
Loons, page 94
Leopard, page 103
Tiger, page 106
Cheetahs, page 108
Jaguar, page 110
Intarsia and Segmentation
Rooster, page 15
Blue Jay, page 22
Cat, page 28
Easter Bunny, page 36
Brown Trout, page 46
Sea Turtle, page 52
Crab, page 60
Wolf, page 66
Elk, page 68
Lion, page 98
Introduction
Scroll Saw Woodworking & Crafts is proud to present this collection of 28 wildlife projects. This book will enable you to create your own wooden zoo, using your scroll saw to make everything from a sea turtle to an elk to a house cat.
The variety goes beyond kinds of animals, too. Some projects are all about the scroll saw, using only dozens of small cuts on a single piece of wood to form an animal’s likeness. Others incorporate different skills, adding multiple woods, sanding, and paint to form multi-dimensional intarsia images.
The categories—Birds, Pets, Water Life, North American Wildlife, and Big Cats—will help you decide which project to tackle first. Most are decorative, designed to be hung on walls, but you will also find a napkin holder, a coat rack, some trivet options, and even one aquatic portrait that can bring new life to an abandoned aquarium.
The more demanding projects include detailed step-by-step instructions, while some of the simpler ones consist only of a pattern and picture of the final project. You will also find tips that will help you improve your skills scattered throughout the book.
Whether you’re carving for yourself or as a gift for someone else, we’re sure you will enjoy making these wild, wonderful creatures.
Horse, page 42
Birds
From the huge bald eagle to the tiny songbird, birds have always captured the human imagination. We envy their flight, smile at their song, and thrill to the unexpected flash of color they bring the landscape.
The four projects in this section offer a chance to translate that fascination into works of art that make captivating home accents and gifts. Maybe the rooster napkin holder will remind you of all those times you awoke to that early-morning crow, or the blue jay intarsia of the beauties of nature.
Whether you’re a seasoned scroller or just starting out, the variety in this set of projects ensures that you will be able to enjoy creating your own fine feathered friend.
Blue Jay Intarsia, page 22
America’s Symbol of Freedom
By Leldon Maxcy
Whether you’re a beginner or advanced scroller, cutting this eagle project will keep you busy at your saw for some time! You’ll get lots of practice making tight turns, which is a great skill to have. Once finished, you will have captured the beauty of this magnificent bird, America’s symbol of freedom. This project, cut as a silhouette using oak or a portrait using Baltic birch, should sell well at craft shows.
Step 1: If you’re cutting this as a silhouette and using a hardwood, put 2” packaging tape over the top of the wood. The tape lubricates the blades and prevents burning. If you’re cutting this as a portrait, use 1/8” Baltic birch plywood to stack cut three to six in one cutting session. You can use the packaging tape on the stack too.
Step 2: Attach the pattern to the wood or to the packaging tape, if you’ve chosen to apply tape to the wood as described in Step 1. Use temporary bond spray adhesive. Be sure to spray the back of the paper pattern, NOT the uncovered wood. If you spray the wood, you’ll have a hard time removing the pattern.
TIP STACK CUTTING SAVES TIME
This eagle project lends itself nicely to making multiple pieces at one time, a technique called stack cutting. The key to successfully cutting several pieces at once is making sure the pieces of wood in your stack don’t slide around.
There are several methods for getting the stack ready for sawing. I prefer the packaging tape method. First you cut the wood pieces to the same size, sand them, then apply tape to all four sides of the stack, folding it over each top and bottom edge. Now you have a stack ready for sawing. Make sure the tape is flat, especially on the part that wraps onto the bottom of the stack. If it’s not, the tape could get stuck on the saw table.
Step 3: Drill all blade-entry holes with a 1/16” bit. Refer to the pattern and drill in the places marked with X’s. Note that all large cuts have at least one drill hole marked. Some of the small interior cuts don’t have any drill spots marked. Drill the blade-entry holes in the available space. Keep in mind, too, that you can leave some of these small areas uncut without affecting the overall appearance of the eagle image.
Step 4: Before sawing, sand the back with 180-grit sandpaper to remove any tearout from the drilling. Sanding also evens out the back surface to keep the project level on the saw table.
Step 5: You can leave the corners square or round them as I have in the completed project you see here. If you want to round the corners, do that now, before making any inside cuts. Start cutting out the eagle using the #3 reverse-tooth blade (or blade of choice). As a general rule, cut the smaller inside cuts first so you have more of the workpiece to hold on to as you continue cutting. Periodically sand the back to remove fuzzies to help keep the project level. This might save the fragile pieces from breaking off when you do the final sanding.
TIP DON’T DISCARD YOUR CUTOUTS
For this piece and any other piece of detailed fretwork that has large cutout areas, save the pieces you have cut out, and place them back in the cutout. Do not glue them; they simply hold the shape of the cutout space to give fragile pieces some support.
Step 6: Remove the pattern. See “What to Do When the Pattern Sticks” if you have difficulty taking it off. After removing the pattern, give the entire piece a good sanding to remove fuzzies and residue left from the spray adhesive. I start with 180-grit sandpaper and finish with 220 grit.
Step 7: Attach the backer. I use a piece of unstained Baltic birch plywood for the backer. Apply and evenly spread the wood glue to the back of the eagle.
Step 8: Apply the finish of your choice. I use four coats of semi-gloss lacquer. If you chose hardwood and you’d like to have a darker finish with more prominent grain, use an oil finish, let it dry one to three days, then apply two or three coats of lacquer. You can frame the one cut as a silhouette, but you would need to cut it the same size of the stack cut ones and use thinner wood.
TIP WHAT TO DO WHEN THE PATTERN STICKS
If you have trouble getting the pattern off, use a hair dryer or heat gun to loosen the glue. You can also use mineral spirits applied liberally with a paper towel. After about 15 seconds, the pattern should lift right off.
Materials & Tools
Materials:
• 1/2” x 7 1/2” x 10 1/2” oak or 1/8” x 8 1/2“ x 11” Baltic birch plywood
• 1/8” x 7 1/2” x 10 1/2” Baltic birch plywood for backer
• Clear 2” packaging tape
• Sandpaper, 180 and 220 grit
• Temporary bond spray adhesive
• Oil finish of choice (optional)
• Wood glue
• Clear coat finish spray
• 11” x 14” picture frame with mat (optional)
Tools:
• #3 reverse-tooth blade
• Drill press with 1/16” bit
• Palm sander
• Needle files of choice (optional)
Break of Dawn
By Kathy Wise
An ideal partner for your morning coffee, this country rooster is a great way to show off your scrolling skills. The napkin holder is easy to make and can be embellished with fretwork or intarsia. Careful wood selection brings the intarsia version to life, and the project is simple enough to complete in a single day. You can substitute an alternate design to match your décor.
Create matching designs for both sides of the holder by stack cutting. The sections of the intarsia design can be stack cut from 1/2”-thick wood. The fretwork rooster is stack cut from 1/4”-thick stock.
Always keep a master copy of your pattern for later use. Make two copies of the side pattern per napkin holder. For the intarsia overlay, make five copies of the rooster pattern. Cut the pattern pieces apart and separate them into color groups. You need only one copy of the fretwork rooster. Tape contact paper flat on a board. Spray adhesive on the pattern and position it on the shiny side of the contact paper. Cut the blanks to size according to the materials list.
Make sure all the wood you use is flat. Plane any wood that is not flat, because you must have flat wood to get a tight-fitting intarsia.
TIP SQUARE CUTS
Make sure your blade is square to the saw table by using a square to check a cut piece.
NAPKIN HOLDER: FRETWORK
Cut the holder. Use a #5 skip-tooth blade. Place the bottom of the side patterns on a flat edge to ensure a good joint. Round the edges by sanding them or using your router bit of choice. Do not round the side pieces where they attach to the base. Sand the pieces smooth.
Cut the fretwork designs. Use double-sided tape to attach two 1/4”-thick blanks together. Attach the pattern and drill 1/16”-diameter blade-entry holes. Sand away any tearout on the bottom. Cut the internal frets first, then cut the perimeter. Separate the stack and sand the wood smooth.
Glue the fretwork to the sides. Dry fit the rooster to the side piece, and mark the location of the feet with a pencil. Apply dots of clear cyanoacrylate (CA) glue to the back of the roosters and press them in place on the sides. Apply spray varnish to the fretwork, sides, and base.
Assemble the holder. Use a pencil to mark the position of the sides on the base. Drill and countersink four holes in the base. Align the sides and use a nail through the holes to mark the sides. Drill pilot holes on the marks. Apply wood glue to the bottom of the sides and attach them to the base with screws.
NAPKIN HOLDER: INTARSIA
Cut the intarsia rooster.


