2,99 €
Mehr erfahren.
- Herausgeber: Youcanprint
- Kategorie: Lebensstil
- Sprache: Englisch
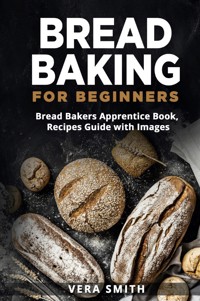
Are you planning to learn the fundamental of baking, but you have no idea where to start? Do you wish to prepare fresh homemade slices of bread and share the incredible and enjoyable moments with the family? It's time to bake perfect breads with the help of Bread baking for beginners and discover the magic behind flour, water, salt, and yeast. The guide book gives all beginners the chance to learn the baking process from no start to final sweetbreads. There are bundles of recipes designed and step by step, explained in hand with pictures to ensure you easily understand and follow every step. It might seem so easy to prepare breads, but it can cost a lifetime if you lack experience and skills. Grab a copy and learn the quick steps to bake your own breads. The baking process involves different types of flours and waters. It's time to learn what to pick and what to leave in the 100+ recipes provided. How is the book different? The guide book contains detailed steps that are easy to learn and understand as they have pictures demonstrating every stage of baking. The book has 100+ unique recipes selected among the best world baking recipes. The recipes are quick and affordable to prepare using clear materials. The Bread Baking for Beginners suits everyone from beginners who have the chance to learn new recipes and professionals who will also learn new tricks and tips in the baking field. The bread-making process is easy; thus, no skill is required; everyone can prepare it. Here is a fraction of what you will discover: • The basic knowledge about how to bake bread with yeast and sourdough • Helpful tips, tricks, and advice for baking bread • Nine excellent tips for baking bread • How to choose the right flour for baking and what the different flours do • How to bake different types of bread, recipes, and much more! • 100+ tasty recipes • And much much more. Let master at making tasty breads and sharing them with your lovely family. Scroll up Click Buy button and enjoy happy cooking moments. Get yourself a copy.
Das E-Book können Sie in Legimi-Apps oder einer beliebigen App lesen, die das folgende Format unterstützen:
Veröffentlichungsjahr: 2022
Ähnliche


Bread Baking for
Beginners
Bread Bakers
Apprentice Book,
Recipes Guide with
Images
Vera Smith
Copyright All rights reserved.
This eBook is provided with the sole purpose of providing relevant information on a specific topic for which every reasonable effort has been made to ensure that it is both accurate and reasonable. Nevertheless, by purchasing this eBook, you consent to the fact that the author, as well as the publisher, are in no way experts on the topics contained herein, regardless of any claims as such that may be made within. As such, any suggestions or recommendations that are made within are done so purely for entertainment value. It is recommended that you always consult a professional prior to undertaking any of the advice or techniques discussed within.
This is a legally binding declaration that is considered both valid and fair by both the Committee of Publishers Association and the American Bar Association and should be considered as legally binding within the United States.
The reproduction, transmission, and duplication of any of the content found herein, including any specific or extended information, will be done as an illegal act regardless of the end form the information ultimately takes. This includes copied
versions of the work, both physical, digital, and audio unless express consent of the Publisher is provided beforehand. Any additional rights reserved.
Furthermore, the information that can be found within the pages described forthwith shall be considered both accurate and truthful when it comes to the recounting of facts. As such, any use, correct or incorrect, of the provided information will render the Publisher free of responsibility as to the actions taken outside of their direct purview. Regardless, there are zero scenarios where the original author or the Publisher can be deemed liable in any fashion for any damages or hardships that may result from any of the information discussed herein.
Additionally, the information in the following pages is intended only for informational purposes and should thus be thought of as universal. As befitting its nature, it is presented without assurance regarding its prolonged validity or interim quality.
Trademarks that are mentioned are done without written consent and can in no way be considered an endorsement from the trademark holder.
COOKING, FRYING, BAKING & CO. - WHAT'S THE
DIFFERENCE?
Different dishes require different preparation methods. But why are certain foods cooked, grilled, fried or steamed? And what else is there for new preparation methods? We introduce you to the most important methods.
Dampen
When steaming food is not prepared directly in the water but in steam. There are special pots with sieve insert, in which the food is put into it. You then cook with the lid closed. Even pressure cookers are suitable for steaming. Even more comfortable is the preparation in special Dampfgargeräten. The beauty: The method is not only suitable for vegetables, but also for fish, meat and fruit.
The following advantages are offered by steaming: Vitamins and nutrients are largely retained as the food does not come into direct contact with boiling water Especially ideal for preserving the taste, shape and colour of the food
Cook
When cooking food is placed directly in 100 ° C hot water. As a result, they cook quickly, but it is also the vitamins and nutrients
to the collar. Because the higher the temperature, the more nutrients are lost. In addition, some foods change when in contact with boiling liquids. For example, the protein found in animal foods is solidified (e.g. in fish or eggs ) and starch contained in foodstuffs.
When cooking food is heated in 100 ° C hot water deep-fry
When frying foods are cooked in 180 to 220 ° C hot fat and thus quickly get an intense taste. The fryer is best suited for this, but theoretically, it can also be fried in a saucepan. It is important to use a fat with a high smoke point (e.g. lard or coconut fat). In addition, the fat must be hot enough. Otherwise, the food will absorb too much of it and become a calorie bomb. The hot fat can be used up to three times but should be filtered after each use.
If you like it healthier and still do not want to do without fried food, you should resort to a hot air fryer. Here are usually a few drops of fat, because the food is cooked in the hot air. Your meals will not only have a much lower fat content compared to the traditional fryer - but your kitchen will also be spared the typical frying smell.
Frying is a popular preparation method - even for sweet potatoes
Roast
Whether almonds, coffee or nuts - when roasting pleasant flavours rise in the nose. In addition, the food obtained by the roasting a particularly good taste. It can be roasted with both fat and fat.
But beware: Roasting also causes unwanted substances, such as furan. This was classified by the World Health Organization (WHO) as potentially carcinogenic. However, the furan content can be reduced by reducing food browning (for example, toasting toast).
to bake
The cooking in hot air normally takes place in the oven at temperatures between 100 and 250 ° C instead. Due to the dry heat, the food on the surface usually gets a tan or a crust. In addition to cakes, bread and pastries, casseroles are also prepared in this way. By the way: Did you know that dough tans faster in dark ovens than in light ovens?
The oven is cooking food with hot air
stew
If food is cooked only in its own juice or with little liquid such as water, wine or broth, it is called stewing. Steaming can be done both in the oven (for example in aluminium foil or in the roasting pan) but also on the hotplate. In the latter case, you should use a shallow and large pot or pan with lid. A Roman pot is also suitable for steaming. The browning of the food remains in the process. Since the foods are only exposed to medium heat while steaming, they retain more vitamins and minerals compared to cooking or grilling.
stew
When stewing, foods such as meat are first sautéed in hot fat, quenched and then cooked in the sauce. Ideal for this is pots or roasters, each with a lid. The method is particularly suitable for meat and vegetables.
grilling
At temperatures between 250 and 300 ° C, foods are cooked on a grill at high heat. Grilling is popular on charcoal, gas or electric grills, but also ovens have a grill function. You should be careful with dripping fat. If this comes into contact with the heat source, harmful substances can form.
When grilling caution with dripping grease is required roast meat
When roasting, a distinction is made between long-term roasting with temperatures between 140 and 250 ° C, short-time roasting at 120 to 200 ° C and low-temperature roasting at 100 °
C:
Long-term roast: Food, such as meat, is first seared with or without fat at high temperatures and then cooked.
Short-time roast: First, the food is fried in hot fat and then cooked at low temperatures ready. By the way, one variant of short-term roasting is sautéing, in which thinly cut foods are sautéed and then pivoted at high temperatures, for example in a wok.
Low-temperature cooking: The gentlest method of cooking, which takes place in the oven at a constant 80 ° C. A special form is vacuum cooking, or sous vide. Here, the food is first sealed in plastic bags and vacuumed before they are cooked at 50 to 85 ° C.
BASIC KNOWLEDGE: BAKE BREAD WITH YEAST
AND SOURDOUGH
Baking bread - basic tips
1. Weigh exactly
Always weigh exactly the ingredients, because baking bread depends on exact quantities. Flour, leavening agent, liquid and salt have to be added to the dough in precisely defined amounts and proportions so that the bread succeeds and tastes good.
2. Knead well
Who kneads, wins! Bread dough wants to be well-kneaded, as it works under air, which contributes to the loosening and the glueing whiteness develop for an elastic structure.
3. Is the bread ready?
Has the bread been baked long enough? To find out, there are several options depending on the type of bread: Swab sample on soft doughs: Put a wooden stick in the middle of the loaf and pull it out again. If no more dough sticks to it, the bread is ready baked.
Tapping on elastic doughs: Take the bread (with oven gloves!) Out of the oven and tap it briefly on the bottom of the loaf. If it sounds hollow, the bread is ready.
A roasting thermometer is the safest indication of what it looks like inside the bread: when the core temperature reaches 93 ° C, you can remove the bread.
Bake flour, cereals, grains and spices to make bread Flour is one of the main ingredients in baking bread. It is only ever combined again and again. Which type of flour or cereal you choose does not just change the taste of the bread ...
rye
Is a popular bread grain, it binds well the moisture, making rye bread stays fresh longer. However, rye has substances that prevent the loosening of bread during baking. Therefore, rye must be processed with sourdough.
wheat
Is a universal grain. Its mild taste and gluten (Gluten) ensures smooth and elastic dough. When baking bread, wheat flour is also often combined with gluten-free flours (such as corn and buckwheat) to improve their baking properties.
oats
Mostly consists of flakes. These can both be mixed in the dough and sprinkled on the finished bread. Oat flour has a very low gluten content, which is why it is usually mixed with wheat when baking bread.
Corn
Has lots of valuable ingredients, a full flavour and a beautiful golden colour. To bake bread, however, corn must be mixed with gluten-rich flours, so that the dough rises well.
barley
Is an ancient crop that has a high content of B vitamins and minerals. Barley flour should be processed with bread when baking with sourdough.
millet
Has a high content of iron and other minerals and is very healthy. Baking bread most often uses millet grains.
Spelt
Is closely related to wheat and can often replace wheat flour. It has a fine taste. The sticky protein from the spelt is very sensitive, which is why the dough when baking bread must be carefully and not kneaded too long.
buckwheat
Is not a grain, but a knotweed plant. Buckwheat does not contain gluten and can only be used with bread or wheat when baking bread.
Grains for crispbread
Sunflower seeds provide aroma and bite.
Flax seeds contain a lot of omega-3 fatty acids and should always soak in the water for a few hours before they get into the dough.
Poppy seeds are often sprinkled with light wheat bread or bread rolls, but can also be kneaded well into the dough.
Hemp makes bread, whole or broken, crispy.
And the pumpkin seeds bring a lot of flavour in your bread.
Sesame still enhances its taste when the seeds are lightly roasted in a pan.
When sprinkling, however, this is not necessary, the oven does it by itself.
Bake spices for bread
Salt is the most important bread spice; the baker's formula is 2%
of the amount of salt.
Anise, coriander, caraway, fennel are the classic bread spices in sourdough and ensure digestibility.
Chilli brings warmth to the bread - dried, fresh pods or as a spice powder.
BAKING BREAD FOR BEGINNERS
1. You should have these ingredients at home Starting with the very basic, namely the right ingredients for bread. This starts with the flour: In most households, there is only the standard flour wheat 405th This can be used for baking bright bread, but in the long run, of course, you need a few more types of flour. For starters, you should buy the following flours: Wheat flours: 405, 550, 1,050 and wholemeal Spelled flour: 630, 1,050 and wholemeal
Rye flour: 1,150 and wholemeal
Of course, if you are used to having only one flour at home, that sounds a lot to start with. But believe me, at some point this is just the basis for a much larger flour collection!
In addition to flour, you need of course also other ingredients.
Here is a shortlist of the most important things:
Water (do not buy extra! Tap water is enough)
Yeast (fresh or dried)
Sugar/honey
salt
That's enough in principle already! With these 5 ingredients alone, you can already bake your first great bread. If you want to
try special bread recipes, such as oat or potato bread, you need the following:
Dairy products: milk, yoghurt, buttermilk
oatmeal
potatoes
beer
2. You need this kitchen equipment
After you have all the ingredients together, you should next check whether you also have the necessary equipment: Bread doughs are usually heavy and bulky. A manual stirrer would do you, in the long run, no favour. In addition, you need, of course, a kitchen scale and best still a fine-scale. For many bread recipes have only very small amounts of yeast, about 1 g, which can not measure with a normal kitchen scales so accurate. The same is true for measuring cups: It is best to have a normal measuring cup and one to measure smaller quantities. Otherwise, you will need kitchen towels or bakers' linen to cover the dough, a sturdy dough card to dislodge the dough from the bowl and, of course, oven mitts. In addition a sharp knife, a baking brush and a few tablespoons and teaspoons.
3. Common mistakes in bread making and how to do it right On the Internet, you will find an endless flood of bread recipes.
Not all of these recipes come from writers who really understand something about bread ... Meaning, laymen's recipes are often full of bread-making mistakes. For example, in a recipe for a chef, I've read that you should make a loaf of bread and then place it directly in the cold oven. The author claimed that the bread still rises and then bakes as soon as the oven is preheated to the correct temperature. - This is a fatal error that inevitably leads to bad bread and a not very nice crust!
Rule # 1: Bread always has to be baked in a preheated oven!
Another misconception that is often encountered in recipes is the oven temperature or setting. Some people probably transfer the usual temperature during cake baking to baking bread and indicate, for example: baking at 160 degrees. This setting is completely unsuitable for bread.
Rule # 2: Bread needs hot temperatures (at least 200 ° C) and should be baked at top-bottom heat! The best result is when the bread is only very hot baked for about 10 minutes (250 °) and then the temperature drops.
The third rule concerns something that is very important to the development of a beautiful crust, but which is often forgotten:
Rule No. 3: Bread needs high humidity in the oven! To achieve this, simply reheat a mould with water to create water vapour.
The next rule is actually not a correct rule, but rather a reminder:
Rule No. 4: Bread needs salt! Do not forget, otherwise it will be bland 😉
In order to save time, it is also often said that you could bake bread without going. That's not true, because the two main agents for bread (yeast and sourdough) need some time to work.
Leave the fingers of recipes that promise you turbo bread. Either they are made with cottage cheese doughs or baking powder. -
Both do not lead to the desired consistency. Infinite amounts of yeast that accelerate dough growth may give you fast, but not really good bread.
4. Make a bread dough: That's how it works You can imagine baking bread as much as preparing a cake: many individual steps are necessary. (First, the sponge cake has to be made and baked, then the bottom has to be cooled and cut into several layers, the cream has to be prepared, and then everything is pieced together and decorated ...) When making bread, it looks like this:
Pre dough: For many breads, a first dough is first prepared. That sounds like extra work, but it's actually done really fast. In most cases, it is sufficient to mix a few ingredients (e.g. flour, water, yeast) just with a spoon and let stand for a while. So: do not be afraid of starters!
Main dough: For the main dough, first yeast is dissolved in a liquid. Then all the other ingredients and the batter come in, and everything is kneaded.
First Gare: When the dough has finished kneading, cover the bowl with a kitchen towel and allow the dough to rise for a certain amount of time.
Kneading and shaping: After the first cooking, the dough is removed from the bowl and kneaded by hand and formed into a loaf.
Second Gare: This loaf is placed on a baking sheet and covered with a cloth again. So he may rise again.
4. Bake the bread properly: That's how it works What happens after the second gare? Sure, the baking! As you have already seen in my 5 Golden Rules, there are some things to keep in mind when baking. Whether a bread is good or not is decided by the right baking process! First, you should preheat the oven vigorously for at least 15-30 minutes, preferably with a very hot temperature, i.e. 220-250 degrees. Always use the setting top-bottom heat, unless you're baking buns on several levels, then air circulation is better. Already during preheating, you can ensure the right humidity in the oven: place a baking dish or another heat-resistant container on the bottom of the oven and add water. When the oven is very hot, the water boils and evaporates. That's good for crusting the bread.
Put the dough on a baking sheet and put it in the preheated oven. Attention, when you open the oven door, part of the hot steam escapes! So do not bother to scald your fingers or face.
Close the oven door and allow the bread to bake for about 10
minutes at the set high temperature. Then usually the oven door is opened once so that the steam can escape. The temperature is usually reduced and baked the bread so ready. In the last few minutes of the baking time, it makes sense to open the oven door again slightly. This makes the crust nice and crispy. The best thing to do is simply clamp a wooden spoon in the oven door ...
Finished! Your bread has been baked and now only has to cool on a wire rack. Make sure that it is really completely cold before you cut it. Otherwise, the dough will crumble.
BAKING BREAD - HELPFUL TIPS & TRICKS
Flour, water, salt and time need good bread The knowledge of old bakery art is used by more and more people, and they are focusing on the virtue of making their own and bake their own bread. The recipes of the grandmothers are tried out, natural sourdough prepared, the doughs kneaded by hand, and the ripening dough pieces carefully left alone. The reward for the effort: loosely-porous slices of bread with a fragrant-crunching crust, which are a real pleasure to enjoy.
Rye or wheat bread?
Whether breakfast rolls, baguette, ciabatta or brioche - all these bright bread are made from wheat flour. Wheat is the world's most important bread grain. It contains a lot of gluten, which makes the dough stretchable and elastic. The glue can bind a lot of water and thus ensures a breezy and loose pastry structure. As for the leavening agent, the wheat flour is sufficient for some yeast. Wheat flour is ideal especially for beginners: the dough is easier to hold together with the gluten, and it does not react sensitively to long kneading.
Rye bread, unlike wheat bread, is characterized by a darker dough and a thicker crumb. Rye does not contain so much gluten, which makes the dough heavier and denser. Rye flour needs an acidic environment to be able to bake. An ancient method is the addition of sourdough. Sourdough is used for loosening, acidification and flavouring of rye flour doughs.
Natural sourdough contains lactic acid bacteria and yeasts, which form 24 hours after the "start" and make it sour. The sourdough of flour and water is fed every day by adding fresh water and flour on a regular basis.
How long does bread have to bake? What temperature do I use to bake bread? Here you will find valuable tips and tricks!
Yeast:
Dissolve the fresh yeast in hand-warm liquid, then knead in the remaining ingredients. A pinch of sugar feeds the yeasts, thus starting the desired fermentation process. In no case should salt be added to this first step? Salt attacks the yeast cells and causes them to die.
Whether fresh yeast or dry yeast provide a better baking result, the baking specialists argue about it. Important for a loose-airy dough is the right ratio of flour to yeast for both types of yeast.
One pound of wholemeal wheat flour is expected to contain 15
grams of fresh yeast, with pure white wheat flour 10 grams of yeast is enough.
Steam:
If you want your bread to be extra crunchy, then you need to keep enough moisture in the oven. You can simply put a bowl of water in the oven. The evaporating water condenses on the surface of its bread dough piece and prevents the formation of a crust too fast. Your bread should finally rise further in the oven.
However, in a premature crumb, the fermentation gases could not escape - the bread would remain small and compact.
Consistency:
With bread rolls and bread, water is added to the dough, which ensures that they are crispy. Doughs for yeast buns or brioche, whose texture is rather soft, are made with milk. Basically, the dough should initially be soft, and quite a bit sticky, too much flour in the dough makes the bread dry.
Knead:
Yeast doughs are actually looking forward to rough treatment, persistent kneading and beating. As a result, the protein scaffold is formed, which later, when baking, provides for a loose and at the same time, a stable loaf of bread. It is important to knead the dough again after the first fermentation process thoroughly. The fermentation gases and newly formed yeast fungi are optimally distributed in the dough. Dinkelteigen, on the other hand, must
not be kneaded too long: Only one minute too much and you will later get a flatbread from the oven.
Warmth:
The yeast fungus in itself likes pleasant warmth around 30 °
Celsius and proliferates under these conditions to the baker's delight: The dough opens up and increases its volume in a relatively short time enormously. However, there are also dough recipes that require the yeast dough to rise at cool temperatures.
Here, the rest period takes much longer. The baked bread is after a so-called cold Gare much finer pores. However, the yeast reacts very sensitively to drafts. A simple dishcloth over the dough bowl prevents the dough from being damaged.
Grease:
Butter or high-quality oils refine the bread dough. It is important that you knead the other ingredients and then added the fat.
Salt:
A small dose of salt stabilizes the consistency of the dough. It does not get stronger, but it has a more stable taste. As paradoxical as it sounds: particularly sweet doughs need a small pinch of salt, as a flavour carrier it emphasizes the sweetness in the dough. Conversely, the same applies: salty is flavoured by a pinch of sugar or honey.
Form:
For the bread which are to have a particularly crispy and rustic surface, fermenting baskets are used. These are usually made of rattan and ensure that the bread before baking the typical shape and get a nice pattern. In normal box shapes, only the upper side of the bread becomes crispy when baked. They are therefore better for soft bread.
WHICH FLOUR DO I USE TO MAKE BREAD?
We owe our variety of bread to the mixture of different types of flour, which in turn have been ground to different degrees. How strongly a grain was processed, can be recognized by the type designation of the flour: the lower the type designation, the stronger the grain was ground.
Wheat grains are completely ground, including seedlings, in wheat wholegrain flour, but the grain is more or less polished in the other types. The brightest flour is the 405 wheat flour. Here only the inner core of the grain was processed.
The type designation of the flour gives information about how finely the grain was ground. In fact, the flour type in milligrams indicates how much minerals are contained per 100 grams of
flour. For this purpose, exactly 100 grams of flour are burned, and the weight of the remaining ash designates the type of flour.
Flours at a glance
Wheat flour
Type 405
The 405er is the lightest and finest wheat flour. It has a very good binding capacity and lends itself well to elastic doughs that work well. The flour is ideal for cakes, yeast dough and for thickening sauces.
Type 550
This flour is a bit stronger but still light. It is well suited for bread and pizza doughs and biscuits. The flour goes well and forms a fine-pored crust.
Types 812, 1050 and 1600
These types of flour are significantly darker and have higher shell content. They are especially suitable for bread and savoury doughs.
Rye flour
Type 815
Rye flour Type 815 is the lightest rye flour. It is often used to bake savoury pastries such as bread or rolls.
Types 997 and 1150
These quite dark types of flour are particularly suitable for the production of bread.
Types 1370 and 1740
Two very dark rye flours that are ideal for sourdough or mixed bread.


