20,99 €
Mehr erfahren.
- Herausgeber: John Wiley & Sons
- Kategorie: Wissenschaft und neue Technologien
- Sprache: Englisch
Turn your wonderful website dreams into robust realities with the help of Dreamweaver CC For Dummies! Creating dynamic websites is easy with Dreamweaver CC and this friendly, full-color guide. Updated for the latest version of Adobe's world-renowned web development tool, Dreamweaver CC For Dummies covers all aspects of creating websites, from understanding web design basics to using style sheets, integrating multimedia, implementing responsive design, testing and publishing your sites, and more. With the professional guidance of Web design expert Janine Warner, you'll soon be on your way to building the website you've always wanted. * Helps beginning and intermediate website developers get the most out of the new tools and features in Dreamweaver CC * Provides a solid foundation in web design principles before moving on to more advanced topics like working with HTML5 and CSS, adding interactivity with jQuery, optimizing your site for different browsers, and getting creative with images, audio, and video * Explains how to test and take your website live, manage and monitor your site's performance, promote your site via social media, and push it to the top of the search engine rankings like a pro Whether this is your first foray into web development or you're a Dreamweaver devotee, For Dummies has the information you need to create interactive websites that look fantastic on the flat screen, terrific on a tablet, and simply stunning on your smartphone.
Sie lesen das E-Book in den Legimi-Apps auf:
Seitenzahl: 553
Veröffentlichungsjahr: 2013
Ähnliche


Dreamweaver® CC For Dummies®
Published byJohn Wiley & Sons, Inc.111 River StreetHoboken, NJ 07030-5774www.wiley.com
Copyright © 2013 by John Wiley & Sons, Inc., Hoboken, New Jersey
Published simultaneously in Canada
No part of this publication may be reproduced, stored in a retrieval system or transmitted in any form or by any means, electronic, mechanical, photocopying, recording, scanning or otherwise, except as permitted under Sections 107 or 108 of the 1976 United States Copyright Act, without either the prior written permission of the Publisher. Requests to the Publisher for permission should be addressed to the Permissions Department, John Wiley & Sons, Inc., 111 River Street, Hoboken, NJ 07030, (201) 748-6011, fax (201) 748-6008, or online athttp://www.wiley.com/go/permissions.
Trademarks: Wiley, For Dummies, the Dummies Man logo, A Reference for the Rest of Us!, The Dummies Way, Dummies Daily, The Fun and Easy Way, Dummies.com, Making Everything Easier, and related trade dress are trademarks or registered trademarks of John Wiley & Sons, Inc. and/or its affiliates in the United States and other countries, and may not be used without written permission. Dreamweaver is a registered trademark of Adobe Systems Incorporated. All other trademarks are the property of their respective owners. John Wiley & Sons, Inc. is not associated with any product or vendor mentioned in this book.
Limit of Liability/Disclaimer of Warranty: The publisher and the author make no representations or warranties with respect to the accuracy or completeness of the contents of this work and specifically disclaim all warranties, including without limitation warranties of fitness for a particular purpose. No warranty may be created or extended by sales or promotional materials. The advice and strategies contained herein may not be suitable for every situation. This work is sold with the understanding that the publisher is not engaged in rendering legal, accounting, or other professional services. If professional assistance is required, the services of a competent professional person should be sought. Neither the publisher nor the author shall be liable for damages arising herefrom. The fact that an organization or Website is referred to in this work as a citation and/or a potential source of further information does not mean that the author or the publisher endorses the information the organization or Website may provide or recommendations it may make. Further, readers should be aware that Internet Websites listed in this work may have changed or disappeared between when this work was written and when it is read.
For general information on our other products and services, please contact our Customer Care Department within the U.S. at 877-762-2974, outside the U.S. at 317-572-3993, or fax 317-572-4002.
For technical support, please visit www.wiley.com/techsupport.
Wiley publishes in a variety of print and electronic formats and by print-on-demand. Some material included with standard print versions of this book may not be included in e-books or in print-on-demand. If this book refers to media such as a CD or DVD that is not included in the version you purchased, you may download this material at http://booksupport.wiley.com. For more information about Wiley products, visit www.wiley.com.
Library of Congress Control Number: 2013934756
ISBN 978-1-118-64614-4 (pbk); ISBN 978-1-118-65879-6 (ebk); ISBN 978-1-118-65890-1 (ebk); ISBN 978-1-118-65894-9 (ebk)
Manufactured in the United States of America
10 9 8 7 6 5 4 3 2 1
About the Author
Janine Warner’s best-selling books and videos about the Internet have won her an international following and earned her speaking and consulting engagements around the world.
She is also the founder and managing director of DigitalFamily.com, a full-service interactive design and training agency that offers web and mobile design, content strategy, and Internet marketing services.
Janine’s skills as a “techy translator” helped her land the deal for her first book in 1996. Since then, she’s written or coauthored more than 25 books, including Web Sites For Dummies, Mobile Web Design For Dummies, and every edition of Dreamweaver For Dummies. She has also created more than 50 hours of training videos about web design and content strategy for Lynda.com and KelbyTraining.com.
Janine has taught courses at the University of Miami and the University of Southern California. She’s also been a guest lecturer at more than 20 other universities in the United States and Latin America, and she helped create an Internet Literacy program for high school students in Central America.
She is a member of the TV Academy’s Interactive Media Peer Group and has served as a judge in the Interactive Emmy Awards, the Knight News Challenge, and the Arroba de Oro Latin American Internet Awards.
In 1998, Janine’s experience as a journalist and Internet consultant, combined with her fluency in Spanish, took her to The Miami Herald as Online Managing Editor. A year later, she was promoted to Director of New Media. She left that position to serve as Director of Latin American Operations for CNET Networks.
Since 2001, Janine has run her own business as an author, a consultant, and a speaker. Over the years, she’s worked with one of Russia’s largest publishing companies in Moscow; traveled to New Delhi to speak at Internet World India; and worked with media companies and other businesses in Colombia, Chile, Brazil, Panama, Costa Rica, Nicaragua, El Salvador, Mexico, and Spain.
When she’s not traveling, she is based in Southern California, where she lives with her husband, David LaFontaine, manages DigitalFamily.com and occasionally takes a break to run on the beach.
Dedication
To all those who aspire to share their stories and passions on the web: May all your dreams come true.
Author’s Acknowledgments
More than anything, I want to thank all the people who have read my books or watched my videos over the years. You are my greatest inspiration, and I sincerely enjoy it when you send me links to your websites. You'll find my e-mail address on my site at www.DigitalFamily.com.
Special thanks to David LaFontaine, my partner in all things digital and analog, whose patience and support keep me fed, loved, and (mostly) sane, even when I’m up against impossible deadlines.
For letting me feature their websites in this book, a heartfelt thanks to my friends and clients Laurie Ann Schag and Casey Stoll (www.Cinembargo.com), and James Kober (www.AssetShield.com).
Thanks to the entire editorial team on this book: Susan Pink for her attention to detail and quick turnaround on the editing, Jon McFarland for reviewing all the technical details, and Bob Woerner for shepherding this book through the development and publishing process (again and again and again).
Over the years, I’ve thanked many people in my books — family, friends, teachers, and mentors — but I have been graced by so many wonderful people now that no publisher will give me enough pages to thank them all. So let me conclude by thanking everyone who has ever helped me with a website, book, video, or any other aspect of the writing and research that goes into these pages. Okay, now I think I can go to sleep tonight without fearing that I’ve forgotten anyone. Thank you, thank you, thank you.
Publisher’s Acknowledgments
We’re proud of this book; please send us your comments at http://dummies.custhelp.com. For other comments, please contact our Customer Care Department within the U.S. at 877-762-2974, outside the U.S. at 317-572-3993, or fax 317-572-4002.
Some of the people who helped bring this book to market include the following:
Acquisitions and Editorial
Project Editor: Susan Pink
Acquisitions Editor: Bob Woerner
Copy Editor: Susan Pink
Technical Editor: Jon McFarland
Editorial Manager: Jodi Jensen
Editorial Assistant: Annie Sullivan
Sr. Editorial Assistant: Cherie Case
Cover Photos: Front cover image courtesy of Janine Warner; computer monitor © iStockphoto.com/MorganLeFaye; back cover images courtesy of Janine Warner
Composition Services
Project Coordinator: Sheree Montgomery
Layout and Graphics: Carrie A. Cesavice, Jennifer Goldsmith, Amy Hassos, Joyce Haughey
Proofreaders: Melissa Cossell, Lisa Young Stiers
Indexer: BIM Indexing & Proofreading Services
Publishing and Editorial for Technology Dummies
Richard Swadley, Vice President and Executive Group Publisher
Andy Cummings, Vice President and Publisher
Mary Bednarek, Executive Acquisitions Director
Mary C. Corder, Editorial Director
Publishing for Consumer Dummies
Kathleen Nebenhaus, Vice President and Executive Publisher
Composition Services
Debbie Stailey, Director of Composition Services
Dreamweaver CC For Dummies®
Visit www.dummies.com/cheatsheet/dreamweavercc to view this book's cheat sheet.
Table of Contents
Introduction
About This Book
Using Dreamweaver on a Mac or PC
Conventions Used in This Book
What You’re Not to Read
Foolish Assumptions
How This Book Is Organized
Part I: Getting Started with Dreamweaver CC
Part II: Creating Page Designs with Style
Part III: Making Your Site Cool with Advanced Features
Part IV: The Part of Tens
Icons Used in This Book
Where to Go from Here
Part I: Getting started with Dreamweaver CC
Chapter 1: The Many Ways to Design a Web Page
Comparing Static and Dynamic Sites
Working with Templates in Dreamweaver
Creating and editing Dreamweaver templates
Editing WordPress, Joomla!, and Drupal templates
Assessing Other Web Design Tools
Understanding How to Build a Website in Dreamweaver
Managing your site’s structure
Exploring HTML, XHTML, and HTML5
Comparing Tables, Frames, and Layers
Creating page designs with HTML tables
Considering design options with HTML frames
Appreciating the Benefits of Cascading Style Sheets
Understanding Browser Differences
Introducing the Dreamweaver CC Workspace
Changing workspace layouts
The menu bar
The Document toolbar
The Document window
The docking panels
The Insert panel
The Property inspector
The status bar
Changing preference settings
Chapter 2: Opening and Creating Sites
Setting Up a New or Existing Site
Switching among Sites
Managing Sites in Dreamweaver
Creating Pages
Starting from the Welcome screen
Creating an HTML page with the New Document window
Naming new page files
Naming the first page index.html
Bestowing a page title
Changing Page-Wide Styles with the Page Properties Dialog Box
Changing background and text colors
Changing link styles with Page Properties
Adding and Formatting Text
Adding text to a web page
Formatting text with the heading tags
Adding paragraphs and line breaks
Setting Links in Dreamweaver
Linking pages within your website
Setting links to many pages at once
Linking to another website
Setting a link to an e-mail address
Linking to PDFs
Adding Meta Tags for Search Engines
Chapter 3: Creating Web Graphics
Creating and Optimizing Web Graphics
Resizing graphics and photos
Choosing the best image format
Saving images for the web: The basics
Optimizing JPEG images for the web
Optimizing images in GIF and PNG formats
How small is small enough?
Inserting Images in Dreamweaver
Image Editing in Dreamweaver
Cropping an image
Adjusting brightness and contrast
Sharpening an image
Opening an image in Photoshop or Fireworks from Dreamweaver
Inserting a Background Image
Chapter 4: Managing, Testing, and Publishing a Website
Understanding Why Web Pages Can Look Bad in Some Browsers
Understanding browser differences
Targeting browsers for your design
Previewing Your Page in a Browser
Adding web browsers to the preview feature
Previewing pages in many web browsers
Testing sites with online browser services
Testing your designs with mobile, tablet, and desktop previews
Testing Your Work with the Site Reporting Feature
Finding and Fixing Broken Links
Checking for broken links
Fixing broken links
Making Global Changes to Links
Managing Files and Folders in Your Site
Moving and renaming files and folders
Creating files and creating and deleting folders
Publishing Your Website
Setting up Dreamweaver’s FTP features
Publishing files to a web server with FTP
Synchronizing local and remote sites
Setting cloaking options
Using Design Notes to Keep in Touch
Part II: Creating Page Designs with Style
Chapter 5: Introducing Cascading Style Sheets
Introducing Cascading Style Sheets
Understanding the basics of styles
Combining CSS and HTML
Understanding style selectors
Using internal versus external style sheets
Looking at the code behind the scenes
Introducing the CSS Designer Panel
Identifying and selecting styles
Reviewing CSS Selector Options
The Layout options
The Text panel
The Border panel
The Background panel
The Box-Shadow panel
The List panel
The CSS Transitions panel
Switching between CSS and HTML Mode in the Property Inspector
Chapter 6: Creating and Editing CSS Styles
Organizing Style Sheets
Creating an internal style sheet
Creating an external style sheet
Attaching an external style sheet to a page
Moving and copying styles
Creating Style Rules
Defining styles with the tag selector
Creating styles with class and ID selectors
Applying class and ID styles
Resetting HTML elements with CSS
Creating Layouts with CSS and Div Tags
Using Dreamweaver’s CSS Layouts
Creating a new page with a CSS layout
Editing the styles in a CSS layout
Creating a Navigation Bar from an Unordered List of Links
Comparing Margins and Padding in CSS
Aligning and Centering Elements in CSS
Centering a page layout with CSS margins
Aligning the contents of an element
Aligning elements with floats
Editing, Renaming, and Removing Styles
Editing a style
Renaming existing styles
Removing or changing a style
Chapter 7: Designing with CSS3
Comparing Browser Support for CSS3
Adding drop and text shadows
Adding drop shadows to images and divs
Softening Edges with Rounded Corners
Enhancing Your Site with Custom Fonts
How does the @font-face rule work?
Using custom fonts from the Google Web Fonts site
Chapter 8: Creating Responsive Designs with Fluid Grid Layouts
Understanding Responsive Web Design
Designing Pages with Fluid Grid Layouts
Creating a new fluid grid layout
Adding fluid elements to a layout
Positioning elements to create three layouts in one fluid grid
Creating Custom Media Queries
Applying styles to your page designs
Using media queries in external style sheets
Creating media queries in Dreamweaver
Chapter 9: Saving Time with Templates and More
Templating Your Pages
Creating Templates
Creating editable and uneditable regions
Creating a new Dreamweaver template
Saving any page as a template
Making attributes editable
Creating a Page from a Template
Making Global Changes with Templates
Opening a template from any page created from a template
Reusing Elements with the Library Feature
Creating and Using Library Items
Creating a library item
Adding a library item to a page
Highlighting library items
Making global changes with library items
Editing one instance of a library item
Using a Tracing Image to Guide Your Design Work
Chapter 10: Coming to the HTML Table
Understanding HTML Tables
Creating Tables in Dreamweaver
Changing your table’s appearance
Making tables more accessible
Specifying cell options
Aligning table content in columns and rows
Merging and splitting table cells
Sorting Table Data
Nesting Tables within Tables
Part III: Making Your Site Cool with Advanced Features
Chapter 11: Adding Interactivity with Behaviors
Brushing Up on Behavior Basics
Creating a Simple Rollover Image
Adding Behaviors to a Web Page
Creating swaps with multiple images
Using the Open Browser Window behavior
Attaching Multiple Behaviors
Editing a Behavior
Installing New Extensions for Behaviors
Chapter 12: Using jQuery UI and Mobile Widgets
Making Magic with jQuery
Creating Collapsible Panels
Creating Tabbed Panels
Using jQuery Mobile Widgets
Chapter 13: Showing Off with Multimedia
Understanding Multimedia Players
Using YouTube, Vimeo, and Other Online Services to Host Videos
Using SoundCloud to Host Audio Files
Using Adobe Flash
Inserting Flash SWF files
Setting Flash properties
Using scripts to make Flash function better
Working with Adobe Edge Animate Files
Working with Video and Audio on the Web
Comparing popular video formats
Comparing popular audio formats
Adding Audio and Video Files to Web Pages
Linking to audio and video files
Inserting audio and video files
Setting options for audio and video files
Adding Flash audio and video files
Part IV: The Part of Tens
Chapter 14: Ten Resources You May Need
Registering a Domain Name
Dressing Up the Address Bar with a Favicon
Add Forms with Online Services
Selling Stuff on the Web
Sharing Your Computer Screen Remotely
Keeping Track of Traffic
Taking Your Site’s Temperature with a Heat Map
Surveying Your Visitors
Keeping Up with Web Standards at W3.org
Extending Dreamweaver at Adobe.com
Chapter 15: Ten Ways to Promote Your Site
Scoring High in Search Engines
Buying Traffic (Yes, You Really Can!)
Using Social Networking Sites for Promotion
Increasing Your Ranking on Social Bookmarking Sites
Spreading the Love with Social Media Share Buttons
Enticing Visitors to Return for Updates
Marketing a Website to the Media
Unleashing the Power of Viral Marketing
Blogging, Blogging, Blogging
Gathering Ideas from Other Websites
Introduction
In the last few years, the Internet has experienced extraordinary growth and has gone through incredible changes. As more and more users access the web with smartphones, tablets, Apple TVs, dashboard-mounted touchscreens in cars, and even tiny head-mounted displays on Google Glass, web designers have been forced to design sites that work on devices from tiny mobile screens to giant television sets.
Simultaneously, the technologies that work best on the web are changing. The once popular design tool Adobe Flash is losing its audience because videos and animations created in Flash don’t work on the iPad or iPhone. Fortunately, HTML5 and CSS3 (the latest flavors of the Hypertext Markup Language and Cascading Style Sheets, respectively), make it possible to add new design features and greater interactivity without the need for Flash.
I can’t cover every detail of all these technologies in this book, but I do give you a solid introduction to modern web design. You discover how the newest features in Dreamweaver CC make it easier to create web pages that meet modern standards and adapt to all the screens used to view websites today.
In this fully updated version of Dreamweaver For Dummies, I added a new chapter to show you how to create responsive web page designs that adjust to fit different screen sizes, using Dreamweaver’s fluid grid layout features.
Over the years, web design has evolved into an increasingly complex field, and Dreamweaver has evolved with it, adding features that go way beyond the basics of combining a few words and images. Adobe’s dedication to keeping up with changing standards and adding new features with each new version is why Dreamweaver is such a popular program among professional web designers, as well as among a growing number of people who want to build sites for their hobbies, clubs, families, and small businesses.
In the 15-plus years that I’ve been writing about web design, I’ve seen many changes — from the early days (before Dreamweaver even existed) when you could create only simple pages with HTML 1.0, to the elaborate designs you can create with Dreamweaver today using HTML5, CSS3, jQuery, multimedia, and more.
If you’re not sure what those acronyms mean yet, don’t worry. I remember what it was like to figure out all this stuff, so I designed this book to introduce you to the basic concepts before you get into the more advanced features. To prepare you for the ever-changing world of web design, I show you how to use Dreamweaver to create websites that take advantage of the latest advances in web technology — including CSS3, covered in the Chapter 7, and responsive design, covered in the brand-new Chapter 8.
One of the challenges of web design today is that web pages are not only displayed on different kinds of computers but also downloaded to computers with monitors as big as widescreen televisions — or as small as the little screens on cell phones. As a result, creating websites that look good to all visitors is a lot more complex than it used to be — and standards have become a lot more important. This book shows you not only how to use all the great features in Dreamweaver but also how to determine which of those features best serve your goals and your audience.
About This Book
I designed Dreamweaver CC For Dummies to help you find the answers you need when you need them. You don’t have to read through this book cover to cover, and you certainly don’t have to memorize it. Consider this a quick study guide and a reference you can return to. Each section stands alone, giving you easy answers to specific questions and step-by-step instructions for common tasks.
Want to find out how to change the background color in page properties, design CSS style rules to align images, or add an interactive photo gallery with the Swap Image behavior? Jump right to the pages that cover those features. (Hint: the Table of Contents and index can help you find the sections that interest you most.) Don’t worry about getting sand on this book at the beach or coffee spilled on the pages at breakfast. I promise it won’t complain!
You find templates, artwork, and other goodies to use with this book at www.DigitalFamily.com/bonus.
Using Dreamweaver on a Mac or PC
Dreamweaver works almost identically on Macintosh or Windows computers. To keep screenshots consistent throughout this book, I’ve used a computer running Windows 7. However, I’ve tested the program on both platforms, and whenever I find a difference in how a feature works, I indicate that difference in the instructions.
Conventions Used in This Book
Keeping things consistent makes them easier to understand. In this book, those consistent elements are conventions. Notice how the word conventions is in italics? I frequently put new terms in italics and then define them so you know what they mean. It just makes reading so much nicer.
When I type actual URLs (web addresses) in regular paragraph text, they look like this: www.digitalfamily.com.
I also assume that your web browser doesn't require the introductory http:// for web addresses. If you use an older browser, remember to type that quaint prefix before the address (also make sure you include that part of the address when you're creating links in Dreamweaver).
Even though Dreamweaver makes understanding HTML pages easier, you may want to wade into HTML waters occasionally. I include HTML code in this book when I think it can help you better understand how things work in Design view. Sometimes it’s easier to remove or edit a tag in Code view than Design view. When I do provide examples — including filenames, file extensions, attributes, and tags, such as the following code that links a URL to a web page — I set off the HTML in monospaced type:
<a href="http://www.digitalfamily.com">Learn more about Dreamweaver at Janine's DigitalFamily website</a>
When I introduce you to a new set of features, such as options in a dialog box, I set those items apart with bullet lists so you can see that they’re all related. When I want you to follow instructions, I use numbered step lists to walk you through the process.
What You’re Not to Read
If you’re like most of the web designers I know, you don’t have time to wade through a thick book before you start working on your website. That’s why I wrote Dreamweaver CC For Dummies in a way that makes it easy for you to find the answers you need quickly. You don’t have to read this book cover to cover. If you’re in a hurry, go right to the information you need most and then get back to work. If you’re new to web design or you want to know the intricacies of Dreamweaver, skim through the chapters to get an overview — and then go back and read what’s most relevant to your project in greater detail. Whether you’re building a simple site for the first time or working to redesign a complex site for the umpteenth time, you find everything you need in these pages.
Foolish Assumptions
Although Dreamweaver is designed for professional developers, I don’t assume you’re a pro — at least not yet. In keeping with the philosophy behind the For Dummies series, this book is an easy-to-use guide designed for readers with a wide range of experience. If you’re interested in web design and want to create a website, that’s all I expect from you.
If you’re an experienced web designer, Dreamweaver CC For Dummies is an ideal reference for you because it gets you working quickly with the program — starting with basic web-page design features and progressing to more advanced options. If you’re new to web design, this book walks you through all you need to know to create a website, from creating a new page to publishing your finished project on the web.
How This Book Is Organized
To ease you through the learning curve associated with any new program, I organized Dreamweaver CC For Dummies as a reference. This section provides a breakdown of the four parts of the book and what you can find in each one. Each chapter walks you through the features of Dreamweaver step by step, providing tips and helping you understand the vocabulary of web design as you go along.
Part I: Getting Started with Dreamweaver CC
Part I introduces you to the basic concepts of web design as well as the main features of Dreamweaver. In Chapter 1, I give you an overview of the many approaches to web design, so you can best determine how you want to build your website before you get into the details of which features in Dreamweaver are best suited to any particular design approach. In Chapter 2, I start you on the road to your first website — including creating a new site, importing an existing site, creating new web pages, applying basic formatting, and setting links. To make this chapter more interesting and help you see how all these features come together, I walk you through creating a real web page as I show you how the features work.
In Chapter 3, I move on to graphics, with an introduction to creating graphics for the web, an overview of the differences in formats (GIFs, JPEGs, and PNG files), and detailed instructions for adding and positioning graphics in your pages. In Chapter 4, you discover Dreamweaver’s testing and publishing features, so you can make sure that all your links work and that your website will look good in the most important web browsers. You also find everything you need to start uploading pages to the Internet.
Part II: Creating Page Designs with Style
Chapter 5 provides an overview of how Cascading Style Sheets work and how they can save you time. CSS has become the way to create page designs and manage formatting on web pages, and these features have been dramatically improved in Dreamweaver CC. In this chapter, you find descriptions of the style definition options available in Dreamweaver as well as instructions for creating and applying styles. In Chapter 6, I take you further into CSS, introducing you to the power of <div> tags, how to create CSS layouts, how to create centered CSS designs, and how to use Dreamweaver's newest CSS testing features. In Chapter 7, I show how Dreamweaver CC has more fully integrated some of the hot new design options, such as drop shadows and gradients, which were made possible by CSS3.
In Chapter 8, I introduce fluid grid layouts, which make it easier to create websites using a new technique called responsive design. The advantage of responsive design, sometimes called adaptive design, is that it enables you to create page layouts that adjust to different screen sizes so that they look as good on tiny smartphone screens as they do on giant desktop monitors. In Chapter 9, I cover the use of templates and Dreamweaver’s Library items, which come in handy for commonly used elements, such as the copyright on all your web pages. In Chapter 10, I take a look at HTML Tables, and show where and how this time-honored technique is still relevant with modern web design.
Part III: Making Your Site Cool with Advanced Features
In Part III, you discover how cool your site can look when you add interactive images, audio, video, and drop-down menus. In Chapter 11, you find instructions for creating an interactive photo gallery with the Swap Image behavior, as well as how to use other features in Dreamweaver’s Behaviors panel — including the Open New Browser behavior. In Chapter 12, you discover how great the Spry features are for adding AJAX interactivity to your site. You find instructions for creating and customizing drop-down lists, collapsible panels, and more. In Chapter 13, you find out what it takes to add multimedia to your web pages, including how to insert and create links to a variety of file types — from Flash to HTML5 animations, and video and audio files.
Part IV: The Part of Tens
Part IV features two quick references to help you develop the best websites possible. Chapter 14 provides a collection of online resources where you can register domain names and find hosting services, as well as a few services that can help you take care of more advanced challenges (such as setting up interactive forms and e-commerce shopping carts). In Chapter 15, you find ten ways to promote your website, from search engine optimization to social media and beyond.
Icons Used in This Book
This icon points you toward valuable resources on the web.
This icon reminds you of an important concept or procedure that you’ll want to store away in your own memory banks for future use.
This icon signals technical stuff that you may find informative and interesting, though it isn’t essential for using Dreamweaver. Feel free to skip over this information.
This icon indicates a tip or technique that can save you time and money — and a headache — later.
This icon warns you of any potential pitfalls — and gives you the all-important information on how to avoid them.
Where to Go from Here
To familiarize yourself with the latest in web design strategies and options, don’t skip Chapter 1, which guides you through the many ways to create websites that you have to choose from today. If you’re ready to dive in and build a basic website right away, jump ahead to Chapter 2. If you want to find out about a specific trick or technique, consult the Table of Contents or the index; you won’t miss a beat as you work to make those impossible web design deadlines. Most of all, I wish you great success in all your web projects!
Occasionally, we have updates to our technology books. If this book does have technical updates, they will be posted at
dummies.com/go/dreamweaverccfdupdates
Part I
Getting started with Dreamweaver CC
For Dummies can help you get started with lots of subjects. Visit http://www.dummies.com/extras/dreamweavercc to learn more and do more with For Dummies.
In this part . . .
Compare different layout techniques you can use in Dreamweaver.
Explore the toolbars, menus, and panels that make up Dreamweaver’s interface.
Set up a website, create web pages, and add text, links, and meta data for search engines.
Optimize web graphics, with instructions for using Photoshop (or Photoshop Elements) to covert images to GIF, PNG, and JPEG formats.
1
The Many Ways to Design a Web Page
In This Chapter
Comparing static and dynamic site options
Organizing your site’s design and files
Saving time with static and dynamic templates
Choosing between tables, frames, layers, and CSS
Handling browser differences in web design
Customizing your Dreamweaver workspace
In the mid-1990s, learning to create websites — and teaching others how to do it — was easy. Almost 20 years and as many books later, the process has become much more complex. I’ve come to realize that one of the first things to understand about web design is that there isn’t just one way to create a website anymore.
In this chapter, I being with an introduction to the many ways you can create a website and the tools Dreamweaver offers to make those designs possible. I also introduce you to the basics of HTML and how websites and browsers work. At the end of this chapter, you find a quick tour of the Dreamweaver CC interface to help you get comfortable with the workspace.
Comparing Static and Dynamic Sites
Websites fall into two very broad categories: static sites, which are generally built with a program such as Adobe Dreamweaver, and dynamic sites, which combine advanced programming with a database to generate web pages dynamically.
A static site is like a unique book, where each page has been created by hand. The process can be compared to illuminated manuscripts, where monks toiled for years and each page was an individual work of art. Static websites are made up of a collection of individual pages with the .html or .htm extension. You might think that all websites are made up of individual pages (and in a way they are), but with a static site, each page is saved as a separate file.
In contrast, a dynamic site works more like a warehouse full of words, images, videos, and colors with a super-fast clerk who can run at light speed through the aisles, grabbing items and assembling them into pages as you read them. With a dynamic site, the pages you view in a web browser are created as they are delivered to the browser, so they’re not saved as individual pages but as pieces of pages that can be mixed and matched. That gives dynamic sites many advantages, but it also makes them a lot more complicated to create. On a large website such as Amazon.com, for example, this dynamic process makes it possible for Amazon to create a page with recommended books for you that looks different from the page it recommends to me, even though we’re both entering the same URL into a web browser.
If you’re just creating a simple profile or small business site, go with a static site. Dynamic websites are often not worth the extra effort, unless you’re creating a site that you expect to grow to 100 pages or more.
Although you can create custom dynamic websites in Dreamweaver using popular technologies such as PHP or ASP.NET, most programmers who are creating sites with Amazon.com levels of complexity use more advanced programming tools, such as Eclipse or Microsoft Visual Studio.
I used to teach the basics of dynamic site creation in Dreamweaver, but today better options exist. Instead of reinventing the wheel by creating their own dynamic site system with Dreamweaver, many web designers are using a content management system (CMS), such as WordPress and Drupal.
Following are some of the most popular content management systems:
WordPress (www.wordpress.org or www.wordpress.com): One of the most popular and powerful blogging tools, WordPress is increasingly used as a CMS for more complex sites. You'll find many great extensions for WordPress. After a site is built, teaching people to use the administrative tools to update the site (even if they don't know HTML) is relatively easy, making this an especially popular tool among web designers who are creating sites that they want their clients to be able to update themselves.
Joomla! (www.Joomla.org): Joomla! offers many of the features of WordPress. Joomla! is a good choice for magazine-style sites and directories because it enables you to create categories and subcategories far more easily than in WordPress.
Drupal (www.drupal.org): Designed by programmers for programmers, Drupal offers more advanced functionality for creating highly complex, interactive websites. Sites where security is a concern (such as the sites for the U.S. State Department, Congress, or many universities) often use Drupal. Drupal is a powerful CMS, but the learning curve is steeper than for WordPress or Joomla!.
You can use Dreamweaver to create and edit templates for any of the content management systems listed here. Before you do, however, you have to set up a web server on your local computer. You learn more about how to work with these programs in the section, Working with Templates in Dreamweaver, later in this chapter.
If you’re interested in learning more about WordPress, check out WordPress For Dummies, 5th Edition, by Lisa Sabin-Wilson (Wiley).
Most of this book is dedicated to helping you create static websites — but that doesn't mean you can't get many of the same benefits of dynamic sites, including the capability to update pages quickly. As you find in this book, you can combine Cascading Style Sheets, or CSS (covered in Chapters 5–8), with Dreamweaver's .dwt template features (covered in detail in Chapter 9) and get many features of a big-budget website without all the complicated programming skills. (You find a general description of Dreamweaver's template features, as well as a look at the differences among templates, later in this chapter.)
Static pages work well for small- and medium-sized websites, such as a professional profile or online gallery. Because static web pages are written in plain text, you can create them in a program as simple as Notepad or SimpleText, although tools such as Dreamweaver make designing pages a lot easier because you don’t have to remember all the cryptic HTML tags.
A static website offers a few advantages, especially if you’re just starting out. A static website
Is easy to learn to develop: Anyone who can resize a photo has a head start on the skills needed to create and arrange graphic elements on a static page.
Gives you complete control over the design of each page: You can tweak the size, colors, fonts, and arrangement of the elements on each page individually, and you can edit templates for these kinds of sites more easily than the templates for dynamic sites.
Is easy to build, test, and publish to a web server: You can create and test static web pages on any personal computer and then host them on any commercial web server — and you need only FTP access (built in to programs such as Dreamweaver) to publish pages to the Internet.
Working with Templates in Dreamweaver
The term template is used in different ways for different kinds of design work (on and off the web), but essentially a template is a shortcut in the design process. By working with Dreamweaver templates, you can set or adjust almost any aspect of a site’s design or functionality, including a header, logo, navigation bar, or sidebar. Whatever you include in a Dreamweaver template, you can then apply to any new page based on the template, which automatically applies the settings you want to appear throughout your site. Moreover, if you want to adjust the overall settings in your site, you can make those updates once in the template, update your pages, and — voila — all pages based on the template are updated automatically.
But not all templates are created equally. Although they all share those basic characteristics, many kinds of templates are in use on the web today. For example, templates for static websites (which you find instructions for creating in Chapter 9) are quite different from the kinds of templates you would use if you were creating a blog with WordPress.
You can download many kinds of templates from the web, but they don’t all work in all programs. For example, if you download templates designed for Adobe Flash, you won’t be able to use them in Dreamweaver (although you can insert Flash files in Dreamweaver, as you discover in Chapter 13).
You can edit many kinds of templates in Dreamweaver. Before you start using Dreamweaver to create or edit templates, however, it’s helpful to better understand how they are different. The following sections cover two of the most common types of templates in use on the web today (and what you should know about how they differ). See the nearby sidebar, So many Dreamweaver template options, for a complete list of template options.
Creating and editing Dreamweaver templates
Dreamweaver templates (extension .dwt) offer many advantages without requiring advanced programming skills. When you create Dreamweaver templates with the .dwt extension, you can use HTML and CSS to create static websites that include many of the high-end features found on dynamic sites — such as the capability to create new pages quickly and to update every page in your site with the click of a button.
Although you can use Dreamweaver to create templates that use advanced programming (such as PHP or Java), the .dwt Dreamweaver template is a much simpler option that's ideal for small- to medium-size websites — which is why I've dedicated much of Chapter 9 to making the most of Dreamweaver templates.
Editing WordPress, Joomla!, and Drupal templates
Templates like the ones you get with a blogging program such as WordPress use the extension .php because they're written in the PHP (Hypertext Preprocessor) programming language. Although you can create PHP pages and templates in Dreamweaver and use them for more than just WordPress, these types of files are far more complex to create than .dwt Dreamweaver templates.
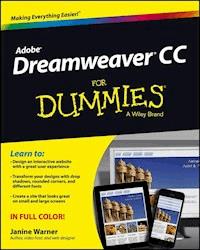
Because so many people use WordPress (such as the blog shown in Figure 1-1) and so many sites offer WordPress template downloads, many people are confused about why WordPress templates don't work in Dreamweaver in the same way that .dwt Dreamweaver templates work.
So many Dreamweaver template options
Dreamweaver supports many kinds of technologies, as well as the templates that go with each. When you create new pages in Dreamweaver by choosing File⇒New, you have the option of creating a blank page or a blank template. When you create a simple HTML template, Dreamweaver uses the .dwt extension. Dreamweaver also supports Microsoft ASP and ASP.NET, and you can create templates using either ASP JavaScript or ASP VBScript (both of which use the .asp extension) — or you can use ASP.NET C# or VB (which use the .aspx extension). The templates for a site created using Java end in .jsp. And if you use Adobe's ColdFusion technology, your templates end in .cfm.
The big lesson is this: Make sure you have the right kind of template for the kind of site you’re creating — and rest assured that Dreamweaver supports just about any kind of technology you can use to create a website.
Figure 1-1: I used WordPress to create this blog on my DigitalFamily.com site.
WordPress templates offer many of the same benefits as Dreamweaver templates — except that templates for blogs such as WordPress draw their content from a database. As a result, they include HTML and CSS (as do the Dreamweaver templates), plus much more complicated code in the PHP programming language, which describes how content from the database should be displayed in a web page.
As a result, to make WordPress, Joomla!, or Drupal templates work in Dreamweaver, you must first set up your computer as a web server and install MySQL and WordPress. Because so many people are using these programs, you can get all the software you need in one nifty package from MAMP.com (for Mac) and XAMP.com (for Windows). You will find links to these tools, as well as instructions for using them to set up your computer as a web server, at www.digitalfamily.com/tutorials/set-up-a-testing-server-on-your-computer/.
Assessing Other Web Design Tools
People who just want to set up a web page as quickly and simply as possible can turn to services that offer what designers call a “website in a box.” Web-based services such as SquareSpace, Sitegrinder, and Zenfolio provide templates you can use to design your site and as well as basic customization, usually for a monthly fee.
Although this approach works for simple sites, these services often promise more than they deliver, especially when it comes to customization or adding new features. Your site may also be vulnerable: If the service ever changes their business model or goes out of business, you can be left at their mercy.
In contrast, Dreamweaver enables you to create a completely custom website and host it on your choice of hundreds of hosting services. If your hosting service raises rates or goes out of business, you can simply move your site to a new host.
Understanding How to Build a Website in Dreamweaver
In a nutshell, building a website involves creating individual pages and linking them to other pages. You need to have a home page, the first page visitors see when they arrive at your web address (also known as your URL), and that page needs to bring them into the rest of the pages of the site, usually with links to each of the main sections of the site. Those pages, in turn, link to subsections that can then lead to deeper subsections.
After you create a website, you can test all the links on your own hard drive and then upload the pages to a web server when everything is ready and working well. You can read more about setting up a site and using Dreamweaver to create pages on your local computer in Chapter 2. In Chapter 4, you discover how to upload your pages to a web server when you’re ready to publish your site on the Internet.
The most important thing to remember is that you need to create a folder on your local computer that will mirror your website on your web server when you publish your site. The site setup process in Chapter 2 is so important because it sets up Dreamweaver to help you create these two versions of your site: the version you create and edit on your computer and the copy you need to maintain on the web server.
Although you have to save all the files in your site in one main folder, you can create subfolders to organize the site. Thus, a key part of planning a website is determining how to organize the pages of your site into sections and how those sections should link to one another. Dreamweaver makes creating pages and setting links easy, but how you arrange the pages and links is up to you.
If you’re just planning to create a small website, you may think you don’t need to worry about how your site will grow and develop. Think again. All good websites grow, and the bigger they get, the harder they are to manage. Planning the path of growth for your website before you begin can make a tremendous difference later. Neglecting to think about growth is probably one of the most common mistakes among new designers. This oversight becomes even more serious when more than one person is working on the same site. Taking a little time to organize the structure of your site, and developing a few consistent conventions for tasks such as naming files, can make everything else go more smoothly.
Managing your site’s structure
Managing the structure of a website has two sides: the side that users see, which depends on how you set up links, and the side that’s behind the scenes, which depends on how you organize files and folders.
What the user sees
The side that the user sees is all about design and navigation. When users arrive at your home page, where do you direct them? How do they move from one page to another in your site? A good website is designed so that users navigate easily and intuitively and can make a beeline to the information most relevant to them. As you plan, make sure that users can
Access key information easily from more than one place in the site
Move easily between pages and sections
Return to main pages and subsections in one step
Setting links is easy in Dreamweaver; the challenge is to make sure that those links are easy for visitors to follow. One of the best ways to ensure that visitors can easily move around your site is to create on every page of your site a navigation or menu bar that includes links to the main pages of your site. You find instructions in Chapter 6 for creating a menu bar with CSS. In Chapter 12, you find out how to use Dreamweaver’s jQuery UI features to create interactive menus with tab groups and collapsible panels. And in Chapter 9, you find instructions for using Dreamweaver’s template and library features, which make menus easier to include on your pages — as well as faster to update if you add or change a menu link later.
What’s behind the scenes
The second side to managing your website structure happens behind the scenes (where your users can’t see the information, but you want some kind of organizational system to remember what’s what). Before you begin designing and linking the pages in your site, think about how to keep track of all the text, images, animations, and other files that make up your site. At minimum, consider the following:
A file-naming system: For example, naming image files consistently can make them easier to find if you need to edit them later. For example, if you use thumbnail images as well as bigger versions, give both files similar names to make it easier to match them later. An easy way to do that is to add th to the thumbnail versions, like this: bird.jpg and bird-th.jpg. Similarly, giving the main section pages in your site names that match the text of the links on your pages can make setting the links easier. For example, if the navigation bar on your home page includes an About Us page and a Contact page, you can easily figure out what page a link should point to if your pages are named aboutus.html and contact.html.
A folder structure: When your website grows past a handful of pages, organizing them in separate folders or directories can help you keep track. Fortunately, Dreamweaver makes this easy by providing a Files panel where you can see all the files of your site — and even move and rename files and folders (see Chapter 2 for more on how to use Dreamweaver’s Files panel).
Exploring HTML, XHTML, and HTML5
Contrary to popular belief, HTML isn't a programming language. Rather, it's a markup language: That is, HTML is designed to mark up a page, or to provide instructions for how a web page should look. HTML is written by using tags, which are markup instructions that tell a web browser how to display the page. For example, to apply italic formatting to text, you (or Dreamweaver) insert the HTML tag <em>, which stands for emphasis, where you want the italics to begin and end. Most tags in HTML include both an open tag and a close tag, indicated by the forward slash /. Thus, to make the name of this book appear in italics, I would write the code like this:
<em>Dreamweaver CC For Dummies</em>
Another challenge of HTML is that the tags have changed over time, and so has the acronym. When I’m referring to the code in a general way, I use the acronym HTML, but the two most popular versions of HTML today are really called XHTML and HTML5.
XHTML, a stricter version of HTML, is still in use on a majority of websites. HTML5, which has garnered lots of hype, is the newest version, and most forward-thinking designers or people who are redesigning older sites are moving to HTML5. Although HTML5 hasn’t been officially approved as a standard, most of the new tags introduced in this latest version are already supported by the latest versions of all major web browsers.
You have two ways to see what the code behind a web page looks like:
In most browsers, choose View⇒Source.
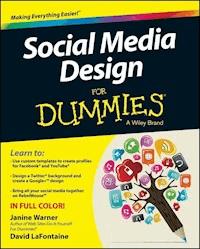
If you’re using Dreamweaver (as shown in Figure 1-2), you can click the Split button (upper-left corner of the workspace) to see the code and the design areas of the program at the same time in Split view.
If you want to see only the code, click the Code button. However, while I'm working on the site design, I find Split view is a useful way to keep an eye on what's going on behind the scenes — and, as a bonus, you can learn a lot of HTML as you go along. Split view also makes it easy to find code related to a specific element or section of text. In Figure 1-2, for example, I've selected the headline in Design view, and Dreamweaver automatically highlighted the same text in Code view, making it easy to see that the headline is formatted with the <h1> tag.
Photos by Casey Stoll
Figure 1-2: Use Split view in Dreamweaver to display the page design and the code behind the page.
How web browsers work
Web browsers such as Internet Explorer, Firefox, Chrome, and Safari are designed to decipher HTML, CSS, JavaScript, and other code — and display the corresponding text, images, and multimedia on a computer screen. Essentially, browsers read the code in a web page and interpret how to display the page to visitors. Unfortunately, because web browsers are created by different companies and the code they display has evolved dramatically over the years, not all web browsers display web pages the same way. Differences in browser display can lead to unpredictable (and often frustrating) results because a page that looks good in one browser may be unreadable in another. For more information on browser differences and testing your pages to make sure they look good to all your visitors, see Chapter 4.
Dreamweaver offers four view options:
Code view: In Code view, you see only the HTML and other code.
Split view: In Split view, the page is divided so you can see the code in one part of the workspace and a view of how the page should be displayed in a web browser in the other part.
Design view: In Design view, you see only the page as it should be displayed in older web browsers.
Live view: In Live view, you get a more accurate preview of how your pages will look in the latest web browsers, and you get an interactive view, where you can test rollovers and other interactive features without having to leave Dreamweaver and launch another program.
In Dreamweaver’s Split view, the Code and Design views are integrated. If you select something in Design view — say, the headline shown in Figure 1-2 — you see the same text highlighted in Code view, enabling you to find your place easily in the code.
Here are a few points to help you better understand the similarities and differences among older versions of HTML as well as XHTML and HTML5:
All versions of HTML include tags that are designed to be hierarchical. Examples arethe <h1> (heading 1) through <h6> (heading 6) tags, which are ideally suited to formatting text according to its importance on a web page. Reserve the <h1> tag for the most important text on the page, such as the top headline. The <h2> tag is ideal for subheads or secondary headings, <h3> for the third level of headings, and so on. A headline formatted with the <h1> tag looks like this:
<h1>This is a headline</h1>
HTML5 adds new tags. HTML5 adds a collection of tags designed to make webpages more semantic, or more meaningful. New tags, including <header> and <footer>, can be used to identify the type of content in a webpage.
XHTML tags must be written in lowercase. HTML5 and older versions of HTML are not case sensitive.
In XHTML, all tags must include the closing slash. A few tags can stand alone, such as the <br /> tag, which adds a line break. As a rule, XHTML tags must have a close tag, even if there's only one tag, and the close tag must always contain a forward slash (/). Thus the line break tag is <br> in HTML and <br /> in XHTML.
Some tags are more complex, and the open and close tags don’t always match. More complicated tags, such as the tags used to create links or insert images into pages, are more challenging to use because they include link information, and the close tag doesn’t always match the open tag. For example, the code to create a link to another website looks like this:
<a href="http://www.digitalfamily.com">This is a link to DigitalFamily.com</a>
At their heart, all versions of HTML are just text — and believe it or not, you can write HTML in a plain-text editor as simple as Notepad, SimpleText, or TextEdit. However, you have to be careful to type all the code perfectly because there is no room for error or typos in HTML. After writing code yourself, even to create a simple page, you’re sure to appreciate how wonderful it is to let Dreamweaver write the code for you.
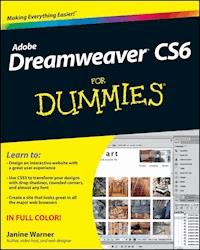
If (at first glance) you think that HTML code looks like hieroglyphics, don't give up too quickly. With just a little practice, you can start to recognize at least the most common tags, such as <h1> (heading 1) tag used to format the headline shown in Figure 1-3.
Figure 1-3: A heading 1 tag highlighted in Code view.
Comparing Tables, Frames, and Layers
If you’ve already done a little web design, you may be wondering what happened to some of the old ways of creating web page layouts. For years, web designers used the HTML feature called tables to create page layouts. Then frames came along, and many people were excited by the capability to display multiple pages in one browser window (which frames and iFrames make possible). Then came layers, which were especially popular among designers because they seemed to offer precise design control.
Today, most professional designers agree that the best way to create a web page design is to use HTML with Cascading Style Sheets, which are covered in detail in Chapters 5–7. In Chapter 8, you find out how to use Dreamweaver’s new fluid grid layouts to combine one HTML file with multiple sets of style sheets to create responsive designs that work well on both small mobile screens and large monitors.
Over the years, all these other options have become less desirable except in a few special cases. In this section, you find a quick review of when tables, frames, and layers may still be useful.
Creating page designs with HTML tables
In the early days of web design, most page layouts on the web were created with tables. By merging and splitting table cells and even adding background images, designers created complex web designs. CSS expands upon this concept by adding many new design options — including the capability to add precise margins and padding around elements, which offers better control of how and where background images appear.
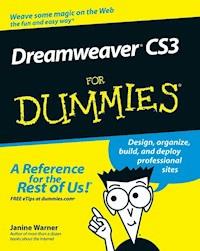
Figure 1-4 provides an example of an old-school site created with the HTML table tag. Most designers turn off table borders by setting the table border to 0 to create cleaner layouts, but in Figure 1-4, I've set the borders to 2 pixels so you can see the outline of the table. Table cells surround each of the photos and captions in this two-column layout; I've merged the columns at the top of the design to make room for the banner image, which spans the full width of the page.
Photos by Janine Warner
Figure 1-4: In the old days, complex web page designs used HTML tables to control text and image placement.
Although tables are no longer recommended for creating page layouts, they’re still considered the best way to format tabular data like that you’d find in a spreadsheet program. You can use tables to format a consistent collection of information — such as the table listing the winners of the chocolate game, as shown in Figure 1-5. (You find out how to create tables to format tabular data, like the table shown in Figure 1-5, in Chapter 10.)
Although I recommend that you redesign sites like the one shown in Figure 1-4 with CSS and <div> tags, I do understand that some designers still find it easier to create layouts with tables, and not everyone has time to redesign their websites right away. I have to admit, I've been guilty of leaving online a few sites designed with tables long after I knew better. I recommend using only CSS today for all your web page layouts — except when you're creating a layout for tabular data. Even then, I still urge you to use CSS to add any styling (such as background colors or padding) that you might want in your tables.
Photos by Janine Warner
Figure 1-5: Tables are still the best way to display tabular data in columns and rows.
Considering design options with HTML frames
You won’t find any instructions in this book for creating websites that use frames, such as the website about flamingos shown in Figure 1-6. Frames enable you to display multiple web pages in one browser window. Although frames are still used on a few sites on the web, most designers don’t like them because they can make navigation confusing to site visitors.
Frames are also problematic because when you use frames, the URL at the top of a web browser does not change, even when you click links and change the pages displayed within the frames. As a result, you can only bookmark (create a link to) the first page of a site that uses frames. Worse yet, search engines have a hard time properly indexing a site designed with frames — which can diminish your site’s search engine ranking.
Figure 1-6:


