Erhalten Sie Zugang zu diesem und mehr als 300000 Büchern ab EUR 5,99 monatlich.
- Herausgeber: Design Originals
- Kategorie: Lebensstil
- Sprache: Englisch
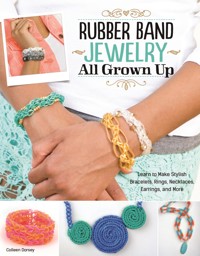
Move over, kids… rubber band jewelry is much too cool to leave to the younger set! This book takes rubber band accessories out of the schoolyard and onto the fashion runway. Rubber Band Jewelry All Grown Up provides innovative designs, expert instructions, and elegant inspiration for every jewelry maker who is young at heart. Express yourself with the bright colors and fun styles of the rubber band craze. This book features original projects for stylish and sophisticated street fashion. Clear step-by-step instructions, numbered diagrams, and gorgeous color photographs make it easy. You'll discover how to create surprisingly chic bracelets, rings, necklaces, earrings, and more, embellished with baubles, beads, buttons, and jewelry findings.
Sie lesen das E-Book in den Legimi-Apps auf:
Seitenzahl: 44
Veröffentlichungsjahr: 2014
Das E-Book (TTS) können Sie hören im Abo „Legimi Premium” in Legimi-Apps auf:
Ähnliche


Rubber bandjewelry isn’t justfor kids anymore.
When the rubber band jewelry trend hit stores and homes nationwide, it was embraced by children, who took the bright colors and funky designs and went crazy. But with the right styling, accessories, beads, and designs, rubber bands can also be transformed into fun young adult and adult styles suitable for everything from everyday wear to parties, weddings, and the like. All you need to do is get a little creative with the seven basic designs found in this book to make stunning pieces you’ll wear for years to come. So take a look at what these pages have to offer, head to your local craft stores to pick up the bands, beads, and findings, and take rubber band jewelry into a new age!
Contents
Getting Started
Tools and Techniques
Making the Basic Bracelet on a Loom
Designs
Basic Link Love
Fishtail
Vine
Ladder
Nesting
Triple
Triple Cuff
Tools and Techniques
TOOLS AND MATERIALS
To get started, you’ll need four basic items, most of which are available at your local craft store. You’ll need:
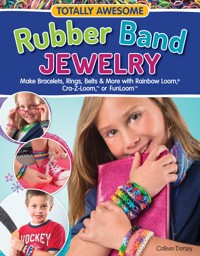
✫ A loom for rubber band jewelry (such as Rainbow Loom®, Cra-Z-Loom™, or FunLoom™)
✫ Small plastic clips (C or S clips are best)
✫ Rubber bands (½" to ¾" [1.5 to 2cm] in diameter)
✫ A small crochet hook
To make the more ambitious and stylish projects in this book, you’ll also need:
✫ A variety of beads
✫ Jewelry findings and closures
✫ Jewelry pliers, wire cutters, and scissors
✫ Thread
Looms can be purchased as kits that include all four of the basic items needed. Rubber bands, looms, clips, beads, and other tools and supplies can all be found online and at your local craft stores. Different looms have different numbers of rows or columns. All the projects and diagrams in this book show the Rainbow Loom®, but most projects are compatible with many looms. Simply follow the diagrams and instructions exactly; you may just have unused rows or columns of pegs.
USING JEWELRY FINDINGS AND CLIPS
To make your finished pieces look polished, use real jewelry findings like clasps, connectors, jump rings, split rings, and the like to complete your projects. That being said, the plastic clips that come with looms and bands are invaluable for use while your projects are still in progress, because they attach easily and don’t fall off. Just keep the weight of the jewelry clasps in mind when choosing them; heavy ones might outweigh the bands, making for an unbalanced project, so sometimes just a simple jump ring is best.
MAKING BEADED BANDS WITH THREAD
A simple piece of sewing thread is your best friend when using beads for your pieces. Many beads have tiny holes that are impossible to thread thick rubber bands through with your fingers. But thread makes some of the tiniest holes workable. Cut a piece of thread about 9" (23cm) long; any longer and you’ll waste time pulling the beads and bands onto it; any shorter and it will be difficult to keep a grip on and manipulate. Follow the instructions below to learn how to thread a bead onto a band.
Thread one end of your thread through the rubber band that you want to bead.
Match the two thread ends together, and then twist or wet the ends so they stick together.
Thread the two thread ends together through a bead or beads, however many you want on the band.
Holding the thread tightly in one hand, pull the bead(s) onto the band, stopping when the loops on either side of the bead arethe same size. Don’t be afraid to pull hard through stubborn beads.
BENDING AND CUTTING WIRE
Thin or thick jewelry wire can be used to create rubber band pieces that hold their shape. Use a strong jewelry wire cutter to snip wire lengths with one clean cut; if you have to squeeze repeatedly or bend the wire to get it to cut, you’ll probably end up scratching the wire or creating a jagged end. Be careful when working with wire, as it’s not pleasant to poke yourself under a fingernail (or anywhere) with a pointy end. You can use a metal file to smooth jagged or pointy wire ends or use needle nose pliers to curl the end back into the piece of jewelry so it doesn’t scratch or snag clothing. When manipulating wire, nylon coated jewelry pliers will give you a cleaner look, as they don’t scratch or indent the wire like metal pliers sometimes do.


