Erhalten Sie Zugang zu diesem und mehr als 300000 Büchern ab EUR 5,99 monatlich.
- Herausgeber: Fox Chapel Publishing
- Kategorie: Lebensstil
- Sprache: Englisch
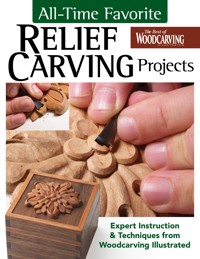
Step into the ancient art of relief carving with a priceless selection of the latest trends and projects! All-Time Favorite Relief Carving Projects. With projects that run the gamut from classic to trendy, All-Time Favorite Relief Carving Projects will teach you how to master relief wood carving with a minimal learning curve. Want to build your own fairy door, ornaments, whimsical bank, Halloween candy holder, or wall hanging? They're all here. Or indulge your creative side with Celtic knots, nature scenes, angels, animals, or green men. Even better, it's appropriate for woodcarvers of any skill level. Hone your skills by practicing fundamental patterns. Or, if you're already a relief carving regular, go straight to the advanced projects and try your hand at household fixtures that will wow your guests. Featuring popular woodworking authors like Dustin Strenke, Lora Irish, Lisa Laughy, Shawn Cipa, Ivan Govaerts, Mark Fortune, Dylan Goodson, Lucy Fox, Robert Kennedy, Beth Lewis, and Mary May, this volume is the ultimate woodworking guide for anyone who wants the latest and greatest in relief carving techniques.
Sie lesen das E-Book in den Legimi-Apps auf:
Seitenzahl: 181
Veröffentlichungsjahr: 2025
Das E-Book (TTS) können Sie hören im Abo „Legimi Premium” in Legimi-Apps auf:
Ähnliche


© 2025 by Fox Chapel Publishing Company, Inc.
All-Time Favorite Relief Carving Projects is an original work, first published in 2025 by Fox Chapel Publishing Company, Inc.
The patterns contained herein are copyrighted by the authors. Readers may make copies of these patterns for personal use. The patterns themselves, however, are not to be duplicated for resale or distribution under any circumstances. Any such copying is a violation of copyright law.
All rights reserved. No part of this publication may be reproduced, stored in a retrieval system or transmitted, in any form or by any means, electronic, mechanical, photocopying, recording or otherwise, without the prior written permission of the copyright holders.
ISBN 978-1-4971-0537-9
eISBN 978-1-63741-211-4
Library of Congress Control Number: 2025900053
To learn more about the other great books from Fox Chapel Publishing, or to find a retailer near you, call toll-free at 800-457-9112 or visit us at www.FoxChapelPublishing.com.
You can also send mail to:
Fox Chapel Publishing
903 Square Street
Mount Joy, PA 17552
We are always looking for talented authors.
To submit an idea, please send a brief inquiry [email protected].
Because working with wood and woodworking tools inherently includes the risk of injury and damage, this book cannot guarantee that creating the projects in this book is safe for everyone. For this reason, this book is sold without warranties or guarantees of any kind, expressed or implied, and the publisher and the author disclaim any liability for any injuries, losses, or damages caused in any way by the content of this book or the reader’s use of the tools needed to complete the projects presented here. The publisher and the author urge all readers to thoroughly review each project and to understand the use of all tools before beginning any project.
For a printable PDF of the templates used in this book, please contact Fox Chapel Publishing at [email protected], with All-Time Favorite Relief Carving 978-1-4971-0537-9 in the subject line.
Introduction
Relief carving is a distinct and sophisticated form of woodworking that requires precision, insight into material properties, and an understanding of complex techniques. All-Time Favorite Relief Carving Projects is designed to demystify the process of relief carving, providing woodworkers of all skill levels with the necessary tools and knowledge to excel in this craft.
This book begins with a thorough examination of the tools essential for relief carving, detailing their specific uses and handling to maximize their effectiveness. We delve into the variety of woods most suitable for relief projects, discussing their characteristics and how they influence the carving process.
Key techniques are the cornerstone of this guide. You’ll learn critical skills, such as the execution of undercuts and stop cuts, how to approach building layers in your carving, and a variety of finishing techniques—to name just a few. These methods are vital for achieving the depth and detail that relief carving is known for.
Additionally, the book addresses the efficient use of resources in the workshop. By focusing on projects that vary in complexity, carvers can gradually build their skill set without significant waste of materials or time. This approach ensures that each project not only enhances your proficiency but also contributes to a broader understanding of woodworking.
Whether you’re looking to refine your technique or start a new journey in woodworking, this book provides the guidance and expertise necessary to undertake any relief carving project with confidence.
Table of Contents
Introduction
Getting Started
Relief Carving Woods
Relief Carving Tools
Relief Carving Tips and Techniques
Beginner Projects
Bark Fairy Door
Crescent Moon
Holiday Star
Twig and Leaf Drawer Handles
Sailboat
Floating Leaf
Frank the Sweet Greeter
Flower Barrette
Miniature Acanthus
Intermediate Projects
Honeybee
Flower Garland in Mahogany
Rosette
Celtic Knotwork
Botanical Woodblock Print
Sunken Greenman
Fall Scene in Low Relief
Noah’s Ark Relief Scene
Traditional Ornament
Whimsical Bank
Advanced Projects
Oak Leaf Frame
Stylized Angel
Relief Landscape
Elegant Floral Relief (Daylily)
Patterns
About the Authors
Getting Started
Before you dive into the intricate world of relief carving, it’s important to set a solid foundation. This chapter will introduce you to the essential tools and materials you’ll need, from selecting the right kind of wood to choosing the best carving tools for different textures and effects. We’ll also cover setting up your carving space to optimize safety and comfort, ensuring that you can focus on enjoying the creative process. Whether you’re setting up a small corner of your home for carving or have access to a full workshop, these guidelines will help you begin your carving journey on the right foot.
What’s a Janka Rating?
The Janka scale is used to determine the relative hardness of domestic or exotic wood species. The Janka test measures (in pounds-force) the force required to embed a 0.444” steel ball into the wood to half of its diameter. For perspective, the softer woods have values near 300—the hardest, upwards of 4000.
Relief Carving Woods
Experienced carvers will tell you to find a source for properly seasoned wood with solid carving capability. It may require a short drive to a lumberyard, or a package delivery from a hardwood seller across the country, but getting good carving stock is paramount to your future as a carver.
The following woods will provide you with many hours of pleasurable carving, present surmountable challenges, and yield beautiful finished carvings.
Eastern White Pine
A great choice for new carvers, pine carves with little effort compared to most hardwoods. Pine has straight and even grain, and is lightweight, inexpensive, and easy to find, making it a contender for your go-to practice blanks. You can use almost any blade on pine, but make sure your tools are sharp, as pine will frequently chip out when cut with a dull blade. It glues, sands, and paints well, but resists staining because of its resins.
Eastern White Pine, Janka value: 380
Basswood
Check the Materials & Tools listings in any project in WCI and, more likely than not, this is the wood used. Classified as a hardwood, it is easy to carve. The grain is straight with few blemishes and holds fine details. It carves well with or across the grain. Basswood sands nicely and accepts glues, stains, and paints. A favorite wood for relief, caricature, and chip carving, it carves cleanly with edged tools.
Basswood, Janka value: 410
Butternut
Referred to as “white walnut,” this hardwood is fairly easy to carve. The grain is straight yet distinctive. It carves well with the grain, resulting in a polished look. Cross-grain cutting requires extremely sharp tools to prevent splitting. Butternut is used for carving in the round, relief, and chip carving. The true beauty of the wood becomes apparent when the carving is finished with oil.
Butternut, Janka value: 490
Mahogany
Considered an exotic hardwood, mahogany is a carving staple. Maintaining sharp edges on your tools lets you cut mahogany without heavy effort. It carves well with the grain but may want to split in crosscuts. It holds detail well, and small files and rasps will help you shape in tight places where carving tools may break the wood. It works with palm and long-handled tools as well as power carving burrs.
Mahogany, Janka value: 800
Water Tupelo
Tupelo is prized by wildfowl and fish carvers. The wood is super lightweight and floats perfectly for duck decoys. Because of its fine texture and interlocked grain, it power carves beautifully with virtually no fuzz-up. It holds fine details, woodburns nicely, and paints exceptionally well. Tupelo will carve cleanly with a knife but can be a challenge with other edged tools.
Water Tupelo, Janka value: 870
Cherry
Long valued for cabinetry, cherry has found favor in carving circles, as well. Its heartwood is preferred and ranges from pink to red in color. The grain is even, tight, and lightly figured, and holds detail well. When the wood is green, it carves more easily. When fully dry, cherry can become too hard to whittle, but it is ideal for relief and power carving. Cherry is also a perfect wood for making spoons and cutting boards.
Cherry, Janka value: 950
Walnut
The appeal of this wood lies in its rich brown color and subtle grain figuration. The hardest wood in this listing, walnut can be carved with hand and rotary tools. You can get finer details with gouges and palm tools. It may require more deliberate effort and sharp tools, but carvers agree that it’s worth it. Walnut works for all types of carving and appears incredibly rich when finished with oil.
Walnut, Janka value: 1010
Relief Carving Tools
Essential Gouges
While there are nearly more specialty tools and gouges than one could name, there are a handful that any aspiring relief carver should have in their arsenal. Along with your standard carving knives, the gouges listed here will equip you to make any of the projects in this book. In a later section, we will discuss specialty tools that may help make your carving experience even more enjoyable (here.)
Straight Gouge
The straight gouge is a fundamental tool in any woodcarver’s kit, characterized by its flat, uncurved cutting edge and cylindrical profile. This tool is indispensable for making smooth, flat cuts across the grain or along the wood’s surface. Its straightforward design makes it perfect for quickly removing wood and smoothing out areas, allowing for precision and control in both rough shaping and finer finishing tasks. Ideal for beginners and experts alike, the straight gouge is a versatile implement suited for a variety of carving projects.
U-Gouge
The U-gouge is another fundamental tool in the repertoire of any woodcarver, distinguished by its U-shaped curved cutting edge that is indispensable for scooping out large areas of wood. This tool is ideal for creating deep, smooth hollows and rounded channels in wood, facilitating rapid material removal while maintaining a clean surface. U-gouges come in various sizes, each designated by the width of the cutting edge and the sweep of the curve, allowing for a range of applications from roughing out to more detailed and refined carving. Their ability to carve wide, yet precise, grooves makes them especially valuable in shaping and defining the contours of both artistic sculptures and functional woodwork.
V-Tool
The V-tool, often called a parting tool, is distinguished by its V-shaped cutting edge that makes it ideal for creating sharp, clean lines and adding fine details to your work. This tool excels in carving crisp, linear details, such as veins in leaves or decorative outlines. Its angled sides allow for precise cuts that create distinct textures and patterns. When using the V-tool, it’s best to apply consistent pressure and work along the grain to prevent the wood from splitting, thereby achieving smooth and consistent grooves that enhance the overall visual appeal of the carving.
Spoon Gouge
This tool’s spoon-shaped design allows you to carve concave areas where traditional straight gouges won’t fit. The gouge’s design gives you less resistance, allowing you to glide easily through cuts. Since you are scooping into the wood, it’s better to make small, shallow cuts, slicing your way down to the depth, than making one aggressive cut.
Back-Bent Gouge
The back-bent gouge looks similar to the spoon gouge, except the cutting edge is reversed (convex instead of concave). This tool is excellent at removing wood on the underside of your piece. For example, when using it on the leaves, you can create deep undercuts, creating shadows and depth.
Fishtail Gouge
This specialized woodcarving tool characterized by its flared, fishtail-shaped end, which allows for precision and accessibility in tight spaces. Its unique design is ideal for detailed work in corners and intricate patterns, offering a mix of fine detailing and the ability to remove larger amounts of wood. This gouge is essential for carvers who need precision and control in their projects, making it a valuable addition to any woodcarving toolkit.
Specialty Tools
You may need more precise tools to tackle more intricate projects. You can source relief carving tools from a range of specialty woodcarving tool manufacturers. Here are a few you may not have tried:
Skew Chisel
This is such a versatile tool. An angled blade makes it easy to cut with and against the grain. The size of this 5/16" (8mm) palm skew chisel will allow you to get into tight areas, such as between the leaves.
Dental Pick
This is a great tool to reach into all the nooks and crannies of your carving.
Skewed Spoon Gouge
Like the name suggests, it’s a skew chisel with a spoon’s shape. A fantastic tool for reaching deep into your carving to clean up those hard-to-reach angled corners with ease. If your budget allows it, purchase these tools as a mirrored pair.
Dogleg Skew Chisel
This 90-degree bent skew chisel is perfect for leveling out the background of your relief carving or to reach into deep nooks and crannies.
Bent V-Parting Tool
This is like the traditional V-parting tool, except it has a spoon shape bent toward the cutting edge. This allows you to get into areas of the carving that a straight V-parting tool would not be able to reach.
Micro Gouges
Micro gouges are designed for precision and detail in woodcarving, particularly useful in miniature and intricate projects. Characterized by their very small, finely shaped cutting edges, these gouges allow carvers to achieve extremely detailed and delicate work that larger gouges cannot handle. Micro gouges come in a variety of shapes including U-shaped, V-shaped, and spoon-shaped, each tailored for specific types of cuts, from tight curves and corners to fine lines and texturing. Their small size and precise cutting capability make them indispensable for adding subtle details and textures to smaller carvings, enhancing the overall intricacy and finesse of the artwork.
Tip: Keeping Gouges Sharp
Using a strop regularly helps maintain the edge of your gouges, minimizing the need for more abrasive sharpening methods like stones.
1. Clean the Gouge: Remove any debris or residue from the blade using a cloth.
2. Prepare the Strop: Apply honing compound to the leather strop to enhance the sharpening process.
3. Stropping the Gouge: Hold the gouge at a consistent angle (typically 20-25 degrees). Use a smooth, sweeping motion to slide the cutting edge across the strop, being careful to cover the entire curvature of the edge. Repeat this process 10-15 times on each side of the gouge.
4. Check for Burrs: Feel for any small burrs on the back edge of the gouge and lightly strop the back side, if necessary.
5. Test the Sharpness: Test the gouge on a piece of scrap wood to ensure it cuts cleanly and effortlessly.
Relief Carving Tips and Techniques
If you’re just getting started in relief carving, there’s a lot to take in. This section discusses making your own relief carving panels, pattern transfer, finding carving depth, and sanding and finishing. As you pick up new tricks and techniques, be sure to incorporate them into your toolkit and carry them with you throughout your carving journey.
Flat relief panels cup after carving, as shown, unless slight bow is designed into the carving panel.
Making Your Own Relief Panels
Learning how to make your own relief panels is an important technique to counteract the tendency of flat panels to warp and cup as you carve (see Figure 1). This simple, straightforward, and time-tested “camber method” lets you construct panels that are stable and attractive, allowing you to focus on your carving.
To build camber (or convexity) into relief panels, you’ll laminate a number of wood pieces together. The following steps and illustrations explain how this method works. To make your own panels using this method, you’ll need a saw capable of cutting and ripping boards, a planer, a jointer, yellow carpenter’s glue, pipe clamps, and C-clamps.
Step 1. Cut the pieces to length and rip them to widths of 3"–4" (7.6–10.2cm). Plane them to a uniform thickness.
Step 2. Mark the surface of each board that will appear on the carved side of the panel. If possible, you’ll want to choose the sapwood side of the board because it will have growth rings with a larger arc. Use the heartwood side for the back of the panel because those growth rings have a smaller arc. The sapwood also tends to be lighter than the heartwood, and the lighter sapwood enhances the appearance of the finished carving.
Step 3. Arrange the boards as they will appear in the finished relief panel, and get the jointer ready. Set the jointer fence to either 91 or 92 degrees, deviating one or two degrees from the typical 90 degrees (see Figure 2). This way, when the boards are joined edge to edge, they will form a curvature similar to that of a wooden barrel (see Figure 3).
Step 4. Glue the boards together with yellow carpenter’s glue. Place pipe clamps across the boards and C-clamps at each joint to prevent the boards from moving out of position (see Figure 4). After the pipe clamps are tightened, the C-clamps can be removed.
Step 5. The result is a panel that is convex on the side to be carved (see Figure 5). During the carving process, the panel cups towards the carved side as predicted, using up most of the camber built into the panel. However, some camber should remain. If the finished carving is hung on the wall, the remaining camber will not be visible, but it actually aids in the hanging of the carving.
Figure 5. When relief panel boards are glued up, a slight bow should result. Carving the covex side causes the panel to flatten out.
Pattern Transfer
When it comes to transferring the pattern to the wood, we recommend one of three techniques:
1. Using a craft glue stick, apply the pattern directly to the wood. With this technique, you need to sand off the excess paper and glue before applying the finish.
2. Place a sheet of graphite transfer paper between the wood and the pattern, using blue painter’s tape to hold into place. Then, using a stylus tool or ballpoint pen (a pencil may tear the pattern), trace the pattern, transferring the image onto the wood.
3. Use a pounce wheel tool to carefully trace over the pattern. This tool will leave tiny indentations in the wood. Then, using a pencil, connect these tiny indentations to reveal the blueprint image.
Tip: Ebony and Ivory
Graphite transfer paper comes in black and white. Use white to transfer images to darker woods, so you can easily see the image.
Measuring Depth
When carving deep-relief projects, it’s important to know how deep you are carving into the project because wood expands and contracts based on temperature and humidity changes. If you remove too much wood from the background, your project can cup or warp, creating small cracks in the delicate portions of your carving. To minimize this process, leave more wood than you take away, and don’t carve lower than half the thickness of the wood. To help stick to these guidelines, measure the depth as you carve by making a depth gauge from paper stock and making two marks on your gauge. One marks the thickness of the wood (in this case, it’s ¾" [19mm]), and the other marks a little over half that height (⅜" [10mm]). Then, shade the upper portion red. Next, from the back of the plaque, slide the gauge into the saw kerf with the ¾" (19mm) mark flush with the plaque. Then, view the gauge from the front of the plaque; if you don’t see red, you didn’t go past the halfway mark.
Use a depth gauge (you can make one out of cardstock) to check your carving depth as you go.
Sanding
To sand your finished carving, place a sheet of 120-grit sandpaper on a flat surface and, while holding the plaque on its edges, carefully sand the entire front and back of the plaque, going in the direction of the grain. Depending on the pattern transfer technique you used, repeat this process (and vacuum the sawdust from the project frequently) until you remove all the residual pattern, glue, and/or pencil markings. Move to 150-grit sandpaper and repeat. During this process, you might unintentionally sand some of your carving. Look it over and fine-tune those areas.
Applying a Finish
Apply all finishes in a well-ventilated area, wearing disposable rubber gloves and eyewear. Always practice on scrap wood first to make sure you like the look. Also be sure to dispose of your rags and brushes carefully; finishes may generate heat as they cure or when reacting to oxygen in the air and can spontaneously combust. Here are a few that work well:
Wipe-On Polyurethane: Using a disposable paintbrush, apply a liberal amount of wipe-on polyurethane (satin or gloss, depending on your preference), and immediately wipe it off using a cotton rag. Use an additional disposable brush and/or rag to remove any excess puddling in the nooks and crannies. Allow the finish to dry, following the manufacturer’s instructions. Using very fine steel wool (grade #0000), carefully buff the finish and remove (with a vacuum or soft brush) any steel wool debris. Apply a second coat of wipe-on polyurethane using the technique previously described.
Boiled Linseed Oil and Howard Feed-N-Wax: Apply a liberal amount of boiled linseed oil over the entire carving using a disposable brush. Let it soak into the carving for about seven minutes, and remove the excess by rubbing with a clean rag. Allow the finish to dry for at least three days. Next, apply Howard® Feed-N-Wax with a disposable brush. Let it set for at least 20 minutes, and then rub off the excess. Buff using a shoe brush, and set aside to dry for two days.


