Erhalten Sie Zugang zu diesem und mehr als 300000 Büchern ab EUR 5,99 monatlich.
- Herausgeber: IMM Lifestyle Books
- Kategorie: Lebensstil
- Sprache: Englisch
Designed to cover all the skills presented in a trade school course, this photo-illustrated self-teaching guide can help the reader land an entry-level cake-decorating job or start an independent business. And those who already work in the field will find it an excellent way to enhance their expertise. It goes through everything, from the basic equipment—such as turntables, icing bags and tips, spatulas and combs, stencils and picture presses—to working with marzipan, sugarpaste, and royal icing, to advanced techniques such as piping, crimping, and creating sugar flowers. With detailed instructions for cake storage and transportation, conversion tables, and a comprehensive recipe section, this an invaluable kitchen reference for any baker.
Sie lesen das E-Book in den Legimi-Apps auf:
Seitenzahl: 188
Veröffentlichungsjahr: 2017
Das E-Book (TTS) können Sie hören im Abo „Legimi Premium” in Legimi-Apps auf:
Ähnliche


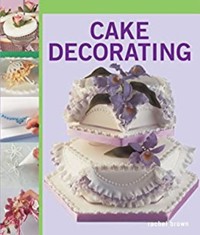
PROFESSIONAL
CAKE DECORATING
PROFESSIONAL
CAKEDECORATING
RACHEL BROWN
contents
introduction
the tools
sugarpaste
royal icing
sugar flowers
cake tops
wedding cakes
the essentials
introduction
Cake decorating is an art which can be practised at different levels. This book is designed to help you improve on basic skills by taking you through several designs which use sugarpaste (rolled fondant or ready-to-roll icing), royal icing and sugar flowers. The ideas and techniques are all easy to learn and you can adapt them to suit cakes for any occasion. You don’t need to be a brilliant designer; you just need a love of cake decorating to produce something really special.
I have used my years of teaching experience to write this book. I have based it on the many different courses I have taught and have tried to keep everything simple instead of getting into complicated measurements.
The sugarpaste cakes have been designed with the term “cut-out work” in mind and all the techniques are based around this. The royal icing is all geared towards piping skills; I have included basic and more advanced techniques so that you can stretch yourself as you feel ready. You will find many of the cutters have been used several times so that each one becomes a multifunctional cutter, which makes them a great investment. The cakes in both mediums gradually progress to a new level of difficulty, with extra ideas and techniques in between.
The basics of cake design never change; what changes are people’s ideas of what they expect from a cake and what it is meant to represent. Don’t allow yourself to be pushed into doing what you feel is beyond you, but remember it never harms to stretch yourself.
Whether you are working from home or doing a college course, I hope you will find this a helpful reference book to consult.
tools required for working with sugarpaste (see chapter 2)
1 Long non-stick rolling pin
2 Sugar shaker
3 Marzipan spacers if you wish to use them
4 Paste colours
5 Cake smoother (flat and side smoother)
6 Small sharp knife
7 Large flat dusting brush
8 Crimpers
9 Scribers (scalpels)
10 Sugar glue
11 Circle cutters
12 Posy picks
13 Tilting turntable
• Two pastry brushes – one for jam; one for water
• Palette knife (metal spatula)
tools required for working with royal icing (see chapter 3)
1 Crank-handled round-ended palette knife (metal spatula)
2 Metal icing rule
3 Metal side scraper
4 Turntable – a tilting one is really useful and is worth paying extra for
5 Piping (decorating) bags
• Selection of piping tubes (nozzles)
• Large flat dusting brush
• Small sharp knife
• Damp cloths - always useful to have to hand
tools required for making flowers with flower paste (see chapter 4)
To make flowers with flower paste you do need special equipment but you will find you use the tools over and over again – making them great value for money.
1 Non-stick rolling board – these are available in a number of sizes and colours
2 Non-stick rolling pin – these are worth the money because they are so useful
3 Balling/bone tool – used for giving your flowers movement
4 Veining tool – the ideal tool for putting veins on sugar flowers
5 Small sharp scissors
6 Arum lily cutter – these come in a wide selection of sizes; several sizes are used throughout the book, but the tiny ones can be seen on page 84
7 Sugar glue – this can be bought ready-made or made at home
8 Coloured semolina – just mix food dust in with the semolina to colour it; it is so useful for so many flowers. Store in a small pot so you can use it when required; it keeps for a long time
9 Plunger blossom cutters – available in a few makes, but the PME range comes in a huge number of sizes
10 Small and medium calyx cutters
11 Palette knife (metal spatula) – a crank-handled (angled) one is preferable. It helps you lift your fine paste work
12 Sugar craft wires – they come in a variety of sizes. The higher the number, the thinner the wire. Available in greens and white.
13 Dry flower oasis can be purchased from any hobby store or florist. Cover it in cling film (plastic wrap) to prevent bits breaking off and getting on your cake work
14 Florist tape – in a number of different colours
15 Veiner – to give each leaf a realistic, natural look
• Balling mat – you place your cut-out flower shape on this to ball it
• Non-stick small stick – this is useful for the small delicate work
• Daisy cutters – there are so many on the market to choose from, all giving different effects. I use the Orchard product range, but the FMM Daisy collection set is excellent as well – it just gives finer petals
• Plastic cocktail sticks (toothpicks) – try to get plastic as you don’t want the splinters the wooden ones may leave behind
• Small paintbrush for applying sugar glue
• Large flat dusting brush, to dust your flowers with
• five-petal blossom cutter – available in a vast array of sizes so you can vary the size of your work
• Food dusts and food paste colours – build up a collection of colours as you take on more work
• Small amount of white vegetable fat (vegetable shortening) – keep it in a small tub with your equipment
• Stamens – artificial flower stamens made from stiffened cotton come in a vast array of colours and are available from sugar craft shops
It really is worth buying good-quality metal equipment as it will give a much better result. These tools should last a lifetime if they are looked after properly. Keep them wrapped up between uses to keep them from getting scratched.
cake boards
Use a cake board that is at least 7.5cm (3in) larger than your cake to give it the best effect when finished. It is visually pleasing to ice the board and carry the design from the cake on to the board.
If you follow the collar design (see page 73), then you will need to make sure that your board is a minimum of 10cm (4in) larger than your cake. It would be terrible if you completed your cake with your collar looking beautiful, only for it to get broken as it overhangs the board.
making a piping bag
method
1 To make a piping (decorating) bag, cut some greaseproof (waxed) paper into an equilateral triangle.
2 Pick up corner C and fold it over to the dotted line, so that a sharp cone shape forms at B.
3 Wrap corner A around the cone.
4 Make sure A and C are at the back of the cone and that the point of the cone is sharp.
5 Fold points A and C inside the top edge of the bag to hold it securely. Snip off the end of B and insert a piping tube (nozzle).
advice
• Always use a good-quality greaseproof (waxed) or parchment paper to create a good strong bag. If you use a selection of different-sized equilateral triangles and make up a quantity of piping (decorating) bags, you will always have a bag suitable for every job.
• You can buy piping bags instead of making your own. There are both reusable nylon piping bags and disposable paper piping bags available on the market. Choose whatever you find comfortable. The advantage of the reusable piping bag is that you can change the tube (nozzle) without having to empty the bag. You simply unscrew the adaptor and swap your tube. They are good for when you are piping a large area or a border. The paper bags are better for the delicate work, but go with what you feel comfortable with to achieve the best results.
inserting piping tubes
• When it comes to inserting a piping tube (nozzle), make sure that you cut only the very end off the bag (as shown in diagram 5 opposite), so that when your tube goes into the bag at least three-quarters of it is inside the bag and only one-quarter is showing. The more you have showing, the more likely it is that your bag will split when you start piping by putting pressure on the bag.
• Avoid the cheap plastic or poor-quality metal tubes as they bend and change shape so easily and do not give such a good finish. When you want to do fine delicate work, you really need a good-quality nozzle. The metal PME tubes are seamless and excellent quality, so you will find your tube will remain in perfect condition.
• When it comes to cleaning your tube, don’t poke things into it to remove the icing unless it is a proper tube-cleaning brush. I leave mine in a container of water to soak the remaining icing out.
filling piping bags
• To fill the bag, hold it with the seam against your thumb and first finger so you are supporting the seam at all times – this will prevent the paper bag coming undone as you fill it. Once you have your royal icing on the end of a palette knife (metal spatula), insert this into the bag and squeeze the bag together at the top.
• You will then find you can pull the knife out between your closed bag and fingers. The icing will be in the bag where you want it and not coming out all over the top.
• Once you have placed a little icing into your piping (decorating) bag, fold the top of the bag over to seal in the icing before you start piping with it. Never more than half fill your bag with icing. Overfill it and you will find that when you start piping your icing comes out of several places at the same time and you end up decorating yourself and not the cake!
techniques
how to marzipan a fruit cake
In order to apply sugarpaste (rolled fondant or ready-to-roll icing) decoration to a cake, you will need to marzipan it first. See the chart on page 140 for the quantities you will need. It is crucial that you use enough marzipan to create a decent layer; if you put on only a very thin layer you will not end up with a good finish to the sugarpaste coating. You can use either natural white marzipan or yellow, which has colour added to it.
The kneading is a very important part of the process. You will benefit from using a good-quality marzipan as the cheapest can sometimes take much more time and effort to knead, and will still not give you a good smooth result – it will crack around the edges and corners of the cake.
I always clean my new cake boards with isopropyl alcohol (IPA), available from all good cake decorating shops. Alternatively, you can use any white alcohol, such as gin or vodka. Just splash a little on and with a piece of kitchen paper (paper towel) wipe all over the board. This removes any shop dust and will prevent the bacteria that causes mould growing between the cake and the board. If you don’t have any alcohol, you could use warm, previously boiled water instead.
1 Position the cake in the centre of the cleaned cake board. If necessary fill any gaps around the base with marzipan pieces. Do not worry too much about little air holes or where fruit pieces have come out on the cake surface, but if there any larger holes just fill with marzipan. Make sure at this point that you have all the tools you require ready to use.
2 Using the correct amount of marzipan (see page 140), knead on a sugar-free surface until you have a smooth, crack-free paste. This will take quite a long time, but it’s important not to rush this stage. Brush any kind of jam (jelly) all over the cake, making sure that you coat the whole surface.
3 On a light dusting of icing (confectioners’) sugar, roll out your marzipan to no thinner than 8mm (⅜in), or use marzipan spacers. Try to keep your marzipan the same shape as your cake and the correct thickness. Smooth all over with your smoother tool until you cannot feel any ridges with your hand.
4 Place your rolling pin in the middle of your paste and lift half the paste over the rolling pin by picking it up in just two corners and flipping it over the rolling pin quickly.
5 Lift up your rolling pin and lay the edge of the marzipan against the side of the cake; flip your marzipan over the cake by rolling your pin. This allows the marzipan to go over the cake without you having to handle it with your hands.
tip
Try rolling your marzipan out on a ridged plastic sheet. There are special ones available on the market if you so wish, but any strong plastic will do. Do not use any icing (confectioners’) sugar. Roll out as before, then all you have to do is turn the plastic over on the cake, peel back the plastic and proceed as before.
6 Start smoothing it out with the palm of your hand from the centre of the cake out. This is to expel any air trapped beneath the marzipan. Ease the marzipan in around the sides of your cake, but use only the palms of your hands. Keep your fingertips away from the cake in order to maintain a smooth finish. You should not need to do much smoothing; just go over it lightly and finish off by going around the side of the cake with a side smoother.
7 To finish you need to trim the excess marzipan. Do not angle your knife in to the base of the cake, but keep it straight. It may look as if you are cutting too far away from the cake but that is fine. Cut a clean line (see picture). To finish just smooth round the base. Your marzipan is now totally sealed against the cake and board, and can be left at this stage to prevent your cake drying out.
tip
Try cutting the excess marzipan away with a pizza wheel – this gives a good clean cut – then smooth as before.
sugarpaste – preparation
Kneading sugarpaste
This is the most important stage. Remember, never knead on a surface with icing (confectioners’) sugar as you will be kneading it into the paste. This will dry the paste out quicker, so it will be more likely to crack on the edges when it comes to covering the cake. You should knead your sugarpaste (rolled fondant or ready-to-roll icing) until you have a smooth, crack-free paste, which will give a good finish to your cake regardless of its shape.
Icing a cake board separate to the cake
Get everything you will need (see page 10) ready before you begin. You will also need a cup of previously boiled water. Take just enough icing to give a thin coat (see chart page 140), and roll out the sugarpaste on a very fine dusting of icing sugar. Measure to make sure it will fit over the board and smooth with the smoother. Dampen the board by brushing over some of the water. Lift up the icing over the rolling pin just as described in the marzipan section (see pages 18–19) and place it over the board. Make sure there is no air trapped underneath by smoothing from the centre outwards to expel any bubbles. Leave it to dry for about 48 hours before putting your iced cake on top. Before placing your cake on the board, put a disc of greaseproof (waxed) paper under the cake to separate the cake from the iced board. You need this greaseproof paper so that the cake and sugarpaste do not come into direct contact with each other. The fruit cake can make the sugarpaste soggy and encourage mould growth.
sugarpasting your cake
Look at the quantity chart for the icing so that you work with the correct amount of sugarpaste (rolled fondant or ready-to-roll icing) at all times. Knead it well. Once you have a good smooth ball of paste you are ready to start.
1 If you are icing a fruit cake, you need to brush it all over with gin, vodka or previously boiled water. This will moisten the marzipan so that the icing sticks to it. If you are icing a sponge cake, coat the outside of your cake with a thin layer of buttercream for the sugarpaste to stick to. Measure your cake across the top, down both sides and across the board. This will give you the overall width that your sheet of sugarpaste needs to be.
2 Roll out your sugarpaste on a small dusting of icing (confectioners’) sugar, until your paste is the required size. Try to keep it in shape and keep turning it to make sure that it does not stick to the work surface. If you find as it gets larger it is difficult to turn, then just lift it by using your rolling pin to flip the icing over and if necessary sprinkle a little more icing sugar under it. Don’t be afraid as you are rolling to knock your paste back into shape with the side of your rolling pin. You will find this also means you don’t have a lot of sugarpaste left over, and thus are more likely to maintain the correct thickness to achieve a good covering. Once you have rolled out your icing, use your smoother to get rid of any ridges. When you rub your hands over it, it should feel as smooth as silk. You are now ready to cover your cake and your board if you have not iced it separately.
3 Start by laying your rolling pin across the centre of your sugarpaste. You will find it an advantage if you have a longer non-stick rolling pin and not a short wooden one. Flip your icing over your rolling pin and lift it across to your creamed cake (or, if covering a fruit cake, the moistened marzipan-covered cake). v
4 If you are icing the board, then moisten the board by brushing it with a little water. Lift the icing to the cake and lay the edge of the icing against the base of the cake (or the board if you are icing that too). Start rolling your rolling pin to gently ease the icing until it lies totally over the cake. This way you do not need to use your hands and risk your fingers pressing into the icing. Starting in the centre of the cake, rub the ball of your hand in a circular movement over the top of your cake, gradually getting closer to the edge. This expels the air that is trapped between the layers. Using a smoother, gently smooth over the top very lightly. Your top is now complete.
tip
If you find you have excess sugarpaste and you know you will not be using it again for a while wrap it up in cling film (plastic wrap) and put it into a plastic bag. Put it in the freezer labelled with the date you put it in and what it is.
To ice a round or oval cake
Once you have completed the top as described on page 21, start easing the icing around the side of the cake with the palms of your hands, expelling the air as you go. Make sure the icing is lying flat over the board. You can then using a side smoother to go around your cake and the board to get a good finish. If, however, you have not yet invested in a side smoother, use your normal smoother. To finish off, use a sharp knife to trim away the excess icing from around the cake board.
To ice a square or hexagonal cake
Once you have completed the top as described on page 21, start easing the icing around the side of the cake with the palms of your hands, expelling the air as you go, but make sure you start with the corners. Pull the icing out and spread it, easing it in on the corner using the palms of your hands, not your fingers.
Once you have the icing on the corners in position, you will find the sides will just ease in. Make sure your icing is sitting flat on the board, then continue with the smoothing and trimming of the board as described above for the round cake. Any cake with corners is going to be harder to ice, but take your time, and if the icing starts to crack on the corners or edges gently rub using the ball of your hand to help iron them out. Do not use your fingers.
crimping
There is a huge range of crimpers on the market, but you will find you will keep to just a handful of the different ones as you discover your favourites. Remember to crimp as soon as you have put the icing on your cake. It is no good coming back to it several hours later because as soon as the sugarpaste (rolled fondant or ready-to-roll icing) begins to crust it is too late. Plan ahead. Have both your crimper and any template you will need if you are working on a design that is on the side of the cake ready.
Give yourself a little time to practise before you try to use a crimper directly on a cake. Roll out a piece of sugarpaste and try using the crimpers to see the different effects you can achieve with them.
The further apart the crimpers are (using the rubber o-ring to achieve this), the bigger the finished effect will be, so even with one crimper different effects can be achieved. If I am crimping onto a flat surface I hold my crimper straight up and if I am using it on the edge of a cake a 45-degree angle is better. Take your crimper and push it just a little way into the icing and squeeze it together to make the design, release the squeeze and remove the crimper. Do not dig the crimper too far into the icing otherwise you will see the cake underneath on the edge. Always remember your next crimp should be alongside the previous one, trying not to leave a gap. Continue in this manner all around the cake.


