
Erhalten Sie Zugang zu diesem und mehr als 300000 Büchern ab EUR 5,99 monatlich.
- Herausgeber: The Crowood Press
- Kategorie: Wissenschaft und neue Technologien
- Sprache: Englisch
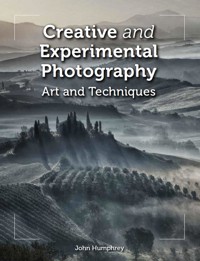
This inspirational book shows you how to take, edit and create photos that impress and last. Through fourteen lessons, it features exciting ideas and techniques that will transform your photos and help you develop your own personal style. Each lesson illustrates a particular style of photographic art and includes a step-by-step guide. Written for photographers of all experience, this book is a masterclass for creative photographers who want to edit photos to display and share.
Sie lesen das E-Book in den Legimi-Apps auf:
Seitenzahl: 152
Veröffentlichungsjahr: 2025
Das E-Book (TTS) können Sie hören im Abo „Legimi Premium” in Legimi-Apps auf:
Ähnliche


CONTENTS
Introduction
Getting started
LESSON 1
Black and white
LESSON 2
Toning
LESSON 3
Texture
LESSON 4
Abstraction
LESSON 5
Double exposure
LESSON 6
Simplifying
LESSON 7
Colour
LESSON 8
Minimalism
LESSON 9
Displacing
LESSON 10
Controlled blurring
LESSON 11
Mirroring
LESSON 12
Pairs, sets and collections
LESSON 13
Detail
LESSON 14
Shrinking
Index
INTRODUCTION
The Internet informs us that five billion photographs are taken every day – 57,000 per second! This huge number is driven by the inclusion of cameras in smartphones, with phone pictures accounting for more than 90% of all of those taken. Many of these pictures are taken to record holidays, special occasions and families. They might be shared briefly with friends, often by showing them on the phone screen. Some find their way to social media where they may be appreciated or ignored.
Fig 0.3 A section of London’s St Pancras Station, mirrored asdescribed in Lesson 11 to createa symmetrical image.
This book is designed to show that these pictures could have another life. Armed with some techniques that can be used at the time of taking, or by making digital adjustments, we can take a relatively ordinary photograph and transform it into a striking artwork.
Photography is a unique and universal form of art. It does not require expensive equipment or formal training. It enables us to recapture the creativity we had as children. Now that most photography has become digital, we can afford to experiment and to develop our own style.
I have aimed to set out in fourteen ‘Lessons’ some approaches to producing pictures from photographs that are distinctive and personal. The Lessons set out the steps to produce the illustrated examples. However, they are not the end of the story. Once you find an approach that works for you, do add variations of your own. You will find beauty in the mundane and turn ordinary into extraordinary. I wish you well on that creative journey.
John Humphrey
GETTING STARTED
The journey of a thousand miles begins with the first step
LAOTZU
Photography projects can feel daunting. Camera settings seem ever more complicated, with impenetrable menus and submenus. Image-processing software offers thousands of options with mystifying terms. Before pictures can be saved, decisions must be made about their resolution, aspect ratio and file format. And then there is ‘impostor syndrome’, in which we question whether our pictures are any good anyway.
I urge you to press on regardless. Mistakes in digital photography are easy to undo, and nothing will be broken. Transforming photographs is creatively liberating and shows that we can all be artists. The Lessons in this book offer ideas and techniques to get things underway. I hope that some of them will prompt further experimenting and will help with the development of your own personal style.
Fig 0.4 A wintry wood scene converted to black and white as in Lesson 1 to emphasise the feeling of coldness, and with noise texture added as described in Lesson 3.
STARTING PICTURES
It is often said that, if you are going to make digital changes to a picture, you must have a good picture to start with. Don’t believe it! One of the pleasures of the photography transformations described in this book is that they can often rescue pictures that simply didn’t work first time round. There are several reasons for thinking that a photograph is not up to scratch:
• The composition doesn’t work.
• Focus is in the wrong place.
• The image is too dark or too light.
• The camera or the subject moved.
• Image resolution is too low.
• The picture is boring.
However, somewhere in these failed pictures there is likely to be an opportunity for creative manipulation. One of the pleasures of finding transformation techniques that suit your personal style is to revisit the hundreds of pictures sitting neglected on your hard disk, and to realise that they can have a new life.
Fig 0.5 The starting picture was of a tulip past its best, but the colour and texture were well suited to conversion to a continuous spiral using the Droste treatment described in Lesson 14.
Of course, not every picture conceals a hidden masterpiece. But the flaws noted above might well be capable of correction and may even present some advantages and opportunities.
Composition can often be corrected by cropping in to a more balanced section of the picture. Concern that this might result in an image that has too low a resolution is understandable but might be resolved by upsizing the picture, possibly using software specially designed for the purpose. This is considered in Lesson 13. It is also possible that a lower resolution might be advantageous if the intention is to apply artistic software filters to the image. Many of the techniques set out in this book are more effective with low-resolution images. Composition problems can be a result of lines that should be vertical or horizontal being on a slope, the most common example being a sloping horizon. This is usually straightforward to correct in software, albeit with a little loss of the edges of the picture.
Focus is less of a challenge than it once was now that virtually all cameras incorporate autofocusing, and cameras with small sensors – such as smartphone cameras – have a wide depth of field, which results in most of the scene being in focus. However, it is still possible that the autofocus has picked the wrong part of the image, and the desirable part is blurry. Again, software, often using artificial intelligence, might come to the rescue. This won’t work miracles, so an out-of-focus section that nevertheless has promising shapes and colours could be worth treating with software filters, maybe to convert into an abstract.
Over- and underexposure resulting in loss of detail in the highlights or shadows might again be capable of rescue in software. This is particularly the case for dark shadows which, by adjustment in the levels or curves settings in software, may reveal surprising levels of detail. Loss of detail in light areas, described as burned-out highlights, can be more difficult to resolve and is one reason for taking pictures in RAW format. RAW is the file format that contains unprocessed image data from a digital camera and, in a RAW editor, offers the best chance of retrieving the full subject detail. If all else fails, can the exposure limitations be turned to advantage? Maybe the overexposed picture has potential as a high-key or minimalist image, and the underexposed picture could be dark, atmospheric and moody.
Fig 0.6 The picture of flamingos at night was unacceptable because of motion blur resulting from movementof the birds and the camera. However, a cropped and adjusted area delivered an impressionistic image of the scene.
Movement of the camera or subject is a familiar experience. If the camera is handheld, as is usually the case, then there is almost sure to be some blurring from camera shake. For most pictures this is not noticeable because either the shutter speed is sufficiently fast to minimise any blur, or because anti-shake control in the camera reduces the effect. As with the focus challenge, it is possible to make some level of correction in software. Failing that, it is possible that the movement blur has pictorial potential that can be exploited to artistic advantage, as in Figure 0.6.
Image resolution is an interesting challenge and is discussed in several of the Lessons. Low resolution might be the result of the camera being set for recording low-res pictures, probably to enable more pictures to be saved on the SIM card, or so that pictures can be readily transferred by Wi-Fi or email. It will also result from images being cropped to remove unwanted areas. Once again, software might bring the resolution up to the desired size for printing or projecting, but possibly without the desired sharp clarity. However, high resolution is often not needed for artistic, particularly abstract, pictures. And if the intention is to apply digital filters, the low resolution might well be an advantage.
Boring pictures abound! Our own photographs generally don’t bore us. They take us back to memorable events or beautiful places. But they will not have the same appeal to others, and we may need a critical friend, or perhaps a camera-club judge, to give an objective opinion. The purpose of this book is to re-examine those pictures for their artistic potential.
SOFTWARE
The 1990s saw the emergence of photo-editing software to accompany the launch of consumer digital cameras. Photoshop 1.0 was followed by CorelDRAW and PaintShop Pro. In the 2000s, the use of digital photography overtook film, and the software developed rapidly. Programs now include Adobe Lightroom, Photoshop Elements, GIMP, Capture One Pro, Luminar AI, DxO PhotoLab, ON1 Photo RAW and PhotoScape X. To add further choice (and complication), there is also a range of supplementary imaging software for specific tasks. These can be stand-alone programs or plug-ins that can be accessed from the mainstream software. They include the Nik Collection, Topaz Photo AI, Retouch4me, Alien Skin Eye Candy, the AKVIS suite and Luminar Neo.
It would be unrealistic to present the steps to a particular transformation using every available software package. So the convention in this book will be based on Photoshop, the most widely used imaging program. However, the tools in Photoshop that are described here are available in most photo software. For software other than Photoshop, it is worth checking out the way to access them.
Setup
The opening page of much software, Photoshop included, can at first look bewilderingly complicated. The usual default is to have the toolbar visible on the left, selected panels on the right, the main menu at the top and the options bar underneath the main menu.
Fig 0.7 The basic Photoshop screen showing the terminology used in this book, with panels open for Layers and History.
The toolbar is generally a fixed vertical strip and gives tools for selection, cropping, retouching and so on. Some tools have sub-tools that can be accessed by right-clicking.
The panels can be chosen to suit and include Color, Brush settings and Gradients. In Figure 0.7 the top panel is the Layers panel and underneath is the History panel. These panels can be moved, resized or grouped.
The menu bar at the very top of the screen contains drop-down menus like File, Edit, Image, Layer, Select, Filter, View, Window and Help.
The options bar displays options for the currently selected tool, such as the brush size for the Brush tool.
KEY TOOLS
Despite the variety of software available for image manipulation, certain tools and settings are common to most packages and are used in these Lessons. They are summarised here and described in more detail for each transformation.
Histogram
The histogram is a graphical representation of the tonal values in an image. It shows the brightness levels (tones) of the image and is a key tool for understanding and adjusting the exposure and contrast of a photo. The horizontal axis represents the tonal range divided into 256 levels. The vertical axis represents the number of pixels at each tonal value. In Photoshop it is accessed through Levels (Image > Adjustments > Levels) or Curves (Image > Adjustments > Curves). The histogram can be adjusted by moving the sliders in these tools; for example, moving the middle slider in Levels to the left lightens the overall image.
Fig 0.8 The Levels histogram showing a gradation of tones from black to white.
Filters
Filters are the tools used to apply special effects or modify images for creativity or correction. They can add textures, blur an image in a range of ways, sharpen edges or produce artistic effects. Filters are shown as drop-down options from the Filter menu, and they can be applied to an entire layer or a selection of the picture.
Fig 0.9 The main Filter menu in Photoshop. Each of the lower options offers a further drop-down menu of alternatives.
Layers
Layers are a key feature of creative photo-editing software. They enable images to be constructed and edited nondestructively. Layers are like transparent sheets stacked on top of each other, each with different elements of the image. The contents of a layer can be adjusted independently without affecting other layers. Crucially, the way in which layers combine with each other can be managed, for example by changing the opacity of a layer, or by using layer blend modes. Blend modes are described within the relevant Lessons.
Fig 0.10 A Photoshop Layers panel showing a starting picture that has been progressively recoloured, blurred and converted to black and white. The top layer has been blended with theblurred layer using the soft light blend mode.
Hue and Saturation
Artistic transformation of photographs often involves adjustments to the image colour and saturation. In Photoshop the tool is in the image adjustments set (Image > Adjustments > Hue/ Saturation). This offers three sliders. The top slider changes the colour distribution of the picture and can alter all the image colours, or a single colour selected in the drop-down menu. Sometimes it is not clear which named colour is the one to be changed, in which case clicking on the colour will reset the selection to that exact hue. It is worth noting that dragging this slider fully either right or left will convert colours to their complementary colours. This tool can also be used for toning the image by clicking the Colorize box and using the slider to pick the tone colour. The middle slider changes saturation. Sliding right increases saturation and sliding left decreases it. The bottom slider makes the image darker or lighter in a similar way to the middle slider in the Levels setting.
Fig 0.11 Photoshop’s hue and saturation controls. Sliders allow for independent control of image colour, saturation and lightness. With the preview box ticked, the effect of the adjustments can be viewed as they are made.
Selections
It is often necessary to make image transformations to only one part of a picture. To achieve this, a selection must be made. Only the content within the selection will then be affected by image adjustments. Photoshop automates the process for some selections and has dedicated tools for selecting skies and for selecting the main subject in a picture. These are options under the Select drop-down menu. For manual control of the process, selection tools are grouped in three sets towards the top of the Photoshop toolbar. Right-click on any selection box to see the options. Key selection tools are:
Fig 0.12 The main image-selection options in Photoshop. Each of the three main boxes offer drop-down selections, giving eleven tools in total. The letters M, L and W beside the tools show the keyboard shortcuts.
Rectangular and elliptical marquee tools. Click and drag to make the selection. Hold Shift while dragging to constrain proportions (perfect squares or circles) and hold Alt or Option to draw from the centre outward.
Lasso Tools. These are freehand selections. The Polygonal Lasso creates straight-edged selections, and the Magnetic Lasso automatically snaps to edges in the image.
Quick Selection Tool. When brushed over an area to be selected, this tool detects edges automatically.
Magic Wand Tool. This selects areas of similar colour. The Tolerance setting in the Options bar controls how much colour variation is selected.
The Select and Mask box appears in the Options bar when a selection tool is active. This allows the selection to be fine-tuned and, for example, enables the selection edges to be feathered. This is often important to hide the selection edges once the image adjustments have been made.
A View Mode such as Overlay and On Black can be chosen to see the selection clearly.
KEYBOARD SHORTCUTS
In this book, the route to the various tools and techniques is described using the Photoshop menu system since this shows the location of each control option. However, for regular use of tools it is worth becoming familiar with keyboard shortcuts that bypass the menus. There are hundreds of such shortcuts, so for particular tasks it is worth an internet search to see if a quick keyboard route is available. Table 1 shows the shortcuts for the main tools described in the Lessons.
This of course is not a comprehensive guide to every aspect of photography software. However, it introduces the main tools used in the transformations in this book and will be a starting point in exploring the endless byways of modern imaging programs. Keep exploring and experimenting to find the steps that lead to your own personal style.
Table 1Photoshop Keyboard Shortcuts
Effect
Windows
Mac
Free transform (for selections or layers above the background)
Control + T
Command + T
Increase/decrease brush size
] [
] [
Increase/decrease brush hardness
} {
} {
Default (black/white) foreground/background colours
D
D
Switch foreground/background colours
X
X
Invert (negative)
Control + I
Command + I
Levels
Control + L
Command + L
Curves
Control + M
Command + M
Hue/saturation
Control + U
Command + U
New layer via copy
Control + J
Command + J
Merge visible while retaining original layers
Ctrl + Alt + Shift + E
Command + Option + Shift + E
Change tool opacity
1–0
1–0
View and open layer mask
Alt + click on mask
Option + click on mask
LESSON 1
BLACK AND WHITE
A monochrome picture is one that has only one colour or hue. There will be light and dark tones (tints and shades) of that hue as it progresses from white to black. The hue can be any colour, but much monochrome photography has no colour at all, producing black and white pictures with a simple tonal range from white, through greys to black.
Fig 1.1


