20,99 €
Mehr erfahren.
- Herausgeber: Crowood
- Kategorie: Lebensstil
- Sprache: Englisch
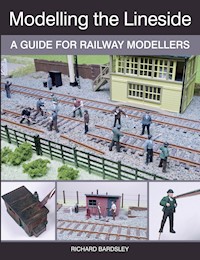
If you want to recreate in realistic model form some of the excitement of watching trains by the lineside - then this is the book for you. It contains several photographs of the available relevant products and includes numerous step-by-step illustrations, with accompanying text, that demonstrate how to build the many features of the lineside, either from kits or from scratch. Moreover, all the various aspects of modelling the lineside are brought together in four layout projects covering typical lineside scenes from the steam era right up to the present.
Das E-Book können Sie in Legimi-Apps oder einer beliebigen App lesen, die das folgende Format unterstützen:
Veröffentlichungsjahr: 2016
Ähnliche


Modelling the Lineside
A GUIDE FOR RAILWAY MODELLERS
RICHARD BARDSLEY
THE CROWOOD PRESS
First published in 2016 by The Crowood Press Ltd Ramsbury, Marlborough Wiltshire SN8 2HR
www.crowood.com
This e-book first published in 2016
© Richard Bardsley 2016
All rights reserved. No part of this publication may be reproduced or transmitted in any form or by any means, electronic or mechanical, including photocopy, recording, or any information storage and retrieval system, without permission in writing from the publishers.
British Library Cataloguing-in-Publication Data
A catalogue record for this book is available from the British Library.
ISBN 978 1 78500 140 6
Disclaimer
The author and the publisher do not accept any responsibility in any manner whatsoever for any error or omission, or any loss, damage, injury, adverse outcome, or liability of any kind incurred as a result of the use of any of the information contained in this book, or reliance upon it.
ACKNOWLEDGEMENTS
This book is dedicated to my mother Margaret Bardsley, who passed away while it was being written; she was proud of my first three books and would have loved this one just as much. I am extremely grateful to my wife Sharon Bardsley for her continued support while also looking after our little boy, Samuel. As with each book I have written, thanks go to my father Stuart Bardsley for his keen proofing skills, but, in addition, he has constructed many of the model kits shown in this book, as well as going out and about for prototype photographs. My train buddy Colin Whalley was as generous as ever in lending me various models to photograph. For permission to use their superb photos, I thank Steve Flint and Craig Tiley of Railway Modeller. For letting me photograph their ‘Glazebrook’ layout, I once again thank my friends at the Warrington Model Railway Club.
CONTENTS
INTRODUCTION
CHAPTER ONE: LINESIDE LAYOUTS
CHAPTER TWO: DEFINING THE BOUNDARY
CHAPTER THREE: CROSSING THE RAILWAY
CHAPTER FOUR: LINESIDE STRUCTURES
CHAPTER FIVE: TRACK-RELATED FEATURES
CHAPTER SIX: SIGNALLING
CHAPTER SEVEN: MISCELLANEOUS LINESIDE DETAILS
CHAPTER EIGHT: BRINGING IT ALL TOGETHER
USEFUL CONTACTS
INDEX
INTRODUCTION
One of the joys of being a railway enthusiast is to be able to turn up at the side of a railway line and just watch the trains go by. The more important the line, such as a main line or major route, then the more trains you will see. Being ‘lineside’ is great fun, whether you are a serious ‘trainspotter’, or just a casual enthusiast. Who would not want to recreate this spectacle in model form?
With your very own model railway layout you can go ‘linesiding’ whenever you want. It is easy to think that a railway line is just track, but there is more to it than meets the eye. There may be signals and a signal box, the boundary fence, warning signs, a platelayers’ hut, a track gang – any or all of these things may be visible in a short stretch of railway line. As modellers, we can incorporate these features to provide an authentic and detailed backdrop for the trains themselves.
Real trains rarely use a railway line with the high frequency that model ones do. So if you spend a little bit of time at a real lineside location, you will doubtless have time between the trains. You could read a good book, but, instead, use the time to study the place and all the little details that can be found there. It is surprising what you will start to notice once you pay attention to these details. Then you can think about incorporating these things into your model railway.
Many things like signals and level crossings can be found at stations, though they may also be found in the middle of nowhere at a point between two stations. So stations are a good place for research, taking away the station itself and using the remaining features to model a stretch of the line.
Signalling is one of the most common features to be found by the lineside, since signals are not just used to start and stop trains at stations. The block working system means that signals (and signal boxes) could be found in what are often quite isolated places. Junctions are not necessarily found at stations, therefore the signals for these locations can be seen where you might not expect to find them.
While today’s Rainford Junction is but a shadow of its former self, this view shows a wealth of detail that can be included in a lineside scene. Besides the obvious features such as the signal box and the signals themselves, there are many important details. These include the signs (both speed signs and warning signs for personnel), the unguarded ‘barrow’ crossing for the signalman, streetlamps for night-time, a traffic cone and even a short length of discarded rail.
There are many reasons to cross the railway line, so bridges, level crossings and underpasses can be found all along the lineside. Conversely, there are many places where the railway company does not want people to cross the line; to prevent trespass there are all sorts of styles of boundary fencing and walling.
Dotted along the lineside there were, and in some cases still are, various buildings in support of the operation of the railway. Most obviously there are signal boxes and equally common were the platelayers’ huts. Sometimes a level crossing in an isolated place would have had a crossing keeper’s cottage.
Some of the details are smaller, such as gradient signs, mileposts and speed signs. Ballast bins can be seen by platelayers’ huts, or just on their own along the lineside. Sadly, many places attract rubbish, from small items to big ones; it is a small detail, but if you really want to be authentic about modelling a time and a place then you need to include it.
Railway lines consist of track and like the rolling stock that uses it, track needs regular maintenance and eventually renewal. An interesting cameo scene can be created at the lineside by modelling the men, materials and equipment that are needed to keep the track well maintained and safe.
While railways have always run on track, the lineside details can set the period and scene instantly. There is a broad distinction between the steam period and the modernization era. The former would have been characterized by such things as telegraph poles, platelayers’ huts (and platelayers) and semaphore signals. The modern railway era is one of concrete trunking, mobile track gangs in vans and colour light signals.
Some things do timelessly cross these two broad eras. There are still some signal boxes and semaphore signals in use today, though this small minority is declining quickly. While modernity is not to be found in a period setting, the old can often be discovered alongside the new. It may be out of use, but often it is still there, for example as a boarded-up signal box or a ruined platelayers’ hut.
A seemingly ordinary lineside scene can actually contain a lot of detail, as this view of the Warrington Model Railway Club’s N-gauge layout ‘Glazebrook’ demonstrates. In the foreground, there is wire-in-post fencing, while at the top of the embankment is a tall vertical planked fence. There is an elevated signal box (giving clearance to see over the bridge), as well as signals to control the junction that begins bottom left. Finally, aside from the locomotive, the steam era is much in evidence by virtue of the telegraph poles.
Fortunately for railway modellers, much of the detail that brings a lineside scene to life is readily available from the model railway manufacturers. Some of it is available ready to plant; all you have to do is take it out of the box and install it on your layout. Other items are available as good-quality kits, so if you enjoy making things there is the added bonus of putting them together. In some cases, what you need may not be available ready-made or as a kit, but scratch-building is not as difficult as it may seem.
Lineside details may be found in isolation, but they can also be found in logical groups. A signal might be on its own, or it might be beside a signal box. The boundary will be defined by a fence or wall, and in the steam era there would have been telegraph poles. It is up to you how much or how little detail you incorporate on to your layout; combining related details at one point can provide an interesting cameo scene that will hold your attention and interest, even when trains are not running.
To the casual observer, the lineside may just seem to be all track and ballast. In many places, this is certainly not the case and there is a wealth of detail to be included to build a model railway that looks just like the real thing. One of the greatest modelling challenges is often the attempt to model the mundane, the everyday and the commonplace. Much of the lineside falls into this category. Fortunately, it is simple to achieve. With a great-looking model railway lineside, you can just sit back and watch the trains go by. You will think that you really are there, back by the lineside where you spent many happy hours all that time ago.
Modelling the lineside can take you back to another place and time. ‘Tunley Marsh’ is a small N-gauge layout with a single track that is set in the 1930s. In the short space between the station and fiddle yard can be seen some classic lineside elements: a signal box; platelayers’ hut; signal; and lineside fencing.
CHAPTER ONE
LINESIDE LAYOUTS
It might seem an odd statement, but the first thing is to understand what actually constitutes the lineside. There is an assumption that every layout needs to have a station, but this is not true. If you want to focus on just the railway line and therefore the lineside, then why not? A layout can be specifically designed with these things in mind so that the finished model delivers exactly what you want. Principally, the design of such a layout will seek to maximize the amount of visible railway line so that long trains can been seen in their natural environment, whether that’s a rural or urban setting.
Most layouts include at least one station, although it is not what you would think of as the lineside since the station is an entity in itself. It might contain elements of the lineside, such as the boundary fence that can be seen in this view of N-gauge layout ‘Tunley Marsh’, but most of the other features are specialist station infrastructure such as platforms and a goods yard.
DEFINING THE LINESIDE
At the highest level, a railway is a network of connecting lines that joins cities and major towns. Each line that makes such a connection will travel through various places en route, be they large or small. There is a tendency to think of railways in terms of stations; the destinations matter more than the journey. Yet stations account for a tiny fraction of the whole route mileage. The vast majority of a railway line exists between the places that it serves.
The lineside can therefore be found between the stations and yards that form the destinations for railway journeys. Of course, you can stand by the railway line at a station, but here there is specialist infrastructure in the form of platforms to enable you to stand safely right next to the track and to interface with a passenger train in order to make your journey. Even non-stopping trains will slow for a station, so if you want full steam ahead, you will need to model the railway as it is away from the stations.
Outside of the station environment, the railway line has a boundary, the limit of the land that the railway owns, and of the infrastructure that it is responsible for and maintains. Railway land is privately owned, so trespass is discouraged, not least for the safety of passing ramblers and sheep. In order to avoid any dangerous trespass, railways have provided the means to cross the railway safely, such as bridges and level crossings.
As a train enthusiast, you stand at the lineside, but you are really standing on the very edge of the railway itself and at the limit of where you are allowed to tread. The lineside extends from the edge of the rails themselves to the boundary fence that is the limit of the railway’s responsibility. That narrow strip of land that wends its way across the country is both the railway and the lineside at the same time.
As DMU 175 005 passes through Winwick Junction near Warrington on 11 October 2010, the focus of attention for the railway enthusiast is probably on the train rather than the lineside. Yet there is a wealth of detail to be observed beside the towering posts for the overhead power lines. On the near side of the line there is wire-inpost fencing (with mesh to keep the farmer’s livestock off the railway), while on the far side is modern steel palisade fencing. There are four relay cabinets in differing shades of grey (and rust), small warning signs for trackworkers and larger speed signs for drivers.
The vast majority of the railway and the lineside is plain, with perhaps just the boundary fence to be modelled. Yet in certain places there are interesting features that are just as challenging to model realistically as a station is. There are small details like a platelayers’ hut tucked away at the side, all the way up to lengthy water troughs with their attendant water towers.
The railway modeller can take as much care over modelling these plain out-of-the-way locations as he would modelling a station. The lineside is perhaps just a backdrop for the trains, but if you get it wrong, it will not look the part and will detract from the aim of presenting the trains in a realistic setting.
DOES A LAYOUT NEED A STATION?
There is a perceived wisdom that every model railway layout should have at least one station. It is true that a station provides plenty of operational possibilities. You can stop and start trains, shunt the goods yard and reverse trains to send them back from whence they came. There is a feeling that stations are what trains are all about; however, stations are but a tiny fraction of the whole railway network.
Unless you possess a railway room that is as big as a barn, it will be necessary to trade off one element of a model railway for another. The biggest problem for the modeller is that stations tend to take up a lot of room. We would all like a bigger model railway, but ultimately only so much can be fitted into the available space. This usually means making choices, a sacrifice here for a gain there. If a station dominates the layout, there is virtually no room to model the railway beyond the station limits. For many layouts, particularly terminus-type layouts, the station ends where the fiddle yard begins.
Even where space allows for some modelling of the railway line beyond the station, there may not be enough to hold an entire train. If you have a short stretch of line with long trains, the train may be entering the fiddle yard while the last coach is still clearing the platform. In such cases, there is no sense of the train being out on the open line between stations. Additionally, an accelerating train may not even be at full line speed by the time it reaches the fiddle yard.
Being at the lineside is all about watching the trains pass by – so do you need a station at all? If you see the layout as a stage on which to display a collection of trains in an authentic surrounding, then a station may just get in the way. In recent years, a number of exhibition layouts have adopted the idea that you do not actually need to model a station on a layout. These layouts prove that modelling an open stretch of main line between stations is just as exciting. It allows for scale-length trains that can be seen running at full speed.
It is not just about using the space for a station, or for something else. There is a whole change of mindset brought about by abandoning the station altogether. It says that the focus of the model railway is going to be totally different, but, above all, it is going to be all about the trains. Accurately modelling the lineside will support this objective, but it will only work if the lineside is realistic and natural.
MAXIMIZING THE LENGTH OF THE RUN
Railways are long and thin. Even if Britain had adopted Brunel’s broad gauge and six tracks on each route, the width that they take up would be minuscule compared to their overall length. This ratio of width to length presents railway modellers with a problem – rarely is there enough space available for a ‘decent run’. Depth is less of a problem since most baseboards will be deep enough for the typical double-track main line.
The real restriction is that there is often not enough length. If you are modelling a branch line, then you will model trains that are quite short, just a pair of coaches in most cases. Modelling a main line means the desire to model main line trains. An express train can easily be twelve coaches long and some freight trains can be even longer. Unless you have a very large space, if you want to model just trains in the landscape, the first step is to omit any stations. The approach to the station at each end and then the length of the platforms take up a considerable amount of space. Often, a goods yard was beyond the platforms rather than behind them, which increases the length still further (a plan that suits a baseboard that is not very wide). The tendency to put the station in the middle of the scenic part of the layout means that you usually have two very short sections of lineside on either side of the station.
Do not be too concerned about needing to have curves rather than straight track. While railway engineers like to build their lines as straight as possible, you would be surprised how much the lines actually snake through the landscape as they follow the contours of valleys and hills. A driver’s eye view is often quite illuminating in this respect. In fact, completely straight tracks in model form can serve to emphasize the narrow nature of a baseboard, so a little curvature from one side to another can look more pleasing even on the straight baseboards.
Curves become a concern for model railways at the corners of a room. Here they must turn through at least 90 degrees and sharp radii are often required. These can look unrealistic so they are often hidden in a tunnel.
These two plans show an average room- or shed-sized layout in OO gauge, both with a fiddle yard on one side. The plan on the left is typical in that the other side is given over to the station, but this leaves just two short sections of open track. Dispensing with the station for the plan on the right gives a long continuous track with more opportunities for modelling the lineside.
Long, thin layouts offer lots of opportunity for modelling the lineside and they are often long enough to include a station as well. They also allow for a high-capacity fiddle yard at the rear to hold lots of trains. Layouts like this could be mounted on a shelf, although access to the fiddle yard may be a problem; therefore, this is a design often adopted for exhibition layouts that allow access all round. Note how the track has formed a curvy line in the scenic section to avoid mirroring the obviously long and thin appearance of the baseboard.
A long, thin layout with lots of lineside potential can be fitted into an average room against one wall, down the middle, or, as shown in the plan on the left, at a diagonal. This will maximize its length, but still requires a gap to access the fiddle yard at the rear. Introducing a kink in the middle as shown in the plan on the left makes better use of the available space. It still allows access all round the layout, but delivers a longer length of lineside potential.
Equally important is to have some kind of fiddle yard. The fiddle yard represents the rest of the railway network and the places where the trains on your layout are coming from and going to. You will need a decent-sized fiddle yard for a layout without a station since all that you can do is watch the trains go by. Unless you are prepared to watch the same train go past all the time, you need a way to change the train quickly without having to stop it and take one lot of rolling stock off the rails and replace it with another set. Therefore, a large fiddle yard with lots of storage tracks is a must.
The fiddle yard is not a scenic proposition, but you cannot live without it if you want to have a steady stream of trains passing through the scenic part of the layout. The classic room-based layout has the fiddle yard on one side and the station on the other; by not having a station, you can achieve a reasonable main line on one side of the room.
Another option is to put the fiddle yard immediately behind the layout. This works well in the smaller scales such as N gauge, where the 180-degree loops at each end that join the front to the back are much smaller. This approach is often seen on exhibition layouts where there is room at the back for the operators and room at the front for the spectators; however, it is not an arrangement that will suit all situations for home-based layouts.
Do not be restricted to traditional thinking. By placing a long, thin layout with the fiddle yard at the rear on the diagonal within a room, a longer straight run can be achieved. A further variation is to introduce a slight kink in the middle to create a sort of boomerang shape. Such layouts effectively sit in the middle of the room, which makes it easier to have all-round access to both the fiddle yard and the scenic portion.
Although you want to maximize the scenic portion in relation to the trains, you can only see the trains from one vantage point at a time. Rather than having a layout which is a series of small scenes through which long trains travel (and thus dominate the scene), consider having just one big scene in which the train can be seen in its entirety.
PASSING LOOPS
One operation that a sizeable station permits is the ability for one train to pass another. Fast passenger trains catch up with the slower ones and would be held up if they cannot pass them. Freight trains are an even greater problem, since they tend to be much slower (more so in the steam era than in the modern era). If you discard the station altogether from the layout design, trains cannot pass each other in the same direction.
The railways faced a similar problem, in that there were not enough sizeable stations along the line to cope with a large mix of fast and slow trains. Major routes had fast and slow lines side by side, but most railway lines could not justify such expenditure on infrastructure. The answer was the strategic placement of passing loops so that trains could overtake one another.
Given that even a large model railway can only ever represent a small portion of a railway line, there is no real need to have any passing loops. Certainly, it is unlikely that fast trains will need to overtake slow ones on the very short distance from the fiddle yard. However, passing loops will make a very interesting feature, not least for all the lineside infrastructure that they require. As a minimum, passing loops will require signals to control the train movements safely and a signal box to control the signals themselves. In the steam era, there may have been water cranes supplied by a water tower in order to replenish thirsty steam locomotives.
GOING SEPARATE WAYS
Most of the infrastructure required for passing loops would also be found at junctions. Not all junctions were to be found at stations; they were often in the middle of nowhere, but where it was convenient to branch off in different directions. The diverging tracks might actually run in parallel for a short while, which makes it easier to lead both lines to the same destination on your model railway, namely, the fiddle yard.
There would be quite an array of signals, possibly using a signal gantry if space was tight, as might be the case in the cramped confines of an urban environment. There would probably be a platelayers’ hut close by, as regular inspection and maintenance of the turnouts and signals at the junction would be vital.
Double-track main lines diverge in this scene on ‘Glazebrook’, the N-gauge exhibition layout of the Warrington Model Railway Club. Although there is a road (and convenient road bridges to hide the entrance to the fiddle yard), this is a scene that is very much in the middle of the countryside, with nothing around. Note the different types of boundary fencing, as well as signals and numerous telegraph poles.
OUT IN THE COUNTRY
By a fair margin, the most popular setting represented by model railways is a rural one, especially when representing a portion of the railway line between two major destinations. The green space between railway centres constitutes the majority of track, often for many miles between stations and junctions.
This leaves a fair amount of property for the railways to look after. Often this property is hard to access without roads nearby, one of the reasons for the proliferation of platelayers’ huts along the line in the steam era, as local track gangs could work their area from their hut.
In many ways, the lineside running through the countryside is quite bland and featureless. There may be some bridges, but in real life it is the landscape that is the defining feature. There is still a challenge to the railway modeller to capture the atmosphere of the lineside authentically in miniature. After all, the lineside is part of the stage that is really there to showcase the trains themselves.
INNER CITY
Compared to the countless miles of railway running through fields and hills, the tracks that run through towns and cities amount to quite a small proportion of the whole. Yet this landscape, thoroughly urban with little or no greenery, is a very different place indeed. The contrast between brick and grass could not be more extreme.
‘Marston Magna’ is a superb recreation of a section of the Westbury to Weymouth line in the 1950s by the West Camel Model Railway Club. The use of N gauge allows the space to set the railway line truly into the landscape, so that the pleasure is to be found in watching the trains pass through that landscape. Lineside features to note include a platelayers’ hut, telegraph poles, a signal and wooden lineside fencing.STEVE FLINT (COURTESY RAILWAY MODELLER)
Ian Clark’s OO gauge layout ‘Rockingham’ is set in South Yorkshire in 1929. In this representation of a semiurban industrial location, it is just as important to protect the railway from accidental trespass. This has been achieved with wooden lineside fencing and a traditional gated level crossing.STEVE FLINT (COURTESY RAILWAY MODELLER)
The railways still needed to protect their boundaries from trespass, but in the concrete jungle, things often had to be more substantial. This meant a lot more use of brick walls to mark the boundary, or retaining walls to keep the earth in its place through cuttings.
The demarcation of the boundary is often more obvious in an urban environment, since in the towns and cities land is at a premium. The railway is often cheek by jowl with the urban setting it serves. Houses are the most prevalent, either with the yards of terraced housing backing on to the railway, or streets running alongside with houses and flats behind.
Ironically, the modern railway often seems less compressed in an urban environment than it did in the past. This is because rationalization and contraction have reduced the amount of railway; double tracks are singled, fast and slow lines merged into one. This leaves quite a spacious border by the side of the remaining railway lines. A modern layout could feature an abandoned line beside the remaining line. An interesting feature would be a multi-arched bridge, one arch having track while the other arch does not.
CHAPTER TWO
DEFINING THE BOUNDARY
The railways were huge property owners. A colossal amount of the initial investment to build a railway would have been spent to acquire the land. Railways are long and thin, but they still amount to quite a lot of land. Not surprisingly, the original railway companies were keen to protect their investment and to demonstrate to the public that, basically, a railway line is private property.
The first rule of private property is: no trespassing. Railways have always been keen to deter trespass on their land, either intentional or accidental. People often need to be protected from themselves and wandering across railway tracks has always been (and remains) a dangerous pastime. You might think that you will hear and see a train coming. In the steam era, it was true that a dirty big clanking locomotive would announce its presence a long way off. The modern era is very different and trains (especially electric ones) can be virtually silent. This is why British Railways started painting the ends of locomotives yellow so that they could be seen from a distance after an increasing number of fatalities to trackworkers (used to noisy steam locomotives), who just did not hear the new trains coming.
It is not just humans who need to be kept off the tracks; four-legged creatures can cause a lot of chaos as well and as they are generally in pursuit of the tastiest grass, they are no respecters of the finer points of property ownership. The accidental death of livestock at the hands of the railway could lead to some interesting claims for compensation. In rare cases, large animals can even derail a train, as happened when a train hit a cow at Polmont in Scotland – the driving coach was lighter than a locomotive and so derailed, with serious consequences.
It will come as no surprise therefore that as the railways have always taken their boundaries seriously, there are a large number of ways to protect them. These ways largely fall into either walls or fences, but there is a huge variety within each of these categories. This is good news for the modeller, as it means that you are spoilt for choice. Sometimes a specific type of boundary is necessary if you really want to define a time and place and there are plenty of options for this. Otherwise, you can take your pick as to how you want your railway to look. Never forget that it is your railway and ultimately you can do as you please. Above all else, these ways to mark the edge of the railway’s domain quite clearly define the edge of the lineside.
WOODEN FENCING
The wooden fence is the most traditional and popular form of boundary to be used by the railway. It was extremely common in the steam era; indeed, some styles of fencing are directly associated with certain railway companies. Wooden fencing is less commonly used on today’s railway, as although it is sufficient to keep animals out, it is not much of a challenge to humans. Preserved railways, however, often still use wooden fencing to define their boundary, not least because it is in keeping with the era that they try to recreate.
Wooden fencing can be thought of as traditional farming field fencing. This consists of vertical posts set fairly close together with a number of horizontal bars between the posts. Timber tended to be cheap and plentiful, so such fencing is an economical option for the miles and miles of open track.
KITS FOR WOODEN ‘FARM’ FENCING
As a reflection of how important and common the simple wooden fence is for defining the real railway’s boundary, there are probably more kits for this than anything else in the entire model railway hobby. All the major scales are amply provided for, so there is no difficulty in finding what you want for your particular model railway situation. Prices are all broadly similar, though some packs will go further than others, so it is worth measuring first of all to see how much model fencing you will need and then work out a final price. Most manufacturers publish how much fencing is in their packs.
Peco’s Flexible Field Fencing kits have been available for many years and they have a lot going for them. First of all, they are available in each of the three major modelling scales, namely, N gauge, OO gauge and O gauge. They are moulded in a fairly generic brown plastic, which looks acceptable but would benefit from a coat of paint or matt varnish.
The Peco range is called ‘flexible’ because it is just that. There is a tendency for many fencing kits only to make fencing in pretty much a straight line on the level. The real world is not always straight and flat. Where the horizontal bars of Peco’s fencing are attached to the vertical posts, the plastic is a little bit thinner. This means that it will easily bend both in the horizontal and vertical planes. Therefore, going round corners and climbing up hills is really easy.
Peco’s Flexible Field Fencing is available in all the main modelling scales. This N-gauge layout shows a run of the fencing at the top of a shallow cutting and ably illustrates how the flexibility of the plastic allows it to hug the undulating terrain, curving and climbing and even doing both at the same time.
The Peco fencing comes with spigots moulded under the posts for attaching the fencing to the layout. So it is a simple case of drilling holes to accept these spigots. By choosing a drill bit that matches the diameter of the spigots, the fencing can be installed with nothing more than an interference fit; no potentially messy glue is needed. Measuring the location of the holes is easy, because you can use the fencing itself as a template.
Peco also offers a ‘fences and gates’ pack in OO gauge, marketed under the Model Scene Accessories brand. This pack is perhaps intended more for farmers’ fields, but it is worth remembering that fencing is fencing and that there is virtually no difference between the post and bar fencing used by farmers and that used by railway companies. Indeed, the railway’s boundary often butts up against farming land, so is it railway fencing or is it farm fencing?
Some fencing products come with moulded bases to help keep it upright, as with the piece shown at the front made by Model Scene Accessories. While the bases make the fencing easy to install, they do not look very realistic; however, once a layer of ground cover is applied, as seen with the two pieces at the rear, the bases are soon disguised.
The Model Scene Accessories product is again moulded in brown plastic that would benefit from a coat of paint or matt varnish. It is not as flexible as the Peco product, though as individual panels on the sprue, it can at least be made to go around corners. Rather than fixing spigots, the panels have small feet at the bottom, so if you are not so sure about being able to drill holes for the fence posts, this product is really easy to install, since the feet can just be glued to the baseboard. You may think that plastic feet will look unsightly and unrealistic; however, it is a simple matter to disguise them with ground cover when adding the scenery.
It is possible to add fences after all the scenic work has been completed. You may be tempted to do it this way, perhaps fearing that the fences will get in the way, or be damaged while adding the scenery, but measuring and drilling holes for posts is a lot easier to do on a blank baseboard. The holes required for fence posts can be so small that there is a tendency to lose sight of them in the greenery once the drill bit is removed.
Another major manufacturer of fencing is Ratio Plastic Models, with a range of products covering both N gauge and OO gauge. In N gauge, it produces lineside fencing in either ‘wood brown’ or white. The moulding is very fine, as is appropriate for the smaller scale. It is not ‘flexible’ per se, but the bars are thin enough to be persuaded to go around corners and up modest inclines.
Wooden fencing for N gauge can be harder to manufacture for the smaller scale so as to get the posts and bars looking fine enough. The black Ratio Plastic Models fencing at the top is finely moulded, while the white Kestrel Designs fencing at the bottom is a bit more chunky. Real fencing comes in all shapes and sizes, often dependent upon the wood to hand, so both products are suitable for N gauge.
The most popular modelling scale is OO gauge, not least because it is easy to model most things to scale, including the posts and bars of wooden fencing. Both the products shown here (Dapol at the top, Ratio Plastic Models at the bottom) would look realistic on a layout. Being plastic, there is a little bit of give in the mouldings to follow curves in the track, although going up or down hills would be hard without cutting the bars from the posts, trimming and then reattaching.
For OO gauge modellers, Ratio Plastic Models produces lineside fencing in black or white plastic. These packs come in decent lengths, though the plastic is quite substantial, which limits its flexibility, and there are no spigots under the posts for fixing.
Exclusively for N gauge modellers are the products from Kestrel Designs. The range includes lineside fencing in either white or brown. The moulding is a little bit basic and tricky to get off the sprues, but the variety of sections on the sprue makes this a useful product for modellers of the smaller scale.


