22,49 €
Mehr erfahren.
- Herausgeber: The Crowood Press
- Kategorie: Lebensstil
- Sprache: Englisch
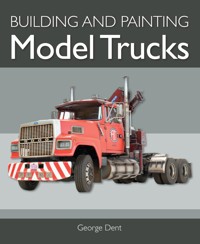
This richly illustrated book offers a complete guide to building model truck kits, across all of the popular scales. Concentrating on civilian vehicles, renowned modeller George Dent describes the fundamental processes involved in kit-building, including preparation and assembly of components, detailing and modification work including custom fittings, plus an in-depth look at painting and weathering techniques. Featuring a range of popular, readily available kits in all of the popular scales: 1:72, 1:48, 1:35, 1:32 and 1:24, and suitable for modellers of all abilities, each project is clearly explained in an illustrated, step-by-step format with over 680 colour photographs.
Das E-Book können Sie in Legimi-Apps oder einer beliebigen App lesen, die das folgende Format unterstützen:
Seitenzahl: 352
Veröffentlichungsjahr: 2021
Ähnliche


BUILDING AND PAINTING
Model Trucks
BUILDING AND PAINTING
Model Trucks
George Dent
First published in 2021 by
The Crowood Press Ltd
Ramsbury, Marlborough
Wiltshire SN8 2HR
www.crowood.com
This e-book first published in 2021
© George Dent 2021
All rights reserved. This e-book is copyright material and must not be copied, reproduced, transferred, distributed, leased, licensed or publicly performed or used in any way except as specifically permitted in writing by the publishers, as allowed under the terms and conditions under which it was purchased or as strictly permitted by applicable copyright law. Any unauthorised distribution or use of this text may be a direct infringement of the author’s and publisher’s rights, and those responsible may be liable in law accordingly.
British Library Cataloguing-in-Publication Data
A catalogue record for this book is available from the British Library.
ISBN 978 1 78500 919 8
Cover design by Blue Sunflower Creative
CONTENTS
ACKNOWLEDGEMENTS
1AN INTRODUCTION TO PLASTIC KITS
2STARTING SMALL: MERCEDES-BENZ 2238 AND VOLVO F12 IN 1:72 SCALE
3FURTHER ADVENTURES IN 1:72 SCALE: ZIL-131 AND DIAMOND T 972 DUMPER
4ON CIVVY STREET: DEMOBBING TAMIYA’S 1:48-SCALE OPEL BLITZ
5POST-WAR WORKHORSE: ICM’S 1:35-SCALE MAGIRUS DEUTZ
6UTILITY AND STYLE: MITSUBISHI CANTER IN 1:32 SCALE
7OPTIMUM TRANSFORMATION: IMPROVING REVELL’S 1:32-SCALE KENWORTH K100C AERODYNE
8PLOUGHING THROUGH: A MERCEDES-BENZ UNIMOG IN 1:24 SCALE
9BUILD BIGGER, BUILD BETTER: 1:24-SCALE DAF 95 CANVAS
10SHOW PONY: 1:24-SCALE MERCEDES-BENZ ACTROS MP3
11LOCKDOWN MODELLING: 1:24-SCALE MERCEDES-BENZ 2238
12PRIDE OF LOUISVILLE: 1:24-SCALE FORD LTL9000
13BRINGING UP THE REAR: A DUMPER TRAILER IN 1:24 SCALE
USEFUL CONTACTS
INDEX
ACKNOWLEDGEMENTS
I would like to express my thanks to all the model and craft retailers who remained open during the Covid-19 lockdowns of 2020; their sterling efforts ensured that we could indulge our hobbies at a time of great stress and uncertainty. Particular thanks go to John at Scale Model Shop for speedily fulfilling my regular orders and maintaining stocks during a difficult period, ultimately allowing me to finish this book.
Alex Medwell, Lisa Munro and the staff at The Airbrush Company have also been a great help during this project. So too has John Bristow at Deluxe Materials and Peter Harvey at PH Designs.
Chris Gilson’s encouragement via WhatsApp has been greatly appreciated; and I am indebted to the team at Crowood for their patience and support. Special thanks go to J-M and the Dent Collective.
This book is dedicated to Pep, who gave me the idea in the first place. Keep on truckin’ babe!
Plastic truck kits offer an enjoyable challenge, especially in the larger scales. This 1:24-scale Mercedes-Benz Unimog snowplough/gritter has received a number of detail enhancements and makes for a very striking model.
CHAPTER ONE
AN INTRODUCTION TO PLASTIC KITS
I’ve been building plastic kits for as long as I can remember. Like many youngsters of my generation, if I wasn’t outside kicking a ball around, I would be at the kitchen table sticking an Airfix kit together, wreathed in the odour of Humbrol polystyrene cement and enamel paint. I wouldn’t really care what the kit portrayed, I was just obsessed by building and painting the parts as neatly as possible. Mostly they were 1:76- or 1:72-scale kits, bought at pocket-money prices from the local sweet shop. With birthday or Christmas money I might persuade my folks to take me to the Liverpool branch of Beatties to indulge in something a little more exotic, such as a 1:32-scale racing-car kit. But I would dream of the larger-scale truck kits on the upper shelves, stacked out of my reach and my budget, and for the time being, beyond my abilities.
Model truck kits are available in various scales, including 1:72, 1:48, 1:35, 1:32 and 1:24.
Finally I got my hands on a 1:24-scale truck kit in my early twenties, and I remember being taken aback by the sheer volume of individual parts, as well as the time needed to put it all together. Looking back, those early efforts were a little rough and ready, but I was already heading towards pursuing model making as a profession, and had become determined to hone my skills across a wide range of genres. Trains eventually took over my life, after joining Model Rail magazine as the in-house model maker in 2004. Since then I’ve worked my way up to become editor, and over the years I’ve built countless railway locomotives and rolling stock, along with a wide variety of scenic items and dioramas, in a variety of scales – and what a great time I’ve had in the process!
The difference between 1:72 and 1:24 scales is apparent. Both of these kits represent a Mercedes-Benz 2238.
However, everybody needs a distraction from the day job, and after a brief hiatus, I rediscovered my love of model cars and trucks a few years ago, especially those larger-scale kits that felt so elusive when I was a child. Building trucks has certainly taught me a great deal about assembly and finishing techniques, while customization and superdetailing still offer an exciting challenge. As some of the projects featured here attest, I relish getting my teeth into an upgrade job, especially when a degree of improvisation is involved. A facility for problem solving is essential for kit builders, as even the best kits can throw up something unexpected.
Trucks have also taught me the value of patience, a trait that modellers usually think they possess in abundance – but in reality, it’s something most of us have to really work at. Who can resist the urge to get a model built sooner rather than later? And yet, with some of the more comprehensive kits, weeks might pass before the model starts to resemble anything like a truck.
I do not profess to any level of expertise regarding real trucks, aside from a general knowledge of models and makes, and a basic level of mechanical awareness. I do, however, have a love for them in a visual and visceral sense, as they have fascinated and terrified me in equal measure since I was a child. Just like my passion for diesel locomotives, the sight and sound of large, noisy machines inevitably grabs my imagination.
We didn’t have a car when I was a child, so I didn’t spend much time on the roads. Accordingly, heavy trucks became quite an exotic sight, and I do remember an old DAF tractor unit that was regularly parked up on waste ground, which I would pass on my way to school. The risqué images in one of the side windows became a hot topic of the playground, but I was also drawn to the shabby nature of the paintwork, the rust patches and the oily stains on the chassis. It is memories such as these that have always fuelled my modelling passion: a mix of nostalgia and wonderment.
While I find the technical minutiae of heavy vehicle engineering interesting, the pure enjoyment of the building and finishing processes are a bigger motivation for me. Predominantly my trucks are built for myself, offering a vehicle for my creative expression (no pun intended!). That said, I always try to make them look as realistic as possible, and when suitable prototype information can be found, I will seek to replicate as much of the real thing as possible. But I’m rarely a slave to detail for detail’s sake. After all, these models have been built as a way of escaping a demanding job, where detail is everything.
These two trucks may be made in the same scale, yet the Kenworth Aerodyne dwarfs the diminutive Mitsubishi Canter.
The purpose of this book, therefore, is not to educate the reader about engines and brake systems, but to showcase the possibilities afforded by the large range of truck models currently on the market. New models appear every year, from brands as renowned as Airfix, Revell, Tamiya, Heller, Fujimi and Italeri, along with ICM, Emhar, Hobby Boss, IBG and Mini Art. Kit subjects can be diverse, and the popular scales of 1:72, 1:35, 1:32 and 1:24 dominate, although there are also opportunities to be found in 1:48. Outside 1:24 and 1:32 scales, the majority of kits deal with trucks that have a military pedigree, but as we’ll see, it is possible to ‘de-mob’ trucks into civilian life without too much fuss.
Military, or ex-military, trucks form the majority of kit subjects in the smaller scales.
The larger scale means that much more detail can be included, but the finished models invariably take up a lot of space, especially when pairing up a tractor unit and trailer.
The following chapters have been arranged in ascending scale order, starting with 1:76/1:72 and working up to 1:24, which is by far the most popular scale for civilian truck modelling. The foibles and attractions of each scale will be discussed, while the projects have been chosen to help illustrate a wide variety of techniques and approaches. Assembly and finishing processes are covered throughout the book, but some of the basic tenets are outlined here to provide a solid foundation from which to work, especially if you are new to the hobby.
ESSENTIAL TOOLS AND MATERIALS
Only a modest array of general modelling tools is needed to get started. Cutting tools such as knives and shears are essential, along with shaping implements such as files and sanding sticks, in order to extract the parts from the moulded sprue and prepare them for bonding. Handling tools, such as tweezers, pliers, clamps and a miniature vice, allow small parts to be retained and located safely and accurately, while a drill and bits, ruler and set-square are also vital aids for assembly. Other tools can be added to one’s arsenal over time, such as a profile cutter, metal cutting shears, hold-and-fold units or punch-and-die sets, all of which are a great help when adding extra detailing components.
An essential truck modeller’s toolkit: sprue cutters, knives, files and reamers help to prepare the parts, while a razor saw, profile cutter, pin vice and drill bits allow parts to be modified. Tweezers and pliers make small parts easier to handle, and folding tools and round-nose pliers are handy for shaping metal detailing parts and materials. A steel rule and set-square help to get the parts aligned correctly.
Abrasive sticks, sheets and pads, in a range of grits, are also essential. Components will need to be fettled and prepared for bonding and painting, especially if a good quality paint job is desired.
Cotton swabs are vital to the weathering process, and cocktail sticks have many uses, particularly for applying small amounts of glue with precision. Micro-brushes are great for detail painting and weathering tasks.
Masking tape comes in many forms. Flexible vinyl tapes are important for working on undulating surfaces, while cloth-backed tape is fine for more general use, especially clamping parts together while gluing.
Punch-and-die sets are a loyal friend to those wanting to upgrade or modify kits, allowing individual hex bolt and disc washers to be created from styrene sheet.
Having a modest supply of stock materials to hand is highly recommended. With a variety of metal and styrene sheet, strip, angle and rod, along with brass, copper and nickel wire, we can take care of many detailing tasks.
Try not to throw away any offcuts of plastic, metal or wood, as they can be useful in the future. I keep a box full of scrap material, and it regularly provides me with the perfect raw materials for other projects.
Detailing components, designed to address shortcomings in specific kits or for more general use, are also available. Kit Form Services (KFS) offers an impressive array of ‘kits and bits’ for 1:24-scale trucks, including complete conversion kits to allow a broader range of prototypes to be reproduced, using existing kits as a base. Czech Truck Model (CTM) is another reliable source of 1:24-scale upgrade kits and components, including pre-painted logos, dashboard facia and realistic head- and tail-light lenses. Italeri also offers a handful of truck accessory kits to complement its range of 1:24 trucks, providing plenty of scope for customization, while Tamiya can provide packs of flexible cable that is perfect for replicating electrical cable or flexible hydraulic and air pipes.
Modellers have access to a range of detail upgrade kits and components, many of which are tailored to specific kits. Kit Form Services (KFS) and Czech Truck Model (CTM) are two of the best sources for a whole host of metal and resin parts.
There is also the option of creating your own detailing parts, and I recently commissioned this set of etched details from PH Designs for an ongoing conversion project.
My order from PH Designs included etched nickel-silver parts to create an impressive radiator cooling fan.
The wheels are a common area where 1:24-scale kits underperform, but resin replacements are available from KFS. Hubs and rims may need to be assembled from various layers.
Assembled and ready for painting, the KFS wheel range offers some welcome variety and a significant uplift in realism, compared to the kit’s original wheel rim (right).
Glues are a modeller’s best friend. Liquid poly-cement, cyano, epoxy and glazing adhesives are crucial. So, too, is a selection of model fillers, from regular putty to ‘liquid fillers’, such as Mr Surfacer and Mr Dissolved Putty, from the Mr Hobby range.
Different paint formulas lend themselves to specific tasks and application methods. Lifecolor and Darkstar acrylics are great for hand-brushing, while Tamiya, Mr Hobby and Alclad II lacquers perform best through an airbrush.
Good quality paintbrushes are a worthy investment. Flat and round, hard and soft, large and small – you’ll need them all!
Sundries, including masking tapes, cotton swabs and paintbrushes, should also be on hand, while maintaining a supply of ‘stock’ material will allow for parts to be enhanced or replaced. Plastic, in sheet, strip and rod format, from the likes of Evergreen, Plastruct, Slaters or Maquett, can be invaluable. Brass and nickel-silver tube, strip, sheet and wire also have their uses, while real stripwood and veneer can also be harnessed to improve the realism of kit components.
BASIC KIT ASSEMBLY
Each chapter offers plenty of assembly tips, but it’s good to start with the basics. Mainstream plastic kits consist mostly of injection-moulded components, rendered in polystyrene (commonly known as styrene), a flexible material that is capable of taking very fine detail. Much depends on the quality of the moulds and the skill of the toolmaker, though as the moulds age, the level of finesse can diminish. Clear glazing parts are also moulded from polystyrene, but the lack of a colouring agent means that the material can be brittle and prone to scratching. Accordingly, clear parts need to be handled with care.
Kit makers often recommend that all parts be washed before assembly, in order to remove traces of mould-release chemicals that can interfere with glue and paint adhesion. As I usually abrade parts with files or sanding sticks before making any glue bonds, to remove imperfections and tidy up joint faces, there’s little point in washing the parts beforehand. That said, completed sub-assemblies are always thoroughly cleaned before priming and painting, to remove any debris and other contaminants.
Parts can be cut from the sprue as and when needed, either with a stout knife or, preferably, a set of special sprue-cutting shears. This reduces the risk of damaging the parts – or yourself – with a knife. Cuts are made a few millimetres from the edges of the components, then the waste is removed with a file and the surface tidied with abrasives. Shears are not always suitable, however, especially when dealing with very small, delicate parts or where the jaws of the tool will struggle to reach within the tight confines of the sprue. In such instances, a miniature razor-saw blade can be used to cut through the material gradually.
A set of sprue-cutting shears speeds up the process of trimming parts from the sprue, while also minimizing the risk of damaging the components and your fingers.
Fettling each and every part to remove imperfections and improve their fit is not always essential, but it will drastically improve the appearance of the finished model.
It is rare for parts to be assembled straight from the sprue without some degree of intervention, as raised seams (from where the two halves of the mould meet) and ejector pin marks (caused by pins that force the parts from the moulds) inevitably require flattening and the surrounding surfaces tidying up. Needle files of various profiles, and multiple grades of sanding stick come to our aid here, and the amount of time spent on getting the parts perfect will be reflected in the appearance of the model at the end of a project. Imperfections, if not attended to, only serve to remind the viewer that the model was built from a mass-produced plastic kit, rather than portraying a convincing miniature replica.
The flip side of such a diligent approach to preparation is the ease with which excessive material can be unwittingly removed from plastic parts, leading to alignment issues during assembly – so take things steadily and test-fit the parts to their neighbours at regular intervals.
Glue is a vital modelling tool in its own right, and choosing the right adhesive to suit specific materials and situations is important. Liquid poly-cements are generally the core adhesive for the majority of plastic kit assembly. This thin liquid acts by chemically fusing the two parts together, but it relies on the parts meeting snugly in order to effect a reliable bond. The parts should be held in contact before applying the cement directly into the joint with a fine brush. If the parts can’t be held together before the glue is applied, a slower-drying poly-cement is required, which can be applied to one of the joint faces before the parts are brought together. The thicker formulas of cement can be a little difficult to use neatly, but they do have their uses from time to time.
Poly-cement’s major drawback is the fact that it needs to work on bare, unpainted plastic surfaces. Paint will have to be scraped away to effect a joint, and the solvent may cause any surrounding paintwork to blister if applied excessively. Furthermore, poly-cement is not recommended for use on clear styrene components, as the solvent will eat into the plastic and cause it to cloud over. Instead, non-solvent glues such as PVA or a dedicated glazing adhesive such as Glue ‘n’ Glaze are better suited, as they produce a flexible, resilient bond, and dry crystal clear. Such glues can also be employed on painted plastic parts or other detail fittings that may be sensitive to the use of strong solvents, or where a degree of flexibility is required: this will be illustrated in the following chapters.
The styrene parts need to marry up snugly in order that the liquid poly-cement can work effectively.
A set-square will help to check the angle of corner joints. These miniature magnetic clamps, from York Modelmaking, can be used to orient the parts accurately before the cement is applied.
Sprung clothes-pegs make perfect clamps for holding parts together whilst gluing. Allow the parts to cure fully overnight.
Any seams between parts can be rendered invisible by abrading the surfaces, then adding filler where needed to create a seamless joint.
As each part and sub-assembly is laboriously prepared, they can be stored safely until required.
Not every element of a model truck is rendered in styrene, and when fixing plastic to other materials, a different type of glue is required. Whereas liquid poly-cements create bonds chemically before evaporating away, epoxy and cyanoacrylate glues produce mechanical joints, where the parts are physically held together by the hardened glue. Two-part epoxy glues come in various formats, with fast (5min) and slow (30min) working times, and they all require mixing before use. They often smell like blocked drains and can be a little messy, but the bonds are strong and flexible.
Cyanoacrylate, sometimes referred to as superglue, also comes in a range of drying times of between 1 to 30sec. Different viscosities are also available, with the thicker versions being ideal for bonding parts that may not fit perfectly, with the glue acting as a filling medium as well as an adhesive. Bonds can be very strong, but some cyano formulas can damage clear glazing if used in close proximity. Only a small amount of adhesive is required to make a good joint, and accordingly it is an ideal glue for fixing small detail fittings of any material, as well as installing painted sub-assemblies together.
Cyano glue is ideal for bonding smaller detail parts and painted sub-assemblies to the main chassis or bodyshell. Different formulas exist, so different glues are suitable for general use or for more specific tasks.
Where gaps between parts arise, or where other remedial work is required, we need to employ model filler and putty. Again, there are plenty of suitable products from the major model kit manufacturers. Solvent-based versions offer superior adhesion to bare plastic surfaces, although deeper holes will have to be treated over several sittings, with each layer allowed to dry in-between. Acrylic-based putties, as offered by Vallejo and Deluxe Materials, have little or no smell and can be cleaned up with water, but otherwise they behave in similar ways to solvent-based putties. However, neither are very good at filling holes larger than a few millimetres wide. Epoxy putties are much better suited to filling larger apertures and are rock hard when fully cured, although they do require mixing before use.
Fixing metal or resin detail parts demands the use of epoxy or cyano adhesives. Be prepared to fill any gaps between the new and original parts with putty, which can be tidied and smoothed with abrasives once it has cured fully.
Take your time to get the bodywork correctly prepared before and during the finishing stages. Decanting Deluxe Materials’ Perfect Plastic Putty through a syringe allows it to reach into hairline gaps without clogging up the relief. A damp swab will clean away the excess and smooth the surface, with little need for abrasives.
The first primer coat usually reveals surface imperfections hitherto invisible, so wet sanding with fine-grade abrasive sheets and a thorough clean will prepare the model for the next layers of primer.
Aerosol-based paints and primers offer convenience with the potential for a high-quality finish.
Spraying paint must be done responsibly. Always wear a facemask and work in a well-ventilated space. An extraction booth helps.
We’ll discuss a variety of painting and weathering techniques in detail during each of the book’s chapters, and I have presented a range of approaches that suited the needs of each particular truck. There is no shortage of good quality painting and weathering products these days – indeed, we’ve never had it so good in terms of kits and ancillary items to keep us all busy and out of mischief.
An airbrush offers greater precision and control over the paint flow, allowing the colour to be built up gradually.
Improvisation is a key modeller’s attribute. These Victorian-era railway decals were chopped up to create a fictional haulier’s logos.
Weathering washes are a highly versatile medium. Enamel-based washes can be particularly effective.
Enamel washes can be brushed liberally over the surface, before wiping most of the pigment away with tissue or cotton swabs, preferably in downward strokes to mimic gravity-led staining.
As will be seen throughout this book, there is plenty of work for dry weathering pigments.
Now that we’ve covered the basic principles of plastic kit assembly, it’s time to get started on the practical work…
CHAPTER TWO
STARTING SMALL: MERCEDES-BENZ 2238 AND VOLVO F12 IN 1:72 SCALE
There is no doubt that truck modelling enthusiasts tend to prefer working in the larger scales, such as 1:24 or 1:35, but there are also those who enjoy the challenge of producing something smaller. Whether it’s about the joys of greater miniaturization, or dictated by a limited display space, 1:72- and 1:76-scale kits offer plenty of opportunities. Furthermore, they may allow us to enjoy parallel interests in building dioramas or model railways, where the trucks will form a small part of a scenic whole.
Many landmark kits have appeared in this scale over the years, from the likes of Airfix, Revell, Italeri, Tamiya, Heller and Matchbox. These have proven especially popular with junior modellers, thanks to their pocket-money price tags, modest number of parts and relative ease of construction. Indeed, there are plenty of kits still around today that date back several decades, such is their enduring popularity.
These days there are plenty of high-quality die-cast cars and trucks to choose from, to suit OO-, O-gauge (1:43.5) and even N-gauge (1:148) model railways and dioramas, thanks to the likes of Oxford Diecast. However, in my youth there was a real dearth of 1:76 civilian road vehicles in either die-cast or kit form, to complement my OO-gauge railway. Matchbox 1:72 die-cast cars from the local toy shop had to suffice, but they seldom looked at home in their surroundings.
Certain military truck kits from Airfix and others were an option, although they needed converting to civilian use, which wasn’t always easy. A number of ‘cottage industry’ resin and white-metal kits could also be found in the 1980s, if you knew where to look, but the main source of HGV subjects was the Kiel Kraft range of plastic kits.
FROM KIEL KRAFT TO KNIGHTWING
Also sold under the Scan Kit moniker, Kiel Kraft offered a wide range of plastic 1:72-scale truck kits during the 1970s and 1980s. Sold at bargain prices and available from toy or convenience stores, kit subjects included post-1960s European designs from Ford, DAF, Mercedes-Benz, Foden and Volvo, plus a couple of US examples such as the iconic Kenworth Aerodyne and Peterbilt 359. Virtually all came in the form of tractor units (with or without trailers), save for a fetching Foden Haulmaster eight-wheel tipper.
Kiel Kraft was once a great source of 1:72-scale plastic truck kits, with a small number still available under the Knightwing brand. Dating mostly from the early 1980s, they’re a little basic, but fun to build and readily detailed.
Kiel Kraft also produced a few kits of vintage prototypes, ranging from Atkinson or Foden steam wagons to an elegant Edwardian fire engine. Of particular interest to railway modellers was a Thorneycroft 1½ ton parcels delivery truck (originally a Davric kit from the 1970s), a version of which was offered with interwar period Great Western Railway livery decals.
All the Kiel Kraft kits were fairly basic (especially the Thorneycroft), but most of the trucks can make very convincing models if some extra time is invested in adding and refining certain details. Furthermore, they’re still available today, thanks to the Knightwing brand.
Despite the age of the original moulds, the current Knightwing versions are crisply moulded and the parts fit together well. The frames are sparse, and most tractor units share the same one-piece chassis with a 6×4 axle configuration. The cab mouldings have a surprising degree of finesse in the most part, and left-/right-hand drive conversion is as simple as it gets: simply fix the steering wheel on your side of choice!
Despite being previously marketed as 1:72-scale kits, Knightwing now brand them as OO-gauge models (1:76), so things can get a little confusing. That said, the assembled vehicles look very much at home on OO-gauge layouts, especially when placed judiciously within a scene. Forcing the perspective is a useful tool for scenic modellers, placing slightly under-scale models in the background and over-scale models nearer the viewer.
Of course, if you are not a railway enthusiast or diorama builder, the issue is irrelevant. More importantly, the kits tend to capture the basic character of the prototypes, and they still offer decent value. There’s no end of possible detail improvements that can be visited upon these kits, with existing fittings enhanced or replacements fashioned from stock materials. Suitable figures in HO or OO gauge are freely available, to incorporate a driver or to populate a diorama. Furthermore there is also the option of converting a tractor unit into a rigid flatbed or dropside body, including the fabrication of realistic payloads.
BUILDING A 1:72 MERCEDES-BENZ 2238S
The Mercedes-Benz ‘New Generation’ SK series of trucks was first introduced in 1974, and remained in production well into the 1980s. I’ve long been a fan of these trucks, and kit makers have also been drawn to the SK series, with a variety of offerings available in different scales since the 1980s. The Kiel Kraft kit that features here had been in my collection for decades and portrays a heavy-duty, long-range 2238 6×4 model; this kit is still available from Knightwing. Incidentally, a 1:24-scale kit of this prototype is available from Italeri, and features in Chapter 11.
The original kit’s illustrated instructions contain a number of errors, the most obvious involving the engine block, which is shown back to front: the sump needs to be placed at the front. Be aware also that the rear spring/axle mounts are handed, so check the orientation of the parts carefully before gluing them in position, temporarily adding the wheels and axles to ensure that the fenders will fit.
The engine block is rudimentary, to say the least, but it’s nice to have something there rather than a just a void. However, I did replace the driveshafts with plastic rod, and added extra cross-members to enhance the overall appearance of the chassis. A number of scratch-built fittings were also installed, including replacement mirrors, a chequer-plate flooring panel and a set of coiled susie cables. The original exhaust pipe was also replaced, with a scrap of thick wire rod employed for the front section and fine brass tube for the outlet pipe.
A choice of front bumper is supplied: either a regular pattern fitting, or one with a huge bullbar attached, which looks grossly over-scale. Replacing the bars with brass wire, shaped and slotted into holes drilled into the uprights, would look far superior. However, for my model I wanted to keep it simple, and fitted the plain bumper.
Most kits from Kiel Kraft feature a generic open-framed chassis, moulded as a single unit. Cut small parts from the sprue carefully, preferably with a sharp set of sprue-cutting snips.
Despite their heritage, the parts only need a cursory amount of fettling with needle files to remove excess material and tidy up any moulding seams.
Pay attention when fitting the rear mudguard and suspension assemblies, as they are handed and will only provide sufficient clearance for the wheels if fitted correctly. The rudimentary engine and fuel tanks are made up of several elements, and any gaps need filling and dressing before they are fitted to the frames.
The axle holes need rifling with a reamer to allow the axles to fit snugly, once they, too, have been fettled to remove the pronounced mould seams along their length.
As well as upgrading the exterior, I also added some extra detail to the interior of the cab. The Ten Commandments range of modelling accessories includes packs of printed truck-interior details, including licence plates, road atlases, newspapers, magazines, flags and even high-visibility tabards. Simply cut them out, fold where necessary, and fix in place, to instantly bring life to the cab. Red/yellow warning panels were also provided in these packs, so a set of these was cut out and fixed to the rear fenders. The UK licence plates were too modern for a 2238, so I obtained some waterslide decals from Fox Transfers to create my own numberplates. Fox also supplied the corporate logos, although it must be stated that this isn’t a rendition of a real truck: rather, I needed some ready-made logos for a haulage firm based near Liverpool for one of my model railway projects, set in the early 1980s.
The main driveshaft was replaced with a length of plastic rod.
The wheels and tyres are produced as single units, but their tread faces featured unsightly raised seams, so these were sanded away.
The ends of the steering axle were bent slightly to allow the truck to be posed with the front wheels at a very slight angle, which always improves the look of any model road vehicle.
The wheels were test-fitted to the axles while the model was sat on a small sheet of glass, to check that everything was concentric. The axles were then glued to the frames, although the wheels were removed and painted separately.
Apart from the silencer, the rest of the kit’s exhaust was discarded. The primary section of pipe was created with a scrap of thick metal wire, fixed into a hole drilled into the silencer.
The outlet section of pipe was cut from fine brass tube, using a razor saw to avoid damaging the soft, hollow material.
The cab was test-fitted to ensure that the exhaust system didn’t interfere with the mounting brackets. I also crafted some extra cross-members from plastic strip and fixed them between the frames at the rear end.
As well as a mounting plate for the fifth wheel, I also added a tread panel from etched brass (from PH Designs), cut and filed to shape. This helps to disguise the basic nature of the frames.
Black-coated 28-gauge copper jewellery wire was wound around a 1.5mm drill bit to create a set of susie cables. Leave a short length of straight wire at each end, and cut the wire with snips.
A simple bracket was created from more scrap plastic, with holes drilled to accept the cables, which won’t be fixed in place until after the truck has been painted.
Another small detail addition to the chassis was a pair of mud-flaps, cut from paper and secured with cyano glue.
The cab requires little in the way of assembly, although the front grille needs to be secured carefully so as not to damage the delicately moulded detail. Tamiya’s Extra Thin poly-cement is ideal for jobs like this. Use the precision brush provided to run a small amount of cement into the gap around the edge. The fluid will find its own way into the joint.
The chunky mirrors were replaced with 0.4mm brass wire, shaped with round-nose pliers to get a nice curve at the corners. The mirrors were cut from plastic strip, and a groove filed into the rear to help them sit on the wire more securely.
Mounting holes were drilled into the cab, and the new mirrors secured with cyano glue. The wire shouldn’t protrude into the cab, or it will interfere with the glazing unit.
After a coat of grey primer (from an aerosol), the cab and frames were painted separately, using Tamiya acrylics and an airbrush. The cab’s colour was created by mixing red and brown, plus a drop of green. After hand-painting the smaller details, the cab and chassis were sprayed with a clear gloss coat.
The clear gloss provides the perfect surface on which to apply waterslide decals; these logos were taken from a Fox Transfers pack for 1:76-scale/OO-gauge trucks.
The cab interior was adorned with designs, courtesy of a pair of printed detailing packs from the Ten Commandments range.
The Ten Commandments packs also provide warning panels for the rear flaps, while the numberplates had to be created from individual waterslide decals, from Fox Transfers.
The one-piece glazing unit was very cloudy, so I tried to salvage it by polishing with fine abrasives, starting with 4,000 grit and working up to 18,000, using plenty of soapy water as a lubricant.
After rinsing and drying, Johnsons Klear acrylic floor polish was brushed on to the glazing unit to restore the transparency and shine. Allow to dry for a few hours before handling.
The finished truck certainly looks like a Mercedes-Benz 2238, although I’d venture to say that the windows appear to be too small. It remains fairly basic in terms of detail, especially when compared to the Diamond T dumper in Chapter 3, confirming that this kit hails from another age. But its relative cheapness and ease of assembly, plus the nostalgia factor – I can remember buying this kit from a musty old hardware store with my pocket money – made for a fun project.
The assembled cab simply clips on to the chassis. The Kiel Kraft kit might be basic, but it can provide a fun project that isn’t overly challenging.
The kit’s instructions include a few errors, most of which I spotted early. Alas, I was too late to realize that the rear light boom should be fitted the other way around, so mine is upside down! The extra details added to the chassis have made a big improvement.
MODIFYING A VOLVO F12
The Volvo F10 and F12 series of trucks were introduced in 1977 and featured a range of ground-breaking elements, especially in terms of cab ergonomics. The number following the ‘F’ prefix denoted the size of engine in litres, and the mechanical aspects were a development of the earlier N series of rigid and articulated trucks.
Utilizing another kit from the erstwhile Kiel Kraft range (although this time a more recently manufactured Knightwing version), I initially envisaged keeping this truck as a tractor unit to complement the Mercedes 2238. However, after a change of heart I decided to extend the chassis to form an 8.5m (27.9ft) rigid dropside version, harnessing a Knightwing trailer kit to provide some of the necessary materials.
Enlarging the chassis was simple enough, with lengths of styrene strip inserted just behind the cab. A little arithmetic revealed that, to create an 8.5m-long chassis in 1:72 scale, the existing 92mm (3.6in) frames required an additional 26mm (1in) in length. Looking at the kit’s chassis, the area immediately behind the cab seemed like the best place to insert the extra material, so plastic strip was sourced, as close to the dimensions of the existing frames as possible. Evergreen’s 1.0 × 3.2mm (0.040 x 0.125in) was the closest I could find, leaving the Knightwing frames needing a degree of tapering on the lower edges of the frames.
This Knightwing Volvo F12 kit is another ex-Kiel Kraft product, which I’d decided to convert from a tractor unit to a rigid dropside truck. The chassis comes as a single unit and its rudimentary nature makes it easy to modify. Evergreen 1.0 × 3.2mm styrene strip is a close match for the dimensions of the side frames.
It made sense to cut the frames at the end of the solid area beneath the cab, leaving the rearmost section untouched, thus preserving the locating slots of the axles and suspension. A fine-toothed razor saw was employed, and the cut was made gently, aiming for a nice square edge.
A set-square revealed how square and even the cut faces were, and a flat needle file made any necessary adjustments.
Lengths of the 1.0 × 3.2mm strip were cut and fixed to the rear section of the frames, one at a time, using a straightedge to ensure correct alignment. A pair of cross-members was also cut and inserted between the frames.
With the axles and wheels temporarily fitted, the two elements of the chassis were brought together on a flat surface. After checking that everything appeared square and true, the bond was made behind the cab. Small reinforcing brackets were formed from plastic angle.
The extended chassis will be fragile until the load bed is installed, so it needs to be handled carefully. The floor from a Knightwing trailer kit was marked out and cut, again making sure that the edges were square.
After fixing the load bed in position, the chassis instantly gained strength and rigidity. The various underframe fittings could now be added.
The sides from the trailer were also cut down and installed, with new upright strengthening brackets added from styrene strip and angle.
The vital element to this process was accuracy of marking and cutting, ensuring that the edges were square and true, with the new material carefully aligned and bonded securely. Extra bits of styrene strip and section served to reinforce the joints, and the decision to maintain the twin rear axles meant that the kit didn’t need many other modifications. The trailer kit parts were trimmed to fit the elongated chassis, and once the load bed was fixed in position, the chassis became very rigid and resilient.
An extended driveshaft was formed from plastic rod, and the underrun barriers fabricated from plastic strip.
A Tamiya aerosol (TS-44) provided the main colour for the cab and bodywork. Once this had dried, the chassis was hand-painted and smaller details picked out before everything was coated with clear gloss.
This detail pack, from Ten Commandments, provided ‘Long Vehicle’ legends and warning panels. As with the Mercedes truck, the licence plates were created from individual decals.
To give this truck a work-stained look, the bodywork and chassis were treated to a brush-on, wipe-off acrylic wash. Working on a small section at a time, a grimy mix of regular acrylic paints was brushed on to the surface. Immediately, most of the paint was wiped away with cotton swabs, working in vertical strokes and leaving behind deposits of pigment within recessed panels and seams.
The acrylic wash stage can be effective on its own, but it is liable to create hard ‘edges’ to the dirt deposits. A fine misting of similar paint shades from an airbrush will soften the effect, with Tamiya’s acrylics being perfectly suited for this task. Restraint is important, as it’s easy to apply too much paint, especially on smaller models. Free-flowing paint and a low air pressure (maximum 15psi) are crucial.


