20,99 €
Mehr erfahren.
- Herausgeber: Crowood
- Kategorie: Lebensstil
- Sprache: Englisch
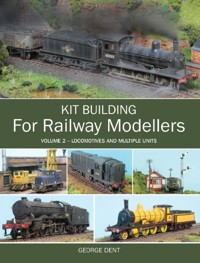
Locomotive kit building remains the best route to achieving a varied range of motive power in most scales but it also retains a mystique, being associated with expert modellers and expensive tools. However, in this invaluable, richly illustrated volume, George Dent demonstrates how anyone can successfully assemble working kits with only a modicum of inexpensive equipment and experience. All aspects of assembly are covered in detail including working in plastics, resin and metal; the very basics of working and joining materials; installing ready-made power units and performing more complex operations, such as assembling etched metal chassis frames and intricate valve gear. Includes a full guide to essential tools, materials and adhesives, covers the art of soldering and explains the basics behind chassis construction and alignment. Presents an in-depth guide to the assembly of cylinders, coupling rods and valve gear and examines a range of power unit and transmission options. Demonstrates how to detail and modify kits for extra realism, illustrates painting, lining and weathering techniques and offers tips on running-in, testing and maintaining mechanisms. An essential guide to building locomotives and multiple units from kits and helps the modeller to achieve the best results from every kit. Aimed at railway modellers of all abilities, it is superbly illustrated with 537 colour photographs.
Das E-Book können Sie in Legimi-Apps oder einer beliebigen App lesen, die das folgende Format unterstützen:
Seitenzahl: 464
Veröffentlichungsjahr: 2013
Ähnliche


KIT BUILDING
For Railway Modellers
VOLUME 2 – LOCOMOTIVES AND MULTIPLE UNITS
GEORGE DENT
THE CROWOOD PRESS
First published in 2013 by The Crowood Press LtdRamsbury, MarlboroughWiltshire SN8 2HR
www.crowood.com
© George Dent 2013
All rights reserved. No part of this publication may be reproduced or transmitted in any form or by any means, electronic or mechanical, including photocopy, recording, or any information storage and retrieval system, without permission in writing from the publishers.
British Library Cataloguing-in-Publication Data
A catalogue record for this book is available from the British Library.
ISBN 978-1-84797-646-8
CONTENTS
ACKNOWLEDGEMENTS
PREFACE
INTRODUCTION
CHAPTER 1: FOUNDATIONS
CHAPTER 2: MAKING A START
CHAPTER 3: NEXT STEPS IN PLASTIC
CHAPTER 4: EASY MOTORING AND ELECTRICAL MATTERS
CHAPTER 5: RESIN
CHAPTER 6: SUPERDETAILING AND KIT BASHING
CHAPTER 7: METALWORK – THE BASICS
CHAPTER 8: METALWORK – THE NEXT STEP
CHAPTER 9: BUILD A BETTER BODY
CHAPTER 10: CHASSIS FUNDAMENTALS
CHAPTER 11: BOGIES, TRUCKS, MOTORS AND GEARS
CHAPTER 12: POWER COLLECTION AND TESTING
CHAPTER 13: OUTSIDE CYLINDERS, PISTON RODS AND VALVE GEAR
CHAPTER 14: PAINTING AND FINISHING
CHAPTER 15: DECALS AND LINING
CHAPTER 16: FINAL ASSEMBLY
CHAPTER 17: FINISHING TOUCHES
AFTERWORD
USEFUL CONTACTS
BIBLIOGRAPHY AND SUGGESTED READING
INDEX
ACKNOWLEDGEMENTS
For help with materials, tools and kits, my thanks go to Alex, Lisa and the team at The Airbrush Company; Geoff Baxter (The Hollywood Foundry); Charlie Petty (DC Kits); John Bristow (Deluxe Materials), Peter Harvey (PH Designs); Brian Hanson (Shawplan) and Dave Alexander (Alexander Models).
At Model Rail magazine, Ben Jones, Richard Foster and Chris Leigh have been very helpful, and Dave Lowery’s expertise in all things metal has proved invaluable. Thanks also go to Chris Nevard for the kind use of his photographs, and I am indebted to Jimmy Lavery for the continued use of his ‘Waytown’ layout as a backdrop-cum-test track, and for a number of his photographs.
Jeanne Carr’s cottage in Settle has again proved the perfect place to thrash out a manuscript, and I have greatly appreciated the donation of a number of metalwork tools from my father-in-law: these have come in very useful during the many projects contained in this book – thanks, David! Finally, special thanks go to all members of the Dent Collective, human and animal. Keep the red flag flying…
Locomotive kit building can be as humble or grandiose as you like. Cutting your teeth on a humble subject, such as this plastic diesel shunting loco, is a great way to learn a number of vital skills, including accurate assembly of a chassis, installing a working power unit and creating a realistic paint finish.
PREFACE
Pride may be one of the seven deadly sins, but there is little to match the hubris of watching a kit-built vehicle moving smoothly around the layout under its own power. Better still if it is finished to a realistic standard, perhaps with a decent weathering job or carrying some intricate detailing that wasn’t part of the original kit. And if it’s something grand such as a steam engine, with working connecting rods and valve gear, then it’s hard not to let the sense of achievement overwhelm you.
Pride in your handiwork is nothing to be ashamed of – indeed, I don’t think I need be banished to Dante’s Inferno to learn humility. In fact, I’m more than happy to admit that I’m nowhere near the best – and certainly not the most prolific – loco kit builder there has ever been. Nor will I ever be; I’m still in this hobby for the fun and enjoyment, as well as the chance to keep learning new things.
On the other hand, I do get through a good few kits every year, of varying materials, scales and difficulty. What’s more, many of the projects are of other people’s choosing, which has proved a great way to learn. If it had been up to me, there are a number of past projects that I would never have undertaken, contenting myself with the easier, quicker or cheaper routes. But forcing oneself to take the plunge and see where the waters take you can be an instructive and interesting journey.
So why not have a go, perhaps starting with something simple like a single-piece plastic body and a ready-made power unit. Then move on to something a little more taxing, such as a multiple unit with articulated bogies and an interior to think about. From here, we can integrate new skills such as soldering or shaping sheet metals in terms of detailing parts. The next logical step is to try building up a new brass chassis for a tender, learning how to get the axles aligned and the parts sitting squarely together. It’s only a small step from here to building a powered chassis. Tackled in small steps, rather than grand leaps, there shouldn’t be anything too intimidating about the next stage.
ABOUT THE AUTHOR
Formerly a graphic designer, guitar maker and museum conservator, I have been the in-house model maker at Model Rail magazine since 2004. In that time I have produced countless articles, run courses on airbrushing and weathering, as well as appearing in instructional DVDs. My four previous titles for Crowood include Detailing and Modifying Ready to Run Locomotives in OO Gauge, Volumes 1 and 2; Airbrushing for Railway Modellers; and Kit Building for Railway Modellers, Volume 1.
INTRODUCTION
Mine has been a long and enduring love affair with model railway kits. Beginning with the iconic Airfix brand, they offered a cheap yet priceless means of honing essential modelling skills, such as assembly, customization, painting and weathering. Indeed, the experience proved hugely addictive: once I’d built the first plastic wagon kit, I was instantly hooked. The passion remains, all these years later, with ready-to-run (RTR) rolling stock still ranking below kits as far as enjoyment is concerned.
As for locomotives and multiple units, kits have also played a large part in my modelling career. Diesel multiple units (DMUs) from DC Kits were a vastly different experience to Airfix products, offering the challenge of working with plastics other than styrene, as well as etched detailing parts. The need for scratch-built interiors, working out how to fit a power unit, and adding extra power collection from the trailing bogies, pushed my skills to the limit.
Originally introduced under the Rosebud/Kitmaster brands, these plastic loco kits proved to be their undoing as they simply couldn’t cope with demand. Indeed, 4mm-scale modellers had been starved of high fidelity reproductions of Blue Pullman units, BR 9Fs, GWR and SR 4-4-0s or small tank locomotives, even if they did come unpowered. Eventually sold to Airfix in the late 1960s, most of the kits are still available today under the Dapol banner.
It took until my mid-twenties before I attempted anything as grandiose as a complete steam locomotive kit, although I’d prepared myself for the challenge by dabbling in etched chassis building for some time beforehand. Beginning with the basic frame and bearing arrangements of locomotive tender chassis as replacement units for RTR models, the core skills were soon mastered, and confidence in the materials and processes developed, not least in the art of soldering.
This gradual approach also permitted the acquisition of tools and construction aids over a long period of time, spreading the cost and allowing each technique to be studied in turn. I doubt that many readers will be aiming to follow this twenty-five-year study path, but I’ve endeavoured to present as much information as possible between this book’s covers, with each chapter concentrating on a specific process.
Moreover, previous books and magazine articles on this subject tend to use individual kits as a means of illustrating ‘loco kit building’. But I’ve always found these a little limited, not least because every kit is different, even those from the same manufacturer. Indeed, each project continues to throw up something new, and there’s always plenty to learn from every job. To me, that is part of the enduring appeal of the hobby. Reducing each construction stage to its basic elements demonstrates how methods can be transferred from one kit to another.
This book, like the preceding volume, therefore follows my own development, building on the fundamentals first. Leaping headlong into complicated projects always carries the risk of disenchantment. The old adage of ‘walk before you run’ is a perfect mantra in terms of locomotive building, and while mistakes are bound to occur, the book aims to equip readers with the knowledge of how to correct them, and, hopefully, not to repeat them. Having said that, making errors can be the best way of learning. It’s all well and good for me to pontificate on why something shouldn’t be done in this or that way, but until you see these things with your own eyes, it can be hard to appreciate why.
Arranged largely in order of difficulty, this book begins with projects in plastic and resin before introducing metalwork, soldering, transmission systems and valve gear. The later chapters covering painting and weathering are probably less difficult than those on chassis building, but are kept to the rear for reasons of chronology. So if you are keeping to plastic and resin kits for now, you’ll have to skip a few chapters to get to the preparation, painting and finishing stages.
HOW FAR SHALL WE GO?
A small caveat should be inserted at this point: in this book, the assembly of steam locomotive chassis is given enough coverage to get you started, offering many vital hints and tips to help get your frames square, bearings aligned, wheels quartered, valve gear assembled, and motors and gearboxes set up correctly. Many of the key methods and materials are described, which should set you up to deal with whatever brand of kit you have set your heart on.
However, to cover all the different methods employed by all the different kit makers (old and new), with all their little quirks and foibles, would require a separate and very hefty volume. Therefore I have attempted to distil as much of the fundamentals as possible within the available space. For those wanting to know more, please glance at the Bibliography, where there is a list of recommended books and articles.
THE KIT IN THE TWENTY-FIRST CENTURY
How relevant is a book on kit building in the twenty-first century? As I stated in Volume 1, the kit more than justifies its place in the model railway market, especially as new materials and production methods have resulted in a vast improvement in the quality of components. This, in turn, leads to kits that are much more realistic, as well as being easier to assemble. Indeed, the proliferation of resin casting and computer-aided design and manufacture has really upped the ante, with firms such as Just Like The Real Thing and Brassmasters offering amazingly accurate kits that retain a high pleasure factor in the building process.
Modellers in OO and N gauge still require kits to make a large number of prototype locomotives and multiple units, despite the rapid growth of RTR coverage. Upon the creation of British Railways in 1948, a staggering number of locomotive types were inherited by the nationalized industry, and RTR makers still barely scratch the surface of mainline steam subjects. There may be only a handful of BR Standard types currently unavailable, but pre-nationalization and, particularly, pre-Grouping prototypes remain elusive. Even modellers of the pre-1960 Scottish scene – an enduringly popular subject – are hamstrung by the lack of iconic steam traction.
RTR first- and second-generation multiple units are also fairly thin on the ground in all scales, and the slimmer pickings of all aspects of RTR O gauge is only now being addressed by Heljan and Dapol. And what of the long-suffering narrow-gauge or 3mm-scale enthusiasts who have to build virtually everything from kits or from scratch? Industrial enthusiasts, in all scales, are also poorly served.
Hopefully, anyone interested in building all types of model locomotives or multiple units will find this book useful. Although there is a definite 4mm scale bias in terms of the subject matter, the processes are virtually identical in any scale up to O gauge.
Kit building provides the only route to obtaining a great many types of British-outline locomotives. Steam subjects in particular are under-represented in RTR ranges, with key prototypes missing from the catalogues of Hornby, Bachmann and the rest. This ex-LNER J21 0-6-0 was built from an Alexander Models 4mm-scale kit.
I think I can safely forecast that an RTR version of a Liverpool Overhead Railway train will not appear in the foreseeable future. But then I may be wrong. I built this model for Chris Leigh’s ‘Herculaneum’ layout, using a Judith Edge package that is more an aid to scratchbuilding than a complete kit. Etched sheets of nickel silver form the bodyshells, along with resin bogie frames and roofs. Everything else, including the underframes and interiors, had to be scratchbuilt. Power comes from a Tenshodo ‘Spud’ motor unit, and the bogies are each fully compensated (with working suspension).
Narrow-gauge subjects are the preserve of modellers willing to build kits – or have them built, as there is precious little alternative source of traction or rolling stock. Photo by C. Nevard
OVER TO YOU
The techniques employed throughout this volume have been picked up over many years of active modelling. There are no formal courses in this sort of thing, so, having devoured countless books and magazine articles, watched other (more senior!) craftsmen at work, and tried out a few ideas of my own, a successful way of working has been developed. It’s probably not the most scientific and I am not a naturally gifted engineer, but my locomotives work and, although it’s a subjective issue, I think they look the part, too.
In these days of rocketing metal and oil prices I have tried to maintain a thrifty mentality throughout the featured projects, which is how I have always approached the hobby anyway. Being brought up in a household of modest income meant that second-hand and recycled raw materials were always the first option, but this can prove equally productive and a more fertile source of improvization than simply buying everything off the shelf.
Therefore, there is more emphasis on the use of plastic and resin kits than most other tomes on this subject, and with the idea of starting at the very beginning, we won’t be jumping into an etched metal 4-6-2 in the opening chapters. At its heart, this work boasts a desire to convince modellers of all abilities that building locomotives and multiple units is attainable, rewarding, and, more importantly, great fun.
So, clear some room on the dining table or a desk, unpack your tools and have a go…
CHAPTER ONE
FOUNDATIONS
The most logical starting point, in kit-building terms, is to choose a subject to replicate. Finding a suitable kit in the right scale comes next, along with equipping oneself with the tools and the practical knowhow for the job. Planning is also beneficial, starting with reading any supplied instructions a few times to familiarize yourself with what each part is and where it goes.
Other factors need to be in place too, namely adequate prototype information. Decisions will need to be made regarding period features to include or omit, and parts deemed inferior will require replacements. Additional components will also have to be procured, such as wheels, bearings, motor and gearbox.
Couplings are always left to the customer’s discretion, due to differing personal preferences. Similarly paint, decals, footplate crew, coal, lamps or headcodes are all factors to consider at the earliest opportunity. Such a list of ‘extras’ obviously increases the overall cost of a project considerably. Indeed, the cost of metal kits and wheels has been increasing steadily over recent years, due mostly to the astonishing rise in metal commodity values.
It’s rare to find a kit rendered in just one material, with even many plastic kits offering at least two different formulas. This typical kit offers whitemetal bodyshell components, along with a variety of etched nickel silver and cast brass detail parts.
It’s likely that extra parts will be required to complete a kit, such as wheels, gears, motor, paint and decals. Depending on the quality of the kit, additional detail parts may also be desired. Working out exactly what is needed is part of the planning process, and it can take time to procure the various pieces to complete the jigsaw.
As I say, factoring the all-in cost of a project will avoid any nasty surprises when sourcing the outstanding parts. Spreading the cost is an option, especially if a project is likely to take months to complete – though bear in mind that the cost of metal shows no sign of decreasing in the near future. Furthermore, some cottage industries work on small batches at a time, and there may be a delay when you do come to order the parts you need, which can be frustrating if you’re waiting to proceed with your project. With this in mind, it may be wiser to source all necessary parts sooner rather than later.
RESEARCH
Photographic resources are invaluable as a supplement to a kit’s instructions, preferably illustrating your chosen locomotive or multiple unit. Fixtures, fittings and liveries differed from one machine to another, especially later in their lives as ad hoc repairs were carried out or spare parts were borrowed from classmates that may even have been painted a different colour.
Changes to finish and details occurred over time, and if a specific period is being modelled, your chosen prototype may require certain modifications. Traction also tended to move around the system from time to time, especially in BR days, so it may also be necessary to ascertain whether a particular loco or unit was actually in the right locality at the right time.
These factors won’t trouble a good number of modellers, but even so, it pays to have plenty of information at hand that will help to identify the various aspects of the real thing, and to cover any inadequacies of the instructions. Furthermore, making rough sketches of specific features, such as the layout of equipment, can help to focus the mind, especially if the kit’s guidelines fail to make these things clear.
Colour images obviously help with liveries, but black-and-white photographs may be sharper in terms of detail. A selection of images of both sides and ends, although not easy to obtain, will avoid any guesswork. For more recent subjects, getting out and photographing the real thing provides an unbeatable visual resource, especially if you’re able to capture images of less obvious areas such as underframes, roofs and interiors. However, just remember that preserved vehicles may not be representative of how they looked in service.
As well as images, background technical and historical information from books and magazine articles also come in handy. Class histories are common, with a vast number of books being published about even the most obscure locomotive and multiple unit types. A little discernment is necessary, however, as some titles are far superior to others, with clearer images and more accurate information. Browsing before purchase is highly recommended.
Locomotive allocation histories are a great resource, and a number of books and pamphlets have been published in the last decade, dealing with British Railways steam, diesel and electric traction (including multiple units and railcars). As well as where particular trains were working at a given time, build, refurbishment and withdrawal dates are also vital, especially if your layout is intended to depict a certain geographical location within a chosen time-frame. Knowing when an example emerged from a major overhaul or refurbishment provides the modeller with an idea of when a new livery or revised fixtures were applied.
Other important period-specific information may govern the type of tender in use with a steam loco, or if any experimental equipment was being assessed at that time. Data on batch variations within a class will offer a clue as to whether a different pattern of valve gear was installed – for example, the LMS Class 5 4-6-0s fitted with Caprotti valve gear, or the Crosti-boilered BR 9F 2-10-0s.
All but the most obscure information is available in print or on the Internet, while the Public Record Office and National Railway Museum possess a vast amount of useful archives. So too do the many local railway museums, preserved railways and societies, some of which are listed in the Useful Contacts section.
Careful study of the kit’s instructions should be supplemented by prototype images and as much technical information as is possible to glean from printed and digital sources.
There is plenty of printed material out there, on virtually all types of mainline and industrial motive power. Allocation and technical histories, livery guides, magazine articles and society journals can provide essential information. The reading room of the National Railway Museum is also an excellent source, along with museum and library archives.
You can’t beat a little on-site prototype research, with visits to museums and preserved railways providing plenty of inspiration. Forward planning is essential to ensure that the intended subject will be accessible. I’d long wanted to see this ex-North British Railway 0-6-0 Maude, but its usual home in Scotland was too far away. However, after hearing that it would be visiting the NRM at York in early 2011, I was soon on the train with camera in hand!
Contacting a preserved railway and requesting an inspection of a specific prototype will often be accommodated for a small donation to the society’s funds. For vehicles not often to be seen by the public, such as this BR Class 06 at the East Lancashire Railway, a private visit was the only way of getting up close. As well as a camera, a tape measure and notebook will assist in taking measurements of crucial components and assemblies.
Depot open days still take place on the modern railway, although only very occasionally, so it helps to know where they will be announced. Magazine titles concerned with the contemporary industry, such as Rail or Railways Illustrated, plus enthusiast websites, are the best bet. Events such as Model Rail Live, held regularly at Barrow Hill, offer the chance to view real and model trains at very close quarters.
Preserved locomotives are not always likely to be in the same condition as when they were in frontline service, so some recourse to period photographs will also be necessary.
Don’t forget to record internal details as well, especially highly visible areas such as locomotive cabs and passenger compartments of multiple units. These ‘hidden’ areas are often the most difficult to research as they seldom appear in books of period photographs.
Another factor to consider at an early stage is whether suitable decals are available for your chosen prototype’s livery. If not, it’s possible to make your own using a computer, a printer and decal paper: all you need is a reference of the original scheme, and the NRM has plenty of samples on display and in the archives. Some good quality photographs can easily be turned into decals.
TOOLS
Readers may be surprised to learn that the number of tools required to build working locomotive models is fairly modest, with only a handful of fancy gadgets necessary. The majority of implements are simply those found in the average modeller’s toolbox, and need not be expensive – many of my modelling tools come courtesy of the local ‘Pound Shop’. However, there are some areas where skimping is counter-productive: cutting, shaping, joining and handling tools are fundamental, providing the building blocks of all our projects, and quality is a priority requirement: a high quality scalpel with plenty of fresh blades, a set of shears for trimming plastic and (especially) metal parts from their frets, a reliable set of fine pliers and tweezers, and a good quality set of miniature drills.
With the prospect of plenty of metal to cut, shape and join, it’s worth considering investing in a good quality set of metal shears, especially those designed for cutting etched parts from their frets. Xuron offer various types of shears for use with different types and sizes of metal, and a set of tin snips for cutting larger sizes of sheet metal will also prove invaluable.
A decent soldering set-up is also vital. Even if you don’t fancy building etched metal kits just yet, you may still need to solder power feeds to a drop-in motor unit, especially if connecting a DCC circuit board. Ultra-cheap irons really are an abomination, being incredibly difficult to use, especially for joining metals. A modest investment in a high quality iron, flux and solders is highly recommended. A more thorough discussion on this subject is contained in Chapter 7.
If I were invited to name my ‘desert island tools’, a ‘Hold ‘n’ Fold’ would be up at the top of the list. These really are a luxury, both in terms of cost and ease of operation, but there is simply nothing better for clamping, folding and shaping sheet metal components. Price varies according to size and specification, but as a one-off investment, they’re hard to beat. If you can stretch to it, I’d recommend a 5.5in ‘Five-Speed’ unit (costing around £60 at 2012 prices) as a maid-of-all-work in most scales.
The basic toolkit of the locomotive kit builder is quite a humble one: tweezers, pliers, razor and piercing saws, hand and table vices, clamps, knives and plenty of spare blades, drills, scriber and centre punch, brushes, files, abrasives, pin hammer, measuring and marking tools, screwdrivers, spanners. All these tools can be obtained at relatively little cost, especially if you shop around. However, do spend a little more on the fundamentals, such as knives, tweezers and rulers.
Cutting tools have a very important role to play, regardless of the materials involved. Knives for fine and heavy duty work will see plenty of use, as will snips for cutting etched metal parts from their frets. Similar shears are also available for safely removing plastic components from sprues, Xuron offering excellent quality implements to suit a variety of tasks. Larger tin snips will be handy for cutting sheet metal accurately without distorting it.
Drills and bits are another vital cog in the modellers’ machine, with a little extra investment bringing a return in terms of quality, accuracy and longer life. Miniature bits, from 0.3mm up to 3mm in 0.1mm increments, plus sets of larger general-purpose bits up to 10mm (in 0.5mm steps), will stand you in good stead. A set of imperial drills may also prove useful if your kit is designed to pre-metric specifications. High Speed Steel or tungsten-tipped tools will offer best results. Pin vices in various sizes, plus a mini power drill are also important. Tapered and parallel reamers are also vital for making small adjustments to existing holes.
Soldering forms an essential part of many kit-building tasks, even when working in plastic. Wiring, as well as joining metals, requires a good quality iron, such as offered by Antex. Temperature-controlled soldering stations are something of a luxury, although they make joining different metals – including whitemetal – much easier. A stock of fluxes and solders to suit different tasks is also required.
Other, more specialized tools will prove their worth for specific tasks and will be described further into this volume. They are not all essential, however, and DIY alternatives are possible. Nevertheless some, like the Hold ‘n’ Fold or chassis alignment and quartering jigs, are really invaluable.
Other useful aids include a quartering jig for locomotive driving wheels, a chassis alignment jig, an axle nut and crankpin driver, a multi-meter electrical tester, a rolling road or test track, and back-to-back wheel gauges to suit your standard of track. All of these will be described in detail in the ensuing chapters, as and when they become necessary. Homemade versions will also be discussed, for modellers of a thrifty bent.
WORKSPACE CONSIDERATIONS
You may be faced with hours of fiddly assembly tasks, so it makes sense to be as comfortable as possible while you work. Plenty of light is a must, with your bench or table positioned so that you are not casting a shadow over the work area. Where swathes of natural light are not available, table lamps are a boon, as relying on a fixed overhead light can be tiring on the eyes. Daylight-simulating bulbs are highly recommended, and a hands-free magnifying tool may prove essential when working with small components.
If soldering or using potent chemicals and adhesives, be sure to work in a well ventilated space, and keep pets and small people away from the pointy tools and noxious liquids. Having a worktop set to a comfortable height can make a massive difference to your modelling enjoyment, reducing the incidence of neck and shoulder strain, and a chair that encourages a decent posture is also recommended. Being sat at a less-than-ideal workstation can lead to fidgeting, and it is inevitable that the quality of modelling will suffer as a consequence. Sitting in my own favourite chair, at my own workbench, however, sees the hours happily drifting by.
A comfortable and safe workstation is just as crucial as the right tools and techniques, with plenty of natural light and ventilation – an uncluttered space with a power supply, cutting mat and extra lighting (with daylight-simulating bulbs) available when necessary. Get yourself a comfortable chair and set the work surface at a height that avoids neck and shoulder strain. Tabletop magnifiers, or those that sit on top of the head, are also helpful when working with fiddly components. A bench vice will be useful, too.
MATERIALS
The most likely materials that we will encounter come in plastic or metal form. Plastics are cheap and easy to work with, though only a handful of modern locomotive kits are now offered entirely in this format. The need for a metal chassis is almost universal as plastic lacks the necessary quality of rigidity, unless made in thick sections.
Polystyrene (or ‘styrene’, as it is more commonly termed), acrylonitrile butadiene styrene (ABS) and butyrate are the most popular plastics. Styrene is best known for its use in Airfix kits, and is perfectly suited to the injection moulding process. Delicate detail can be captured, and the material is pliable yet resilient, and strong joints are possible using a special poly cement in liquid or paste form. On the minus side, it is not particularly hardwearing in a mechanical setting, and it can be degraded by contact with certain oils and solvents.
ABS and butyrate, on the other hand, are less user-friendly in some respects, but their high impact resistance and their tolerance of oils and strong chemicals make them ideal for underframes, bogies and mechanical parts, including drive shafts and gear towers. Nylon is another important plastic compound, being utilized in wheels, gears and other moving parts. Most modern RTR locomotives use nylon transmission components, as the material is incredibly hardwearing and resistant to oils and solvents. Nylon gears are also much quieter than brass or steel transmissions.
Injection moulding requires expensive equipment, but the growth in cold-cast polyurethane resin has opened up the kit market to anyone from the garden shed amateur to the high-end manufacturer. Ideal for three-dimensional objects, it is not the easiest material to work with, but its low cost, modest weight, and ability to take fine detail relief, make it a viable alternative to other plastics and cast metal.
Plastic comes in many guises and it’s not always easy to distinguish between them, although different adhesives are optimized for use with specific formulas. Styrene is the most common, being readily coloured and fairly flexible. Underframes and other, more rigid components are usually moulded in tougher grades such as ABS or butyrate, and are often rendered black or dark grey. The instructions should explain the different materials. When in doubt, contact the kit supplier.
Metal kits and components remain a daunting prospect to some modellers, not helped in the past by the wilfully complicated nature of many older brass or whitemetal kits. When I say ‘wilfully’, I mean that kit makers assumed that customers possessed a certain amount of expertise and an abundantly equipped home workshop. Times are changing, however, and recent advances in computer-aided design and etching have made life much easier for the kit maker and builder. Brass and nickel silver predominate as fodder for the etching process, both alloys possessing particular attributes, such as rigidity (nickel silver) and malleability (brass). Brass can also be cast using the lost-wax method that produces intricate yet tough detailing components.
In contrast to metals for etching purposes, dense whitemetal alloys, most commonly formed of tin and lead, are aimed squarely at the casting process. The exact nature of the material differs between manufacturers, being tailored to suit specific tasks. Possessing a low melting point, the casting process is fairly simple, although soldering this metal requires special equipment. However, it can also be bonded with cyano or epoxy glues. The soft, flexible nature of whitemetal means that it has to be rendered fairly thick to obtain a structure of any integrity.
Metal kits make use of brass, nickel silver and whitemetal, each being employed in situations that suit their individual properties. Copper is also valuable, especially in strip, tube or wire form, for adding details. Brass and nickel silver are ideal for etching, although both are also available in various strip and section for fabricating extra parts. Whitemetal is suited to casting only, and has its own foibles. Like resin, the quality of whitemetal fluctuates between makers, with poor quality alloys being difficult to work and having a rough surface.
Wood-based materials such as card, veneer and strip wood may also prove useful, but these are seldom found as standard in locomotive and multiple unit kits. Veneer, especially from close-grained dark woods such as bubinga, is ideal for adding ultra-realistic flooring in the cabs of steam traction. Lighter timbers, meanwhile, are great for interior panelling in pre-1960s railcars, with sycamore and maple being particularly suited to the job. Card and printed paper is also ideal for interior use, especially in passenger accommodation, but its sensitivity to moisture and sunlight can cause problems unless it is sealed with a non-acrylic varnish.
The most common scenario is that a variety of materials will be found in the majority of kits, each chosen for their suitability to the job in hand as well as the most appropriate manufacturing process. A complete whitemetal locomotive, for example, may prove incredibly heavy, and some makers opt for resin-cast boilers or body components to reduce the overall weight. Similarly, the use of sheet metal in boiler construction is enough to scare away many potential customers, so a cast whitemetal unit is often provided instead.
Other materials that may find their way into our kits include wood in strip or veneer form, as well as paper and card. Resin has grown in popularity, and although offering great potential, the quality of castings varies wildly.
These and other materials, along with how best to work and join them, will be discussed in more detail in later chapters.
ADHESIVES
Glues must be chosen carefully, as different formulas are optimized for use with specific materials. ‘Mechanical’ glues are those that form a bridge between the two materials, with epoxy, cyanoacrylate, contact adhesive and PVA glues falling into this category. ‘Non-mechanical’ adhesives, on the other hand, actually fuse the two surfaces together, leaving behind no intermediate layer. An important proviso for working with ‘non-mechanical’ glues is that the parts must be closely fitting along the whole joint face, or a weak bond will result. Liquid poly cement is the perfect example of this type of adhesive.
CYANOACRYLATE
Cyano is the ultimate glue-for-all-seasons, as it will bond more or less anything to anything. Various formulas exist, in differing viscosities, to suit a range of tasks and materials. There are those designed for use with plastics and others for more general applications, and drying times can also vary, from two to thirty seconds.
Also known by the famous brand name of ‘Superglue’ or by the initials CA, only high quality cyano must be employed in model making. Cheaper brands, usually supplied in tubes that have a very short working life, are unpredictable and can damage some materials and painted finishes. Trustworthy brands include Deluxe Material’s Roket range, Zap and Tamiya.
Cyano is available in varying viscosities: ultra-thin liquids are ideal for penetrating joints for a stronger bond, but they can also be potentially messy; in contrast, thick, gel-type versions are great for larger components or structural assembly, especially with resin. Activator sprays, to suit specific brands, speed up the setting process even further and are helpful when it is difficult to hold parts together.
For treating gaps and holes, cyano filling powders exist. Once cured, they can be sanded smooth like regular hobby fillers. And for when things go wrong or your fingers are stuck together, de-bonding liquids will instantly break the joint. Take care, though, as some of these liquids will damage plastics and paintwork. De-bonders are great, however, for allowing cyano to be used for temporary bonds, such as fixing crankpin bushes during the ‘running-in’ of a chassis. When satisfied, the parts can be loosened and cleaned up before being fixed permanently after painting and finishing.
Cyano is a toxic concoction containing, among other things, cyanide. Use it with respect, work in a well ventilated area, and apply only the smallest amount (too much cyano can create a weak joint). Also, keep it away from clear plastic to prevent ‘fogging’, although odourless formulas are available to overcome this, as well as offering greater peace of mind when working around pre-painted surfaces.
POLY CEMENT
Liquid poly cement consists of a strong chemical solvent, designed for application by brush or syringe. Well known brands include Mek Pak (Slaters), Plastic Weld (EMA), Plastic Magic (Deluxe Materials) and Liquid Poly (Humbrol). All of these offer great results when used with various plastics, especially styrene, while Humbrol’s formula is less effective on tougher plastics such as ABS and butyrate.
The parts need to be held together with a little pressure as the solvent is applied, and only a small amount is required in most instances, as natural capillary action will take the thin liquid into the joint. Indeed, flooding with solvent will soften the plastic excessively and distort any delicate surface relief. As the liquid evaporates (usually in seconds), the fused plastics will begin to re-harden, thus making the bond. Although the parts will ‘grab’ one another rapidly, full strength will only be reached after several hours.
It isn’t always convenient to hold the two parts together while gluing, with slower setting, thicker formulas also coming in handy. Revel’s Contacta, Humbrol’s Precision Poly and Roket Plastic (Deluxe) fit this particular bill, as a small bead of adhesive can be spread on to one surface and the parts brought together as necessary.
Choosing the right adhesive is paramount for reliable joints. Poly cement is formulated for various types of plastic, and offers unrivalled strength and durability. Apply by brush or needlepoint applicator for a neater finish. Cyano glues offer rapid bonds of high strength and are suitable for bonding metals, plastics and resin. Thick and thin formulas are available to suit construction or fine detail work respectively, offering different curing times.
EPOXY
Consisting of a separate resin and hardener, the two viscous liquids must be mixed together in equal measures to create a very useful adhesive. Five, ten and thirty-minute formulas can be chosen, relating to the time that the prepared glue remains workable. After this it begins to harden, and it will reach full strength in a few hours, depending on the brand. Epoxy will adhere to almost any clean surface and creates an extremely strong bond, with a degree more flexibility than cyano.
It is great for bonding plastics, resin and all types of metal, and it offers an alternative to soldering for the assembly of whitemetal kits. It can be messy, however, and the need to pre-mix a small amount every few minutes can prove tiresome. The thick viscosity also limits its usefulness when working with small or delicate components, but it does have the ability to work as an electrical insulating medium and will withstand high temperatures. Before curing, any excess epoxy can be cleaned up with a damp cloth.
PVA AND ALIPHATIC RESIN
PVA, or polyvinyl acetate, is intended for bonding wood, card and other porous surfaces. However, it will also adhere well to plastics, and offers a flexible and extremely strong bond. Liquid glazing compounds, such as Glue ‘n’ Glaze and Pacer’s ‘560’ Canopy Glue, are based on a PVA formula, and although white and creamy when first applied, soon dry to a crystal-clear film.
Aliphatic resin is not unlike PVA and is optimized for use with wood-based materials, yet cures harder and faster. Thin, penetrating formulas, such as Super ‘Phatic (Deluxe Materials), are ideal for fixing loose ballast (seeChapter 3) within metal, plastic or resin assemblies.
CONTACT ADHESIVE
Call me a modelling snob, but there are very few instances when I call this crude adhesive into action, save for fixing walls and trees to my layout. The likes of Evostick and UHU may be great for bonding all manner of materials, but its stringy, gloopy nature does not lend itself to work on fine models, other than adding steel weights to the interior of a bodyshell, for instance. They also contain very strong solvents that can damage plastics (especially styrene), and spillages can be difficult to remove. Solvent-free versions exist, but these are much less effective.
Epoxy adhesives, although demanding the mixing of two components, are versatile and reliable, boasting resistance to oil, water and heat, as well as being ideal as an electrical insulator. PVA, aliphatic resin and contact adhesives also have their uses for wood-based materials, plastics and metal.
ELECTRICAL AND MECHANICAL ISSUES
A kit will often specify one or more potential motorizing options, perhaps even selling the recommended power package as an ‘add-on’ deal, along with wheels and gears. Depending on the manufacturer, these choices may be based more on convention than anything else. Despite there being a wide variety of motors and gearboxes on the market, it’s surprising how many kits still specify the most common (and basic) package. In these cases, the kit may have been designed around that particular mechanism, but the failure of makers to update their instructions (for decades in some cases) can make life harder for the builder, especially when there are superior options available.
Developing your own preferred combinations and mounting systems is something that comes with experience, and familiarity with a range of different products. A little experimentation is always a good thing, although cost is often a limiting factor. Having said that, the price of high quality electric motors has actually fallen in relative terms in recent years.
As declared in the Introduction, this book does not have the space to deal with the minutiae of individual motors and compatible gear set-ups. Rather, the later chapters deal with mechanical matters in a fairly simple manner, although Chapter 11 does contain a brief comparison of the most popular motor packages. This way, the techniques and processes involved can be appreciated without superfluous pages of specifications. Besides, much of this kind of information is freely available from the websites of leading motor and gear suppliers, such as C&L Finescale, Hollywood Foundry and Roxey Mouldings (seeUseful Contacts section).
Other motor-related subjects are covered, such as flywheels, belt drives and self-contained, ready-to-fit mechanisms for locomotives and multiple units. What is important is that the choice of mechanism is made before assembly starts, as there may be some modifications to chassis or bodyshell necessary that will be far easier to effect beforehand. Gear ratio is also something to bear in mind, and choice should be based on the type of work envisaged. For example, a shunting or heavy freight locomotive that is intended solely for slow-speed work will require a different ratio than an express passenger hauler, although the operating speed of the motor must also be considered. See Chapter 11 for more information.
Choice of motor and drive train depends on many different factors, the most pertinent being the amount of available space within a bodyshell, boiler, tender or bogie frame. Haulage capacity is also important, as is the type of electrical control system in use: digital command control (DCC) or analogue (DC).
The vast majority of metal traction kits were not designed with DCC in mind, but it is possible to introduce digital control as long as a number of precautions are followed. One of the main issues is ensuring that all electrical contacts are suitably insulated from the metal bodyshell to avoid short circuits. Similarly, if the chassis uses the wheels on one side to collect the power from the rail, then the chassis itself will be live to one polarity, requiring extra care in insulating the DCC circuitry and the motor itself. The wheels on the ‘other’ side must be insulated from their axles, with separate pick-ups bearing on the rims and connected to the circuit’s opposite polarity input, without contacting any part of the live chassis. Failure to guard fully against short circuits may see the delicate DCC decoder going up in smoke.
I’ve only equipped a handful of loco kits with DCC chips and have found it easiest and safest to fit insulated wheels on both sides of the chassis and forego the ‘live axle’ method completely. Gibson wheels, with their standard use of plastic, insulated bosses, remove much of the hassle of working with metal wheelsets. Incidentally, self-contained motor units, such as Black Beetles, BullAnts and Tenshodo ‘Spuds’ (Chapter 4) are much more DCC-friendly, with only a few interventions needed to the existing power collection arrangement.
Electric motors come in various sizes and specifications, in open-framed or can format or as part of pre-assembled drop-in units. Some motors are suited for high- or slow-speed applications, and choice often depends on the available space within the model. For DCC modellers, there is much debate about the suitability of coreless motors, although their higher performance makes them popular, despite their higher cost. Flywheels and gears also come in various shapes and sizes.
I freely admit that DCC is not really my thing, and therefore I am probably not suitably qualified to talk with great authority on the subject. However, there is plenty of help and information available via model railway magazines, online forums and even DCC equipment suppliers (seeUseful Contacts section). Perhaps, with the ever-growing popularity of DCC (except on my layouts!), kit makers will tailor not only their instructions, but also their whole approach to how metal chassis are designed. Maybe kits with DCC-ready circuitry, working lights and sound facilities will appear in the not-too-distant future?
WHEEL STANDARDS
One last factor to consider at this early stage is the type of wheels to be fitted. Choice depends upon your gauge (N, OO, EM, etc.) and the demands of prototype fidelity. Markits and Gibson are my preferred sources for 4mm-scale subjects, with Slaters producing some excellent wheels for 7mm scale models. Each offers a vast range of wheel sizes and styles, with varying numbers of spokes to suit specific steam, diesel or electric locomotive classes.
Gibson makes use of insulated plastic centres and a push-fit on to a smooth axle. Separate metal tyres conduct the power to the motor via wiper or plunger pick-ups (seeChapter 12), and these can sometimes work a little loose, requiring fixing with cyano glue. A back-to-back gauging tool is necessary when fitting the wheels to the axles, and the quartering of the driving wheels – where the crankpins are set at 90 degrees out of phase to those on the other side of the same axle – requires a simple jig for accuracy (seeChapter 10).
Markits and Slaters wheels, on the other hand, boast a square-ended axle that make gauging and quartering far simpler. The metal tyre, boss and axle mean that one side of the assembly must be insulated to avoid short-circuits: insulated wheels can be discerned by a wafer-thin layer of fibre, fitted between the tyre and boss. It’s important to get these wheels on the right side for ‘live’ chassis construction, or insulated wheels can be fitted to both sides for a non-live chassis. Due to their all-metal construction, Markits and Slaters wheels are fairly expensive, which may not hinder a small 0-4-0 project, but something like a large ‘pacific’ or 2-10-0 will set you back a pretty penny.
The outline of the wheels is important, as some makers offer a ‘standard’ profile, for use on regular track, such as Code 100 for OO gauge. These may struggle when running over finer rails such as Code 75 or smaller, so opting for RP25-compatible profiles is highly recommended. They are marginally more expensive, but they look much more authentic, and can happily run on a broader range of track grades. The RP-25 specification, set down by the National Model Railroad Association (NMRA) applies to all scales and gauges. A degree of standardization across your fleet is a good idea, not only in terms of a uniform appearance, but also for reliable performance. Most wheel makers now comply with the RP-25 profile, but it’s worth checking all the same before purchase.
Wheels are one of the most important parts of any railway model and there is plenty of choice in terms of size, pattern and gauge, from Gibson, Markits, Slaters, Exactoscale and Ultrascale, among others.
The fitting of wheels on to axles differs according to brand. Markits and Slaters make use of square-ended axles that make gauging and quartering simple, being retained with specially shaped nuts. Gibson wheels, on the other hand, employ plain axles that require a little more work to set up.
The subject of wheels will crop up again throughout the ensuing chapters, but choosing the right accoutrements to suit your kit is necessary from the outset. Again, the kit’s instructions will doubtless recommend the correct size, pattern and type, and for the uninitiated, following these guidelines is recommended until further experience is gained with other types.
IT’S YOUR CALL
Finally, the eventual level of detail and authenticity depends largely upon the aspirations of the modeller. The kit will offer its own set of parameters, but with extra detailing components and a modicum of care and experience, the envelope can be pushed a little further. What this book aims to do is to equip readers with the knowledge and confidence not only to get the bare bones of a kit put together and working properly, but also to strive for a higher degree of realism. How far you want to go, though, is entirely up to you.
CHAPTER TWO
MAKING A START
Plastic motive power kits may lack the kudos of their metal counterparts, but that’s not to say that they’re only good for beginners or those afraid of a soldering iron. There are a small number of plastic kits around that offer supreme results without breaking the bank or demanding too much in the way of expertise. Drop-in power units, expertly tooled components that slot together, with little effort, and the ease with which they can be enhanced with etched metal detail components, are all big points in their favour.
Plastic is a rewarding material to work with, easy to join and modify, durable (when assembled well), and easy to paint and finish. On the minus side, the lightweight nature of the material means that it needs extra ballast for traction and reliable running. It’s also not as sturdy as metal, and the quality of the detail relief depends on the standards of the moulds – but that can also be said of virtually every other medium.
Multiple unit kits for 4mm scale have long been offered in plastic form, from the likes of DC Kits or Bratchell Models (which come pre-painted), while small diesel-outline industrial locomotives can be found in the Knightwing range. Airfix at one time sported various BR steam prototypes in kit form, still available today under the Dapol brand, with a choice ranging from a Drewry 0-6-0 diesel or 0-4-0 Pug, to a GWR 4-4-0 and a BR Class 9F 2-10-0.
Almost without exception, plastic locomotive kits come with no form of power unit or driving wheels. Indeed, any wheels and axles supplied will probably be plastic too, and are suitable only for use on static models. Unpowered models are not to be sniffed at and have a definite place on our layouts, especially parked-up on shed or under maintenance. Few plastic kits even hint at the possibilities of motorization, although there are a number of ready-made aftermarket solutions available, such as those offered by The Hollywood Foundry (seeUseful Contacts section). In kit or ready-to-fit format, these mechanisms and chassis cater for OO, EM and P4 gauges.
Multiple unit kits, although now dwindling in number as more RTR products come on stream, are also simple to power, especially with self-contained motor bogies. In addition, the growth in RTR multiple units allows high performance chassis and underframes to be salvaged for use in kits or conversion projects. What’s more, self-contained power units are also suitable for certain locomotive kits.
For those with a Continental bent, Revell offer a number of supremely detailed 1:87 scale (HO-gauge) plastic kits of the German Classes 01 and 02, plus US ‘Hudsons’ and ‘Big Boys’. Trumpeter, a renowned military model kit maker, offers a truly superb rendering of a handful of World War II German steam traction in 1:35 scale, although this matches none of the established railway gauges. However, for my own dalliances in wartime modelling, I’ve been converting a handful of 1:72 scale plastic locomotive and wagon kits to fit in with 1:76 (4mm scale) stock.
Injection moulding remains the most common means of creating plastic components and kits. The method can produce exquisitely detailed parts provided that the moulds – or ‘tools’ – have been machined to a high standard. Older toolings often betray themselves by the ugly amounts of excess material (‘flash’) around each part and the frustrating location of feed or ejection pips that require filing or filling before assembly. It’s a sign of the quality of the engineering and materials employed in those old Kitmaster/Airfix tools that still allows them to be used in mass production over half a century later.
Various plastic locomotive and multiple unit kits are available from sources such as Dapol (ex-Airfix), Knightwing, DC Kits and Bratchell Models. Although the modeller is left to find his/her own motors and transmissions, there are plenty of tailor-made solutions available in kit or ready-to-fit format.
As well as products in OO and HO, there are a number of plastic kits aimed at military modellers in 1:35 and 1:72 scale. The latter is slightly larger than OO (1:76) but, with a few tweaks and an adapted chassis, this Hobby Boss kit should not look too out of place on my fictional Egyptian layout, set in the 1940s. The small discrepancy between this and the rest of my OO stock can be explained by the difference between the more generous Continental loading gauges and that of the smaller, exported British equipment.


