23,99 €
Mehr erfahren.
- Herausgeber: Crowood
- Kategorie: Lebensstil
- Sprache: Englisch
Weathering is not just about making something look dirty. Rather, it should be seen as an artistic endeavour, with the aim of making a model appear as lifelike as possible. It also helps to blend a range of separate structures into a cohesive scene. Careful weathering brings out the best in even the most mundane model, drawing attention to moulded relief and enhancing surface textures. In this latest volume, expert modeller George Dent shares his theories and practices on the art of weathering buildings, motor vehicles, ships and all manner of scenic features.
Das E-Book können Sie in Legimi-Apps oder einer beliebigen App lesen, die das folgende Format unterstützen:
Veröffentlichungsjahr: 2018
Ähnliche


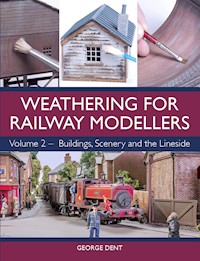
WEATHERING FORRAILWAY MODELLERS
Volume 2 – Buildings, Scenery and the Lineside
GEORGE DENT
THE CROWOOD PRESS
First published in 2018 by
The Crowood Press Ltd
Ramsbury, Marlborough
Wiltshire SN8 2HR
www.crowood.com
This e-book first published in 2018
© George Dent 2018
All rights reserved. This e-book is copyright material and must not be copied, reproduced, transferred, distributed, leased, licensed or publicly performed or used in any way except as specifically permitted in writing by the publishers, as allowed under the terms and conditions under which it was purchased or as strictly permitted by applicable copyright law. Any unauthorised distribution or use of thistext may be a direct infringement of the author’s and publisher’s rights, and those responsible may be liable in law accordingly.
British Library Cataloguing-in-Publication Data
A catalogue record for this book is available from the British Library.
ISBN 978 1 78500 440 7
Disclaimer
Some of the techniques used by modellers for weathering are potentially dangerous. All materials and tools employed in modelling and weathering should be used in strict accordance with both current health and safety regulations and the manufacturer’s instructions.
CONTENTS
ACKNOWLEDGEMENTS
1THE REAL WORLD
2MATERIALS
3TIMBER BUILDINGS
4BRICKS AND MORTAR
5MADE OF STONE
6AIRBRUSHING
7ROADS, PAVING AND PLATFORMS
8THE PERMANENT WAY
9ON THE ROAD, PART 1: MOTOR CARS AND TRUCKS
10ON THE ROAD, PART 2: INDUSTRIAL VEHICLES
11ON THE ROAD, PART 3: KEEP ON TRUCKING
12SHIP AHOY!
13ADVANCED TECHNIQUES 1: PEELING PAINT EFFECTS
14ADVANCED TECHNIQUES 2: PRE-SHADING
15ADVANCED TECHNIQUES 3: INDUSTRIAL DECAY
16THE CLEARING HOUSE
LIST OF SUPPLIERS
INDEX
ACKNOWLEDGEMENTS
My special thanks go to Alex Medwell and Lisa Munro at The Airbrush Company, who have provided much help and support over the past ten years, which has been greatly appreciated.
My Model Rail colleagues deserve thanks: Richard Foster, Chris Leigh and especially Chris Nevard for the use of some of his wonderful photographs. Thanks also to Mike Harris.
Big love to all members of the Dent Collective – past and present – plus little Percy, Robbie, Bernie, Kev and Shirley, who have cheered me up on a daily basis. And finally, thanks to my dad, for getting me into modelling in the first place.
CHAPTER ONE
THE REAL WORLD
‘Weathering’ is an odd term and one that, in my opinion, does not quite do justice to the art of improving realism. It is a popular term that entered the modeller’s lexicon some years ago and I have been something of an evangelist for the weathering cause for a long, long time. More or less from the beginning of my obsession with model making, the quest for ultra-lifelike results has spurred me on to keep trying new methods and materials.
My formative years were spent building Airfix and Matchbox plastic kits, hoping to emulate the wonderful military figures crafted by my dad. Indeed, it was he who first introduced me to the idea of weathering, as an alternative to creating pristine finishes on vehicles, aircraft and buildings. The time-honoured methods of dry-brushing and applying wash coats were learnt at an early stage, bringing a greater degree of shading and highlights – as well as adding ‘dirt’ – to three-dimensional subjects.
A parallel interest in model railways saw the same principles applied to locomotives and rolling stock. As funds and time allowed, I managed to pick up more tips and techniques from books, magazines and fellow modellers in all manner of disciplines. My art and craft education also helped, both practically and theoretically. Being taught how to airbrush proved invaluable, but so did being taught how to see.
So much of weathering involves observing and replicating the minutiae of life, much of which we ignore in our day to day lives. How many of us have spent time studying the myriad tones within individual bricks, I wonder? It is easy to mock these things as idle daydreaming, but teaching yourself to look much more closely at the world around us is an important skill for any modeller. Noting how different materials react to the eroding effects of the weather, how paint blisters and peels away, how corroded metal takes on a distinctive texture; each provides vital research material that we can harness and put to good use. Photography allows us to capture images of these factors, so don’t be shy and snap away at anything that catches your eye.
WHAT IS WEATHERING?
So, what are my reservations about the word ‘weathering’? It’s the vagueness of the term that I object to, especially when I hear folks using it to describe plastering black paint over a highly detailed model. I do see the logic behind the use of the term. After all, in most cases, we are actively seeking to replicate the effects of the outside elements – the weather – upon an object. That may take the form of fading caused by exposure to the sun, extremes of temperature or the effects of sea water. It could be damp streaks caused by rain washing away dirt or splashing up mud from the ground, or perhaps tidemarks caused by rising and ebbing water levels. Man-made factors also come into play, such as smoke staining, leaking fuel or general dust deposits from coal or other inherently dirty commodities.
Weathering is a means of ensuring that every aspect – no matter how small – looks at home in a miniature setting. Road surfaces, cars, buildings, trains and even the people can be treated in specific ways, to create a cohesive whole.CHRIS NEVARD
Looking closely at buildings and objects reveals so much interesting contrast and detail. A new lick of paint and uPVC windows have spruced up this signal box, yet the green staining on the slate roof is suggestive of the building’s shady, wooded location.
Ashwell is another ex-Midland Railway box. Scrutiny of the woodwork displays faded, peeling paint and a coating of fine brown dust, so typical of trackside structures. Note the repairs to the roof tiles and corrosion on the level-crossing barrier.
Examples of extreme weathering reveal how real materials behave when exposed to the elements.
Don’t be afraid to look closer. Not only does this image reveal how unpainted oak weathers, but also how a beautiful array of tones can be seen in the rusting hinge and bolts.
Brick and masonry structures feature a wealth of tones and shades, even on the most humdrum of structures.
The Coal Road bridge beside Dent station boasts a wide range of brick colours, some decorative, others the result of repairs. Traces of a whitewashed sighting board linger, decades after the semaphore signal was removed.
Remnants of decorative masonry, beneath more than a century’s worth of grime, offer an interesting challenge. The austere wartime repairs to the rear of this dockyard pump house are also worthy of note.
When I set out to weather a model, it’s not just about adding dirt. In most cases, it’s about helping an object – be it a building, car, bridge or a miniature human being – to blend into its surroundings. Furthermore, the scenery itself ought also to be treated to some degree of weathering, so that everything appears harmonious and consistent. A muddy tractor in a dry, dusty field will not work. Nor will a pristine chimney look at home amongst a grimy steel works.
Stonework also features plenty of tonal variation, with some materials being much less uniform than others. The soot stains remain, over fifty years since the last trains passed along the former Tebay–Kirkby Stephen route.
A typically damp outlook is presented by this cattle creep beneath the Hope Valley line in Derbyshire. The local sandstone, when clean, boasts a honey-like shade, but the elements, moss and algae have added a broader palette of tones and sheens.
Concrete has a characteristic texture seldom captured on models, especially those moulded in smooth plastic or resin.
An extreme example of saline staining within a former railway tunnel. The mix of white, cream and lime green shades is dramatic.
Wherever possible, I prefer to treat weathering as another part of the building and painting sequences, especially when working with a kit. As will be seen in later chapters, ready-made buildings and structures benefit greatly from a whole new finish, incorporating the weathering from an early stage rather than as a final touch.
With such an approach, a plan for the model’s intended appearance needs to be decided upon from the beginning, which may demand a change in the modeller’s mindset. Freeing yourself from the constraints of creating a perfect, pristine model prior to weathering is a liberating experience. It saves plenty of time and effort too, as will be demonstrated in due course.
THE BOOK
Whereas my previous book, Weathering for Railway Modellers Volume 1, concentrated on the trains themselves, this volume is concerned with the miniature environments within which our model railways are set.
Following a look at the key materials and implements involved in weathering, the ensuing chapters then cover a wide range of practical processes, beginning with those suitable for use on timber, masonry and concrete buildings. These initial forays are designed to consolidate a small number of core techniques, such as dry-brushing and the use of washes and dry pigments, which will prove invaluable for all manner of simple or complex weathering tasks.
Even the most pampered car quickly gains a degree of road dirt. Look closely and there’s a faint misting of dust along the bodywork, while the tyres have a distinctly matt sheen – different to the shiny vinyl found on die-cast road vehicles.
A lovely mix of coal, soot and rust adorns the bucket of this machine. The yellow paintwork is relatively clean, but well faded and showing plenty of scuffs, scratches and patches of corrosion.
Agricultural vehicles make for an enjoyable weathering project. Note how the accrued dirt matches the colours found on the ground.
Replicating these caterpillar tracks would demand the application of various rust tones, as well as lighter stone shades. There is plenty of surface texture, which we can capture effectively.
Algae and mud festoon this humble craft in Bideford Bay. Note also the different tones on the harbour stonework.
The airbrush really comes into its own when weathering track. Rails, sleepers and ballast appear in different shades, according to age, era and location, so some prototype research is worthwhile.
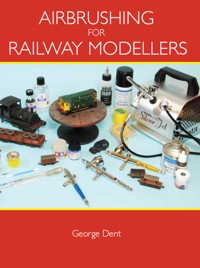
The airbrush is then introduced, showcasing the array of unique effects that this tool can create. However, apart from a few specific techniques, the airbrush is not an essential piece of kit. As will be seen, though, it can offer an extra dimension to our modelling output.
Ways of creating lifelike road and paving surfaces are considered, along with tips for achieving convincingly muddy farm tracks and authentic treatments for the permanent way and its immediate environs. Plenty of ideas for enhancing road vehicles, machinery and even ships, follow, before we delve into slightly more complex undertakings. These latter chapters cover the creation of peeling and chipping paint and rust effects, as well as ways of replicating the grain detail and texture of bare timber, amongst other things.
Jaw-dropping scenic additions can be created with a number of more involved weathering techniques, such as chipping and rust effects. Semi-derelict subjects, such as this, offer plenty of inspiration.
Finally, Chapter 16 acts as a depository for a number of hints and tips that would not fit anywhere else. These include how to make miniature people and animals appear more realistic, along with other ideas for smaller scenic additions.
LET’S GET STARTED
Whether I like the term ‘weathering’ or not, it’s time to clear some room on the workbench and make a start. Be prepared to get your hands dirty and please do not be afraid of trying new things. The purpose of this book is to pass on the benefit of my thirty-plus years of weathering experience, attained mostly through experimentation – with the odd bit of frustration and disappointment along the way. All of the disasters proved instructive in some way and learning from our mistakes is one of the best ways of improving our modelling prowess. So, if things don’t always go to plan, spend a moment to wonder why – and resolve to do it better next time!
We all love adding ‘clutter’ to our layouts, so why not make it look as authentic as possible. Close study of real corroded metal surfaces can be highly instructive.
CHAPTER TWO
MATERIALS
Much depends on the model at hand, but, in general terms, weathering requires little in the way of tools and equipment. As the upcoming projects show, it often helps to work on buildings, vehicles and scenic items in a part-assembled state, so we need to be able take things apart and/or fix them back together effectively. Therefore, the ‘standard’ modeller’s tool kit will be required. Typically, this will contain knives (with spare, sharp blades), files, abrasives, a mini-drill and bits, tweezers, pliers, a steel rule and a set of miniature screwdrivers.
Abrasives and cutting tools can be just as useful in the actual weathering process as they can be in assembly, helping to create suitably distressed, textured surfaces. As well as sheets of regular sanding paper, in various grits, more refined abrasives are worthy of inclusion in our tool kit. Brands such as Albion Alloys, Flex-I-File, Micro Mesh and Squadron are recommended, each offering an array of flexible sheets, sticks, pads, strips and needles in abrasive grades up to super-smooth 12,000 grit.
WEATHERING MEDIA
There are plenty of brands to choose from, in terms of paints and other media, thanks to a recent boom in the availability of weathering products, led predominantly by the military and aviation markets. Railway modellers have not been left behind, however, as Humbrol, Revell, MIG, AK Interactive, Lifecolor and Vallejo all offer suitable packages of paints and pigments.
Themed paint and pigment packs are a convenient way of obtaining useful colours and shades for specific tasks, such as treating brick- or stone-built buildings, timber, muddy or dusty surfaces, rusty metal, or even slimy, mouldy deposits on a riverbank or quayside. Such packs may contain paints or dry pigments, or a mixture of both, and can often prove more versatile than the branding may suggest. For example, I often use ‘rust’ colours on brick-built structures, especially when recreating the distinctive orangey-red masonry commonly found in parts of northern England.
We only need a handful of tools, mostly for cleaning, dismantling or assembling models, while abrasives and cutting tools are useful for distressing work.
There is certainly no shortage of weathering paints on the market. Acrylics are my preference for buildings and scenic work.
PAINTS
Acrylic and enamel paints have been the two most popular model paint formulas for decades, each offering both advantages and drawbacks. Other paints can play an important role in scenic work, such as artists’ watercolours, gouache and oil paints. Wax-based metallic paints also have many uses, as do clear varnish coats and dilute enamel- or water-based washes.
Enamels, such as the ever-popular Humbrol and Revell tinlets, offer the advantages of durable finishes and good adhesion (especially to non-porous surfaces). Longer drying times allow plenty of time for manipulation or corrective work, but progress can be slow. There is also the matter of harmful and unpleasant solvent fumes, which is a significant factor when working on larger scenic areas or buildings.
Enamels are great for airbrushing work, due to their slow-drying nature (they don’t clog up the inside of the tool as readily as acrylics) and free-flowing nature, when thinned correctly. I have long enjoyed employing RailMatch’s range of weathering enamels for certain tasks, especially painting and weathering track. Indeed, I find that enamels produce a more durable finish on metal rails than acrylics.
For the vast majority of scenic painting and weathering work, however, acrylics are my first choice. Acrylics differ across brands, some containing a high proportion of alcohol, while others are predominantly water-based with much less in the way of odour – a vital factor to consider when working on larger areas where fume extraction facilities are not available.
Tamiya acrylics are alcohol-based, offering rapid drying times and are great for spraying via an airbrush. Unfortunately, I find that they dry too quickly for successful hand-brushing. The use of Tamiya’s own thinners is highly recommended, whereas water-based acrylics, such as Lifecolor, Vallejo, Humbrol and RailMatch, will happily respond to each other’s brand of thinners, or even water.
Tamiya acrylics are great for airbrush work, but are best used with the same brand of thinners. Vallejo acrylics are good for spraying or hand-brushing and can be thinned with any water-based thinners.
Lifecolor acrylics see the most use in my workshop. Plenty of themed diorama packs are available, each containing six pots aimed at specific scenic tasks.
Lifecolor also produces mixed packs of acrylic paints and dry pigments that can be used in separate layers or intermixed to create textured coatings.
The main drawback of enamels is the long drying time. However, they do offer convenience, especially when airbrushing. Alclad II’s Mil-Spec enamels come pre-thinned, ready for spraying.
Smaller three-jar packs are also offered by Lifecolor. The Leaking and Stains paints are especially useful.
Over the years, I have found Lifecolor acrylics to be the most enjoyable to use. Virtually odourless and highly versatile, they’re a pleasure to apply by hand. They are also good for spraying, but I would recommend filtering before use in an airbrush (as is the case with virtually all acrylics). Tending towards a thinner viscosity, it may be necessary to build up several coats, although a separate thickening agent is available, which can be useful.
The drying times for most acrylics are between twenty minutes and an hour or two, depending on brand and thickness of application. Compared to at least eight hours for enamels, acrylics offer the potential for rapid progress. Furthermore, drying can be further speeded up with the use of a hairdryer.
Drying time also affects how readily paints can be employed for specific weathering effects, especially manipulation after the paint has been applied. Both acrylics and enamels can be controlled on the surface with the help of a little white spirit, but the window of opportunity is drastically reduced with acrylics to about twenty minutes, whereas enamels can be reworked for hours after application. Acrylic-based removal agents now exist, such as that offered by Lifecolor, which avoids the need for smelly, greasy white spirit. Tamiya acrylic thinners is also effective at dislodging dried acrylic paints.
Which brings us onto the benefits of using tube-based oil paints, such as those available from Abteilung, Wilder and AK Interactive. Used in conjunction with matching thinners, these paints resemble artists’ oil paints, yet dry much more quickly and are offered in modeller-friendly weathering shades. They are much better suited to certain tasks than regular enamel or acrylic paints, especially when post-application manipulation is required. They are also great for creating subtle streaking, fading or staining effects and, when diluted sufficiently, can be used as washes.
Apart from Tamiya paints, most acrylics struggle to adhere to glossy, non-porous surfaces, such as bare metal or plastic, unless a primer has been employed. This is not always possible or practical (such as when painting metal rails), thus paint choice depends on practical factors, not just personal preference or cost.
Textured acrylic paints are also available, from Tamiya and Wilder, which are fantastic for creating realistic road and track surfaces. Numerous shades are available and, in Wilder’s case, a choice of fine or coarse textures to suit different scales and situations. We can create our own textured paints easily enough, by mixing talcum powder, plaster or even fine sand with either acrylic or enamel paints. Dry weathering pigments can also add texture to paints, although they can also drastically alter the colour of the paint, depending on the shades employed.
Tube-based oil paints and matched thinners are versatile enough to be used as regular paints or dilute washes. They also boast very long shelf lives, provided that the lids are replaced properly.
Metallic finishes, especially these wax-based True Metal paints from AK Interactive, can be effective for picking out detail relief and areas of burnished metal.
Rough surfaces, such as concrete walls or muddy tracks, can be easily recreated with textured acrylic paints.
CLEAR COATS
Clear coats, or varnishes, have an important role in the weathering process. They can be used to seal previous layers of paints and pigments to protect against handling, or fading under exposure to sunlight. They can also be employed to fine-tune the sheen of an object, to suggest a dry or dusty finish, or a damp, greasy patina.
Again, clear coats are available in enamel and acrylic format, as well as some lacquer-based formulas, which can be even smellier than enamels. Be sure to use the recommended thinners when necessary and keeping a stock of different sheens on hand, from dead matt to high gloss, will prove useful.
Clear coats can be employed to prepare a surface for weathering, or to seal a layer of dry pigments. They can also suggest polished, greasy or wet surfaces. Keep a range of matt, satin and gloss formulas to hand.
SPRAY CANS
There are plenty of weathering shades available in aerosol format, but I only use these very occasionally. Spray cans lack finesse, especially when compared to an airbrush, and there’s the issue of harmful fumes to consider. Even when wearing a facemask, the room is quickly engulfed in a toxic fug that can take hours, or even days, to clear.
The smell can be managed if working on smaller parts or buildings that will fit within my spray booth. Working outdoors is an option if the weather permits, but any slight breeze has a detrimental effect on the paint flow. Some of my esteemed modelling colleagues obtain great results with aerosols, especially when weathering track, ground cover and buildings, but it rarely works for me.
WASHES
Weathering washes, while ostensibly similar to paints, are intended for a very different purpose. Containing much less pigment, the majority of the fluid is made up of thinners, allowing the pigment to flow into tiny recesses or to collect around raised details, before the liquid carrier evaporates away.
Available in enamel- or water-based formulas, they are designed predominantly for application by brush. Performance differs among brands and formulas and complementary thinners are available to thin the pigment further, to manipulate the washes after application, or to remove the wash completely, if desired.
Weathering washes create more subtle effects than regular paints and are available in acrylic or enamel formulas, with matching thinners.
Lifecolor’s acrylic Liquid Pigments are a cross between paints and washes, offering a different array of potential effects.
Washes have many uses, as we shall see in later chapters, helping to highlight detail relief, tone down overly vibrant colours, or to bring a cohesion to an object painted in multiple colours. Washes are also perfect for creating subtle streaking and staining effects, while some versions are designed to create a greasy, oily sheen.
Various shades are available, from earthy browns, greys and black, to rusty reds or slimy greens. Due to their slightly translucent nature, several coats can be built up to create variations in tone and to suggest many years’ worth of staining and streaks.
Enamel washes are usually recommended for use over acrylic paintwork, as, provided that the underlying paint is fully dry, the acrylics will be impervious to the oil-based solvents in the wash. In contrast, enamel paints remain sensitive to the use of further solvent, even days after application. Acrylic washes are also fine over an acrylic finish, as long as the paint has cured fully.
Enamel and acrylic washes have their good and bad points, which are similar to those associated with regular paints. Personally, I prefer enamel washes, due to their greater workability, but the longer drying time (usually a couple of hours) can be tiresome. Acrylic versions, such as Lifecolor’s Tensocrom and Liquid Pigment ranges, behave differently and do not share the same level of adherence to some smooth surfaces and materials, yet they can still prove highly effective, particularly on porous surfaces, such as card and plaster.
COMPATIBILITY
Acrylic and enamel paints, washes and clear coats cannot be mixed with each other and, if applying over a previous layer of a different formula, the underlying paint must be completely dry (allow at least twenty-four hours). Certain lacquers or synthetic acrylic finishes, such as aerosol-based primers and clear coats, may react adversely with an existing layer of acrylic paint, causing it to bubble and peel. If in doubt, test on a scrap model or surface first.
WEATHERING POWDERS
Powders, or dry pigments, offer a different array of effects to paints, creating dustier textures. They can be intermixed to create a wide palette of tones and be applied over several layers, depending on how grubby the subject is intended to be. They are ideal for creating smoke staining on bridges and tunnels, or streaks on roofs and walls, or even on roads and other ground surfaces.
Dry pigments are freely available, with those from MIG, Vallejo, Lifecolor, Revell, Darkstar and Wilder being recommended. Fixative solutions are useful for improving adhesion and allowing thicker deposits to be accrued.
The use of liquid fixative solutions allows heavier deposits to be built up and prevents the effects from being blown or worn away. Adhesion differs between brands, but, in general, a matt surface takes the pigment far more readily than a gloss backing. With this in mind, it may be worth applying a coat of matt varnish to a surface before-hand, if adhesion is proving an issue. Application is most effective with soft-bristled, flat brushes, although some extra texture and streaking effects can be created by following application with a stiffer brush. As already mentioned, dry pigments can also be added to regular paints, especially acrylics, to create a textured coating. The surface can be treated further with powders in their dry state. Alternatively, the pigments can be mixed with a fixative solution to create a thin wash or a thick, coarse-textured paste; ideal for ground coverings or heavy staining on walls or rusty metalwork.
FURTHER OPTIONS
Coloured pencils, especially the blendable artists’ variety, offer a less obvious weathering medium. These are great for creating rust patches or picking out raised details. Keeping a variety of earthy browns, reds, silver and chalky white pencils to hand will be helpful.
Try picking out metallic detail with an artists’ graphite stick or Lifecolor’s Reflective Agent powder. After application, both can be burnished with a clean, stiff brush, to produce extremely realistic effects.
Artists’ coloured pencils also have many uses. They are great for creating rust patches, streaking effects and even graffiti.
Graphite sticks are also a great resource. Available from art stores, these pencils are perfect for creating an authentic look to bare metal surfaces prone to burnishing, such as the forks of a stacker truck or the tracks of a bulldozer. Lifecolor’s Reflecting Agent, a finely ground graphite powder, can be used to the same ends. Once brushed onto a surface, it can be burnished to create a realistic metallic sheen. It can also be mixed with acrylic paints to create metallic finishes.
It is possible to create your own weathering powders, or similar dry media, using ground-up coal dust or ash, along with plaster (especially DIY repair plaster) and even real soil.
MASKS AND MASKING
Masking comes in various forms: tapes, films and fluids. Products aimed at model and craft use are preferred to DIY/decorating products, as we need masks with minimal tackiness, to avoid damage to underlying paint or delicate details. As we are likely to be working on three-dimensional objects with uneven surfaces, a flexible tape or film is desired. There are also improvised forms of masking, such as Blu-Tack, Post-It Notes or homemade card stencils, some of which will appear in various projects later in this work.
The primary functions of masking are to separate different colours during painting and to protect vulnerable areas such as clear glazing and electrical components. Masking media can also be tasked with creating specific weathering effects, as we shall see in the following chapters.
Masking fluids, such as Humbrol’s Maskol and Wilder’s Quick Mask, can be applied with an old paintbrush, cocktail sticks, or even a scrap of sponge for more random deposits. Drying to a flexible film, the masking is simply peeled away when desired, although it’s best not to leave the dried fluid in place for longer than a week or so, lest it turn brittle and prove difficult to remove.
Acrylic ‘chipping’ fluids, such as AK Interactive’s Worn Effects and Heavy Chipping, help to create amazing peeling or worn paint effects. Cans of hairspray can also be employed to the same ends.


