Erhalten Sie Zugang zu diesem und mehr als 300000 Büchern ab EUR 5,99 monatlich.
- Herausgeber: Crowood
- Kategorie: Lebensstil
- Sprache: Englisch
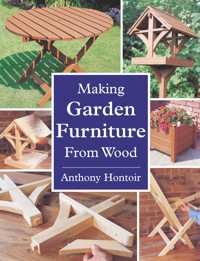
No garden is complete without sympathetic furniture. Using simplified woodworking techniques, this book covers fourteen pieces ranging from tables and chairs to bird houses and fencing: all are both useful and delightful additions to any garden. Includes projects ranging in difficulty for novice and experienced woodworkers to enjoy; advice on tools and materials; explanation of jointing techniques; clear step-by-step instructions for each project, with cutting lists; supported by over 160 colour photographs and line artwork
Sie lesen das E-Book in den Legimi-Apps auf:
Seitenzahl: 210
Veröffentlichungsjahr: 2012
Das E-Book (TTS) können Sie hören im Abo „Legimi Premium” in Legimi-Apps auf:
Ähnliche


Making Garden Furniture From Wood
Anthony Hontoir
Copyright
First published in 2005 by The Crowood Press Ltd, Ramsbury, Marlborough, Wiltshire, SN8 2HR
www.crowood.com
This e-book edition first published in 2012
© Anthony Hontoir
All rights reserved. This e-book is copyright material and must not be copied, reproduced, transferred, distributed, leased, licensed or publicly performed or used in any way except as specifically permitted in writing by the publishers, as allowed under the terms and conditions under which it was purchased or as strictly permitted by applicable copyright law. Any unauthorised distribution or use of this text may be a direct infringement of the author’s and publisher’s rights, and those responsible may be liable in law accordingly.
ISBN 978 1 84797 441 9
Contents
Title Page
Copyright
Introduction
1 Tools and Materials
2 Jointing Techniques
3 Ornamental Fencing
4 Flowerpot Holder
5 Window-Box
6 Versailles Box
7 Storage Box
8 Child’s Table and Chair Set
9 Small Folding Rectangular Table
10 Square Table
11 Folding Round Table
12 Folding Garden Chair
13 Bird House
14 Patio Food Trolley
15 Bench Seat
Index
Introduction
For many people, the garden is an extension of their home, regardless of its size and whether or not it is made up of beautifully maintained lawns and lovingly nurtured flower borders, or is simply a small patch of ground with a patio. Indeed, those of us who live in town houses with no garden at all can still create an outdoor atmosphere by using window ledges and balconies with a little imagination.
The garden gives us all an opportunity to enjoy outdoor life through the entire year, starting with the freshness of spring when new growth is just beginning to stir and come to life; the warmth of summer with its long hours of daylight and the opportunity this affords to eat outside; the coming of autumn, when fruit trees bear their annual crop; followed by the short cold days of winter, when we gaze out upon leafless branches and empty borders, knowing that it is time to help our small feathered garden visitors through the difficult months by offering them shelter in the form of birdhouses with the chance to provide sustenance. Each season brings its own view of nature, and the garden is our private version of it.
Like the home, no garden is complete unless it is provided with the right sort of furniture to suit our particular taste. For no matter how big or small the garden happens to be, whether we prefer to look out upon a broad expanse of green lawn, the myriad colours and mingled fragrances of planted flowerbeds, or trees and hedgerows in full blossom, our enjoyment of these wonderful outdoor surroundings is made so much more pleasurable when the garden or terrace is furnished with tables, chairs and the many other accessories that help to make it complete.
This book concerns itself with the building of traditional garden furniture, those items that we would consider essential for our comfort and convenience, in a traditionally accepted appearance or design. None of these items is either expensive or complicated to make: indeed, the woodworking techniques have been simplified throughout, to ensure that the reader does not require a great deal of knowledge and experience of woodwork. Nor should it be assumed that the workbench needs to be equipped with a vast array of costly and complex tools – in fact, rather to the contrary: the workbench for these projects does not need to be stocked with anything other than a set of basic, good quality woodworking tools. If you happen to be in possession of power tools and know how to use them safely and effectively, all well and good, but they are not a necessity to the achieving of first class results. There is always something particularly satisfying about producing a completed piece of woodwork entirely by hand, using a modest array of tools.
As for the reader’s own individual ability, the usual advice is that it is wisest to commence with the easier items and progress gradually to the more difficult. However, joints and techniques have been kept as straightforward as possible, so even the larger projects are well within the scope of the reasonably competent woodworker. For the novice, it might seem rather daunting to contemplate making the bench seat, which is the biggest piece of furniture in the book, especially since it involves large sections of wood which may be quite expensive to purchase. But if you practise first on cutting the required joints – inevitably mortise and tenon joints – in small sections of the same wood and follow the old axiom of ‘measure twice and cut once’, you will probably surprise yourself with the way you quickly progress.
Before describing in easy step-by-step instructions how each of the projects is made, the first chapters set out the basis of our approach to tools and materials, and the joints that are most commonly employed throughout the book. Each of the projects has a high degree of versatility, in that the design can be adapted or modified to suit the size of the garden for which it is intended, or to create an object that will serve a different purpose.
Where you have the greatest choice in any matter, is in the type of finish that is applied to the wood when the piece of furniture has been completed. These days there are so many different types of wood finish available that it is very hard to decide which is best, although to some extent the question is simplified by the fact that all of the items are intended for outdoor use, with one or two exceptions which could be considered more suitable for the conservatory, and therefore mostly you will need to opt for a water-resistant finish which will protect the wood from long periods of exposure to sun, wind and rain. It is then more a matter of determining the colour of the finish and judging the surface appearance of the wood after it has been applied and allowed to dry thoroughly: both of these being considerations of personal preference.
The best advice with regard to the treatment of the wood is to use offcuts and experiment with a variety of finishes until you obtain the result you find most satisfactory; and of course a more expensive product should give you better and longer-lasting protection.
No more need be said by way of introduction, other than to wish you the best of luck with your endeavours in the hope that the designs in the following pages will enhance your own garden, patio, terrace, conservatory or whatever provides you with your access to the outdoor world.
CHAPTER 1
Tools and Materials
It is possible to make most of the items in this book without needing a fully equipped workshop, although the more facilities and tools that are available to you, the easier it will be to produce good quality results. With a little ingenuity, a handful of basic tools, and some space at one end of the kitchen table, there is no reason why the keen woodworker cannot make pieces of furniture to the highest standard of finish. On the other hand, this is not really the most satisfactory way of proceeding, for several reasons.
A proper working area is recommended, whether it is a spare room inside the house, part of the garage or a garden shed. Timber tends to be supplied in long lengths, and you require space in order to handle it safely and efficiently. A workbench of some sort is essential, whether it is a purpose-made wooden bench equipped with a vice, a fold-away version or merely a sturdy table to which you can clamp the material whilst you work on it. The area needs to be dry, with reasonable ventilation, and preferably supplied with electricity for the provision of adequate lighting and to power any special tools that you may happen to own.
The working area should also be kept clean. This is particularly important from a safety point of view. Accumulated off-cuts of wood, shavings and sawdust build up very quickly, and present a fire hazard. Waste material should be gathered up at the end of every session and placed in rubbish bags for disposal. Apart from anything else, an untidy workshop is more likely to encourage accidents, and safety should always be uppermost in your mind.
Even the most harmless-looking tools can be dangerous, if stored or handled incorrectly. Sharp chisels should always have their tips covered when not in use, and manipulated with the greatest of care; saws should be hung up in a special place when not needed; and power tools demand constant vigilance. You are most likely to own an electric drill, planer, jigsaw and possibly a router if you have any power tools at all, and each of these can do great damage in a fraction of a second.
None of this is intended to put you off! Indeed, woodwork is a wonderful pastime, for you can see the results of all your hard effort taking shape in front of you, and often it gives you the opportunity to make something that it is not quite possible to go out and buy, or something that you could not afford to buy, and you have the personal satisfaction of knowing that the job is well done.
TOOLS
Whether you are a newcomer to woodwork, with only a limited set of basic hand tools, or an experienced practitioner with a fully stocked toolbox, it is the purpose of this book to show you how a range of useful and attractive items for the garden can be built without the need for a large array of complicated and expensive tools. For those who already possess a well equipped workshop full of power tools, it clearly makes sense to put these to full use, but this does not mean that you cannot achieve excellent results without them.
There are, naturally, a number of tools that must be considered essential if you are to produce top quality results. If you do not already own any of these, you must be prepared to purchase most, if not all, of the hand tools listed below. The power tools are desirable – though not essential – but you will find that many DIY stores have a range of these tools that are not exceptionally expensive and could prove a worthwhile investment, provided you take care with them. Let us consider the types of tool that you should aim to include in your tool cabinet.
Tape Measure
All woodwork depends on accurate measurement, and the rule or tape measure is probably used more than any other tool. My own choice is the springloaded flexible steel tape measure that pulls out from a plastic or metal casing, has a lock to hold it in any position, and retracts back into the casing when not in use. The scale is usually marked in inches and centimetres. An L-shaped steel lip is attached to the free end of the tape, and serves to mark the zero position. When the tape is calibrated in both imperial and metric measurements, always take care not to mix them up. For example, it is never a good idea to start working in inches and then convert to millimetres in the middle of a project, as there will always be a slight difference in the conversion process. Although there is a legal requirement to sell material in metric measurements, many people still prefer to work in inches. All measurements are quoted in millimetres and inches in this book, but for practical purposes metric figures should take precedence for the sake of accuracy.
A retractable steel tape measure.
Pencil
It is hard to think of the everyday pencil as being a tool, but it has a very important role to play in woodwork, for everything that needs to be cut or joined also needs to be marked. I normally use an ordinary HB pencil that I keep well sharpened to retain a fine point. Do not use a pencil with a hard lead, because this will score the surface of the wood, and a very soft lead will quickly lose its ability to draw a thin line. An HB lead is a good compromise.
Marking Knife
This is used to mark a thin line on the surface of the wood, as in the case of going over the previously squared pencil line of a tenon, so that the teeth of the saw, when cutting on the waste side of the line, do not rip the grain beyond the line and disfigure the wood.
Square
In the process of marking the wood for cutting and jointing, it is the usual practice to draw a line at right-angles to its length. The try-square consists of a rectangular wooden handle, edged in brass, that has a steel blade attached to it at 90 degrees with two parallel edges. A more sophisticated version of the plain try-square is the mitre square, whose adjustable blade can be set at any angle between 45 degrees and 90 degrees.
The mortise gauge, which also serves as a marking gauge.
Mortise Gauge
This tool is used to scribe two parallel lines along a piece of wood for the marking out of the mortise and tenon joint, for instance, and it has two spurs, one of which is fixed, the other being adjustable, so that the gap between the two parallel lines may be set as required. The best types of mortise gauge are equipped with a rounded brass thumbscrew at the opposite end from the spurs, to control the position of the inner movable spur with great precision. The sliding wooden fence, which is released and tightened by means of a screw, can be locked in any position, and provides the means of guiding the gauge along the length of the wood that it is scribing. Most mortise gauges combine two functions by having the double spurs for the marking of mortises and suchlike, but when needed, the adjustable spur can be tucked into the fence to leave only the fixed spur for single line marking.
Tenon Saw
As its name implies, the tenon saw is used for cutting tenons and other types of joint where fine sawing is required. It is quite a short saw, and has between twelve and twenty teeth to the inch. The top edge of the blade is strengthened with a steel or brass back to give rigidity and ensure a straight cut, and for this reason it is also known as the backsaw. The blade length ranges from 200mm (8in) to 305mm (12in). A firm wooden handgrip is an advantage.
Handsaw
This is a general-purpose saw that you will use to do most of your preparatory, or rough, cutting. It normally measures around 610mm (24in) in length, and has either eight or ten teeth to the inch. The teeth are set in an alternating pattern – as they are with the tenon saw, except here it is more pronounced – so that as the saw cuts into the wood it creates a passage known as the kerf, which is wider than the thickness of the blade, thus ensuring that the saw does not bind or jam as it passes through the wood. The handsaw does not have a strengthened back, so it is flexible, and the manipulation of this type of saw requires some skill to maintain a perfectly straight cut.
Coping Saw
This is a very useful saw when you need to cut curves. The thin blade is mounted in a metal frame shaped in the form of a U, and held under tension by tightening the handgrip. If the handgrip is slackened off, the blade can be rotated about its axis within the frame to set it at any desired angle. The extent to which it can cut the wood, however, is always determined by the saw’s frame.
Electric Jigsaw
In its most common form, this is a hand-held power tool in which the saw blade oscillates up and down at very high speed to provide a fast and highly manoeuvrable means of cutting. Various blades may be fitted, ranging from fine to coarse. The more expensive models of jigsaw have a variable-speed cutting action, governed by the amount of finger pressure exerted on the switch.
Chisel
It is advisable to have a set of good quality chisels covering a range of sizes so that you can select the most suitable width of blade for the job in hand. Typical blade widths would be 6mm (¼in), 9mm (⅜in), 13mm (½in), 16mm (⅝in), 19mm (¾in) and 25mm (1in). The firmer chisel has a strong cutting blade with square edges, whereas the bevelled chisel has two sloped edges, making the tool ideal for cutting dovetail joints, although dovetails do not appear in any of the projects in this book.
A bevelled chisel.
Mallet
A large wooden hammer, intended for striking the chisel in chopping out joints, and for knocking together the various pieces of wood that make up an assembly. The mallet should not be used for driving in nails, a task that must be left to a conventional steel hammer.
Smoothing Plane
This is the most frequently used bench plane. It is made from steel, and is fitted with a wooden or plastic handle and knob. The cutting blade is easily detachable for sharpening and adjusting the depth of the cut.
Electric Plane
This is a high-speed tool that does much the same work as the smoothing plane, except that the physical effort is reduced and the task of planing down the wood made a lot quicker. The planing action is facilitated by a revolving drum that carries two identical blades placed 180 degrees apart. As the drum spins at speeds of up to 20,000rpm, the blades alternately come into contact with the surface of the wood and remove small amounts as the plane is pushed forward. There is a knob for altering the depth of the cut, which works by raising or lowering the sole at the front, whilst the position of the spinning drum remains constant. With prolonged use, the rubber drive belt has a tendency to snap, and occasionally needs replacing with a new one, but this is an easy task.
Spokeshave
The function of the spokeshave is mainly to shape curved surfaces, and it is an invaluable tool for dealing with sweeping curves, such as those encountered on the arms and legs of chairs. It may not be called into use very often, but is an excellent tool when required.
Handbrace
This tool is used for the majority of drilling operations. It consists of a crank forged from steel, which is fitted with a rounded wooden or plastic handle at one end and a chuck at the other, for holding a variety of drill bits, ranging from small twist drills, auger bits and centre bits.
Pillar Drill
This is a very useful piece of workshop equipment, for it combines the speed and convenience of an electric drill with the precision of being held in a vertical stand. The drill may have a variety of speeds, determined by a series of pulleys and drive belts that are easily adjustable, and the drilling action is controlled by a spring-loaded up-and-down movement. This machine, which needs to be bolted very securely to a strong worktop, is excellent for boring out the first stage of waste when preparing mortises.
Electric Router
There is always an element of mystery about a tool that has a reputation for performing many tasks, such as rebating, grooving, fluting and edge-moulding, but in fact the electric router is simply a motor housed vertically inside the body of the tool, which drives a chuck at very high revolutions. Into the chuck may be fitted a wide range of cutters, although its use in this book is confined to the preparation of rebates and housing grooves. The base of the router is circular, so that it can be lined up against a length of straight-edged batten, acting as a guide, and steered through any angle without deviating from a straight path. A detachable fence can be mounted beneath the base to provide the router with its own adjustable guide, and the spring-loaded plunging action of the body may be pre-set against a scaled depth-stop so that the cutter is accurately controlled both laterally and vertically.
CARING FOR TOOLS
The most effective way of looking after all your woodworking tools is to store them away safely when they are not in use, rather than leave them lying around on the worktop. If your workplace is in the garage or garden shed where the atmosphere is likely to be damp, you can safeguard all steel surfaces from rust by giving them a regular rub over with a soft cloth soaked in light oil.
Inspect saw blades, chisels and planes regularly to ensure that their cutting edges are always keen and efficient. An oilstone is an absolute must for periodically re-sharpening chisels and planes. Remember also that many tools are designed to cut wood, and they are none too particular about cutting careless fingers as well. Power tools are especially dangerous in this respect, and require careful handling at all times. Learn how to hold and manipulate these tools properly, and stay safe at all times.
MATERIALS
Before you can begin making any piece of garden furniture, you must decide what sort of wood you are going to use. The decision is not as difficult as would be the case for many other kinds of woodwork, because by its nature, garden furniture often calls for a material that is basic and will withstand outdoor conditions. Nothing delicate or exquisite is demanded here. Most of the items in this book are made from either the sort of softwood that you can buy from any timber merchant or DIY store, or one or two hardwoods that are not difficult to obtain, such as sapele, utile and iroko.
The terms ‘softwood’ and ‘hardwood’ can be misleading, for the names suggest that hardwoods are tough and durable, whilst softwoods are weaker and more susceptible to breakage. In fact, certain hardwoods are relatively soft, and a few of the softwoods are particularly hard, so clearly the generic name is misleading, for it does not refer to the actual hardness or softness of the material. However, it so happens in this case that whitewood or redwood, which are typically the softwoods that you might expect to find on the shelf at your nearest timber stockist, are in fact quite soft, and iroko is especially hard and unyielding, although it produces very good results.
Unless you wish to purchase more exotic or expensive materials, such as parana pine, oak, maple or walnut for your own garden, you would be advised to keep to the types of wood that are most readily available and not too expensive.
How Timber Is Supplied
Whether you intend to buy your wood from the timber merchant, the DIY store or some other outlet, possibly a garden centre that has a few sizes of wood for sale, it is supplied in two forms: sawn or planed. When cut from the log and subsequently sawn into smaller sections, the surface of the wood is rather coarse, although it may be considered ideal for certain kinds of outdoor woodwork, such as fencing. The main characteristic of sawn wood is its dimensions, for if a particular piece is quoted as being 50 × 25mm (2 × 1in) in cross-section, that is exactly what it should measure.
Planed wood, also known by the initials PSE (planed square edge) or PAR (planed all round), in contrast to sawn wood, has its sides and edges prepared from the roughly sawn state by passing it through a planing machine, which skims off some of the surface to leave a smooth finish. To obtain this result, there must clearly be some reduction in the dimensions of the material, equal to the amount taken off by the plane. Prepared wood is therefore fractionally smaller in cross-section than its sawn equivalent, and there are two ways in which it may be quoted. For example, the same 50 × 25mm (2 × 1in) piece in the planed form can be referred to as either 50 × 25mm (2 × 1in) prepared, or 45 × 19mm (1¾ × ¾in) finished size, PSE or PAR.
There should be no problem in obtaining any amount of softwood from the timber merchant in a range of standard sizes, but hardwoods can present more difficulties. You will either have to choose from the limited varieties that are held in stock, or place a special order. If you have a local joinery that specializes in making doors and windows, it may be worth asking if they have off-cuts or lengths of hardwood left over from a particular job; and even if they do not have exactly what you want in stock, they will probably have the means to get it for you.
Faults In Wood
The fact that wood is being offered for sale does not necessarily mean that it is in perfect condition, and there are several faults that you should look out for. If you are buying a softwood such as pine or deal, the most obvious characteristic is the knot. This is the point at which a branch joined the trunk of the tree. Provided the knot is live and quite small, it should present no real problem, but large dead knots are a liability and ought to be avoided. They are distinguished by a surrounding black mark, and often the centre of the knot is ready to fall out, if it has not already done so.
Knots such as this one are hard to avoid in softwoods such as pine.


