20,99 €
Mehr erfahren.
- Herausgeber: The Crowood Press
- Kategorie: Lebensstil
- Sprache: Englisch
This book is designed to be a valuable reference for wargamers and modellers who build and paint models of the armoured cars used during World War II. It includes extensive information on the many different types, some well known and others less so, with photographs of vintage vehicles to help create realistic models. It is aimed at new entrants to this hobby, as well as those who wish to widen their field of interest. With over 220 colour photographs, this book includes hints and tips on modelling tools and accessories; British, Commonwealth, German, Italian, Hungarian, Japanese, American, Soviet and French armoured cars, and more. There are guidelines for building plastic, resin and metal models in 1/76, 1/72, 1/48 and 1/35 scales. Real-life reference pictures and a 3D-printed model is featured.
Das E-Book können Sie in Legimi-Apps oder einer beliebigen App lesen, die das folgende Format unterstützen:
Seitenzahl: 186
Veröffentlichungsjahr: 2021
Ähnliche


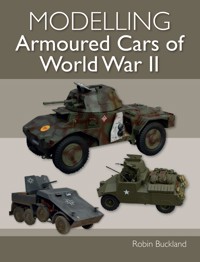
MODELLING
Armoured Cars ofWorld War II
MODELLING
Armoured Cars ofWorld War II
Robin Buckland
First published in 2021 byThe Crowood Press LtdRamsbury, MarlboroughWiltshire SN8 2HR
www.crowood.com
This e-book first published in 2021
© Robin Buckland 2021
All rights reserved. This e-book is copyright material and must not be copied, reproduced, transferred, distributed, leased, licensed or publicly performed or used in any way except as specifically permitted in writing by the publishers, as allowed under the terms and conditions under which it was purchased or as strictly permitted by applicable copyright law. Any unauthorised distribution or use of this text may be a direct infringement of the author’s and publisher’s rights, and those responsible may be liable in law accordingly.
British Library Cataloguing-in-Publication DataA catalogue record for this book is available from the British Library.
ISBN 978 1 78500 907 5
Cover design by Blue Sunflower Creative
Contents
Dedication
Introduction
1 Basic Modelling Equipment
2 British and Commonwealth Armoured Cars
3 German and Axis Armoured Cars
4 American Armoured Cars
5 Russian Armoured Cars
6 French and Other Allied Armoured Cars
7 Taking Your Hobby Further
Appendix: The Miniature Armoured Fighting Vehicle Association (MAFVA)
List of Manufacturers
Tools/Materials Suppliers
Bibliography
Index
Dedication
I need to thank the magazine editors I wrote for over many years, especially Ray Rimmell for starting me off with my Armoured Column in Airfix magazine back in 1985, and then both Ken Jones and Kelvin Barber for their support in writing my Small Scale Scene column in Military Modelling magazine for over thirty years. Ken also put his trust in me to look after the MilitaryModelling.com website, which I did from 2009 to the end of 2017. Thanks must also go to those manufacturers who supported me with information and samples over all those years, as I couldn’t have done it without your support. I’d also like to thank fellow MAFVA member Vincent Mifsud for his assistance with the 3D printing project. There are too many others to mention them all, but in particular I’d like to remember my great personal friend, Barry Walby of MMS Models, who sadly passed away at the end of February 2020.
Most important of all, however, I’d like to dedicate this book to my lovely wife Una, who has had the amazing tolerance to put up with me and my modelling obsession, a hobby that has kept me occupied for well over fifty years.
Introduction
Many years ago now, I was motivated into getting into the hobby of modelling military vehicles thanks largely to the articles in Airfix magazine, way back in the 1960s. They also did a series of small hardback modelling guides, tackling a varied mix of topics and covering vehicles, aircraft, warships and figures. One of them was Modelling Armoured Cars, by Gerald Scarborough. In those days there were relatively few model kits available on the market, and many needed to be scratch-built. Now, around fifty years later, the variety of models on the market, in a multitude of scales, make modelling a very different ball game.
The Airfix Magazine Guide, a book that prompted my own interest in modelling armoured cars. There is so much more available on the market now than there was then.
My main aim in this new book is to encourage modellers, and maybe wargamers as well, to explore the topic more widely. There is a whole range of military vehicles out there that are that bit different to the glamourous tank, which so often gets the limelight. I don’t intend this to be an encyclopaedia of every armoured car, or indeed every kit in every scale. To attempt to do so would I think be doomed, as new kits are appearing all the time, plus I am sure there are some I haven’t come across up to now. The aim is rather to look at just how broad the subject is, and give an idea of the wide variety of models that are available these days, whether you are considering simple, robust models for use on a wargames table; a super-detailed model including interior details in a larger scale; or just a wide collection of different types. Another advantage of armoured car kits in general is that while they may not have some of the attraction/fame of MBTs, they are smaller, less complex and less expensive – so, for the majority of modellers, a more affordable option.
One of my earliest larger-scale models was an armoured car, an Sdkfz 222, and one which actually has a wind-up clockwork motor. It was not brilliantly done but is a model I do still have. I can’t actually remember the manufacturer (I think it may have been Nichimo), other than knowing it was an early Japanese kit; plenty more armoured car models under my belt since then, but it still has a place in my collection.
One of my earliest 1/35 models, a clockwork Sdkfz 222, built in the early 1970s.
There are models in plastic, white metal or resin, or you can scratch-build your own from a set of scale drawings or, most recently, use a computer to turn those drawings into a 3D model that can then be printed on a 3D printer. As for painting and finishing, I don’t claim to give you the most artistic finishes for painting and weathering, but leave that to you to develop as you wish. There are plenty of styles and techniques presented in most commercial modelling magazines, some of which look considerably more ‘real’ than others. What style to go for is obviously up to each individual modeller. There is also plenty of guidance to be found from manufacturers, such as Ammo by Mig Jimenez and others.
Magazines and websites tend to concentrate on individual subjects, whereas my intention is to provide a much wider perspective on a particular topic, leaving individual modellers to expand their interests and extend their skills in the way they enjoy most. Personally, I build models for my own pleasure, not to win prizes. In the same way I tend not to build dioramas as I just don’t have the space for them, so keep just a few bases that I can place models on simply for photographic purposes.
A selection of armoured car models, all different and in various scales, all of which are covered in this book.
These are all examples of the Sdkfz 263 – in 15mm (1/100), 20mm (1/72), 1/48 and 1/35 scales.
Over many years of modelling, and indeed writing about the hobby, I have so often seen or heard comments from people saying things like, ‘I didn’t know you could get a model of such and such.’ Well, having seen a lot of models over the years, I hope to share with you just how much variety is available within the topic of World War II armoured cars, along with some basic notes on the real things to help with understanding what the models represent, as this might help you choose which ones to try out.
Chapter One
Basic Modelling Equipment
As the aim of this book is to encourage beginners and youngsters to take up the hobby, I will start looking at this aspect of modelling with just the basics, and demonstrate how you can keep costs down and just get on using basic tools. Then I’ll move on to a few ‘extras’, which, while you may not use them every time, are very handy when you do need them. The longer you go on making models, the more tools you are bound to acquire.
BASIC TOOLS
Let’s start with what I consider the basic tools needed for building models. These include such things as knives and suchlike, along with materials such as glues.
Modelling/Craft Knives
There is a good mix of different styles of modelling knife on the market. The important thing is to find the style/size of knife handle that is most comfortable to use. I will happily say which ones I have used over the years, but each of us will have our own personal preference. They are not expensive, so you might want to try a few different ones and see which work best for you.
The key tool for modellers, a craft knife. These are my two favourites, but try different ones and choose the type you find most comfortable to use.
Before I tackle these any further, I must give a safety warning. The blades used with these knives are very sharp indeed. Always be careful how you cut with them: cut away from you, and preferably use with a cutting mat well away from your fingers. Having said that, I still do a lot of clean-up of parts once they are removed from the sprue and that is done in hand. Just be very careful. I have cut myself quite regularly over the fifty-plus years I have been modelling, but never seriously. Even when not serious, however, it is usually painful.
Another safety reminder – especially if you have a young family in the house – is to make sure you don’t leave a sharp-bladed craft knife out where it could be picked up by any young children. If you want to encourage any of your children to take up the hobby, train them in the safe use of knives from the very start.
Over the years I have used two particular knives. The older one is the simple Swann-Morton plastic-handled knife, which I find a comfortable fit in the hand; it has several different-style blades (both straight and curved) that are designed to fit it. My preferred blade for years has been their curved No. 2 craft tool blade.
In recent years I have changed to a much smaller, cylindrical metal blade handle, which fits the small Swann-Morton SM065, a straight blade that I find very good for fine work.
Other handle styles include the basic surgical scalpel. This has quite a flat handle and I don’t find it comfortable, though the Swann-Morton blades are very sharp indeed. Quite different is the larger-style handle, such as those found on X-Acto tools. Again, I tried these many years ago but found I didn’t get on with the larger handle while doing fine work. Try them out and choose your own favourite.
Sprue/Side Cutters
This vital little tool is a ‘must have’. You could get by with a pair of scissors but side cutters will make your life much easier. There are various options on the market, but my favourites are in the Xuron range. There have both straight side cutters and the ‘shear’ type, where the blades overlap very slightly. I use either type when building plastic kits, and they can be useful with resin models as well.
Three different side cutters, another basic tool.
These are more expensive, so if you are on a budget you may find small pairs on sale at market tool stalls for as little as £1; they work well enough, especially given the low price. Equally, I have seen some brands at a considerably higher price point. They may be good but, to my mind at least, not worth the extra cost for what you want them for.
Hand Drill
A pin vice, or hand drill, is a tool I would also put on my ‘essential’ list. I keep one handy all the time, as they are useful for plastic, resin and metal models. You can buy a great selection of drill-bit sizes, such as in sets as illustrated here. They are not expensive but will last you a long time. The most commonly used drill size is 1mm.
A pin vice is another vital tool for the AFV modeller. They are not expensive and I find I use them on a very regular basis.
Sets of small-diameter drill bits are readily available and not expensive; the 1mm bit is the one I use most often.
You can buy drills from modelling tool makers such as Revell or Master Tools (a Trumpeter brand), but you can also get them in your local hardware store, and these are usually cheaper. Again, I have found perfectly good drills on sale at market stalls for as little as £1, and at that price it isn’t much of a strain to buy two or three if you are concerned they may not last. That said, I have a couple that I have been using for well over thirty years or so.
Files
So-called needle files are handy to have, and generally not expensive. You can also get even smaller ones, referred to as ‘rat tail’ files, which are handy for sorting out location holes that you may need to drill out to help get a better fit of parts.
Needle files are very useful to have when the fit of parts need just a little tweaking.
Sanding Sticks
One of the most common issues you will come across in building plastic models is joint or moulding seams. These need to be removed. One way is by careful scraping with a craft knife, but the alternative is to sand them down using a sanding stick. I use both techniques, sometimes in combination. As ever, there is a great variety of types on the market.
Sanding sticks come in variable grades, from coarse (to remove excess material) to fine (for final finishing/smoothing).
They also have different grades of grit. A coarser grit is used for removing a good amount of material, but has the disadvantage that it can leave marks on the plastic bodywork that really you want to leave alone. So, use a finer grit to do the finer work and an almost smooth one for finishing and leaving a smooth surface. A number of companies produce them in the different grades and some also have single sticks with multiple surfaces of different grades all on the one tool. If you look in local chemists’, you will find very similar boards (emery boards), sold in the nail care aisles, which can be a handy alternative.
Razor Saw
A razor saw is a tool I only use occasionally, but when needed, it is the ideal thing. Rather like the basic craft knife, there are various types on the market, with different-size handles and able to hold different grades of blade; which one you go for will come down to personal preference. Yes, price can come into it, but comfort will likely be the deciding factor for any long-term use.
Two different styles of razor saw. Again, try a couple to decide which you prefer.
A very fine razor saw from JLC, which makes a finer cut and removes less material, which might affect any new joins.
Tweezers
Another key tool in any modeller’s toolbox is tweezers, ideally at least two or three different types. There is a variety on the market, and some come in sets of different styles, for example a straight pair and an angled pair, both with sharply pointed tips. One word of warning with both these is to try not to accidently stab yourself with them, as it hurts (says the voice of experience). These are useful not only when building models but especially for positioning transfers/decals on your completed model.
Just three of the many varieties of tweezers, another tool I would not be without.
The slightly larger type of tweezer, with rounder, blunt tips and usually a serrated ‘grip’ surface, are good for holding model parts, so they don’t ping off onto the carpet, never to be seen again.
There is one other style, which uses a crossed structure; with these, a spring design makes them grip for you, rather than your own finger pressure.
OTHER MODELLING TOOLS
Metal Ruler
A ruler comes in handy, either 15cm or 30cm, depending on the size of models you like to build. The most important thing to say is to get metal rulers, not cheaper plastic ones. If you are lucky, you can find ‘scaled’ rulers for 1/76, 1/72, 1/48, 1/35 and so on.
Metal rulers, both 15cm and 30cm, are much better than plastic ones when using a sharp craft knife.
Elastic Bands
Sometimes you will want something to hold larger parts together while the glue dries, for example when building a hull. You can hold parts together in your hands until things ‘grip’, but sometimes you will get parts that want to spring apart the moment you let go. The simple elastic band can be just the job. You won’t need them all that often in my experience, but sometimes plastic parts can become warped for one reason or another, and then they won’t fit nice and squarely.
Power Tools
Obviously there are a great many power tools out there with a host of applications. The one I use most is a power drill, in my case a cordless Dremel (I have an older corded one as well, which I keep as a back-up). This is often useful. They also have a wide range of available accessories.
One of the more expensive – but important – tools you might acquire is a cordless power drill, in this case a Dremel.
Some power tools come in a small format for modellers, but I have managed to do without these for many years. They include items like a small lathe, sanders and saw tables, which are all available from various manufacturers.
GLUES AND JOINING MATERIALS
Plastic Cement
We have come a long way from the old tubes that were pretty much the only option when I was young and started modelling, and now there are a number of different makes of plastic cement on the market. They all work essentially the same way, however, melting the surface of the plastic and effectively ‘welding’ the parts together. It is worth remembering that, and not applying too much in one place, as it can melt/distort the part(s), damaging the surface.
My favourite plastic cement, Revell Contacta Professional, which has a fine metal applicator tube for precise application.
Most of the time these days I use Revell Contacta Professional, which has a long, thin metal applicator tube that helps you apply finely measured amounts of glue to the mating surface of the kit parts. Other brands include the ever-popular Tamiya Extra Thin Cement, which comes in a squat, square bottle, and a brush fixed inside the cap. There is a similar arrangement in Plastic Magic from Deluxe Materials, which I also find very good. Other options are made by the likes of Ammo by Mig Jimenez and Humbrol, to name a couple. I suggest simply trying one or two and deciding which one you like using best.
Glue alternatives: the popular Tamiya Extra Thin and Deluxe Materials Plastic Magic.
The one exception is for clear plastic parts – window glazing and periscopes, for example – for which I like the white glues that are usually sold for fixing transparent parts, as these dry clear. The one I use is Glue’n’Glaze from Deluxe Materials. You can use superglue, but be aware this often causes the inside surface to ‘fog’ and, once fixed inside, you can do little if anything to rectify the problem.
Superglue
Superglue, or to give it its proper name, cyanoacrylate, is a clear adhesive and a very useful tool for modellers, particularly for assembling both resin and metal models. For a long time I thought that cyanoacrylate glue had been developed as part of the space race, but in reading more about it, I discovered it was actually first developed during World War II in research to make clear plastic gunsights, though it wasn’t actually used in the end. After the war, it was not until the 1950s that it was commercially sold as an adhesive, one which quickly gained popularity. It doesn’t present a toxic risk, and in fact it is sometimes used in medicine to close a wound as it is quicker than conventional stitches. Fans of crime dramas such as CSI will be familiar with seeing it heated inside an enclosed Perspex container to produce fumes, which then stick to the residue of fingerprints, rendering them visible. All in all, it’s amazing stuff.
A recent addition to the options for cyanoacrylate is a black version, along with an activator (hardener) from Ammo by Mig Jimenez.
There are a couple of things to note about superglue. It does stick skin very quickly and easily, so do take care when you are using it. Fortunately there are debonding agents available, which I think are very useful to keep handy, just in case. It also has a relatively short shelf-life, about a year from manufacture. I am sure I am not the only one to have gone for a bottle I’ve kept on one side only to find it set solid. Once it is opened and air gets in, the shelf-life is reduced further, though if you use it regularly then that shouldn’t be a problem. Still, this is one reason it tends to be sold in quite small tubes/bottles.
I use superglue for assembling resin models/parts in particular, and also for metal models as an alternative to solder. You can get both thick and thin variations of superglue, each having their particular uses, and most recently, Ammo by Mig Jimenez have introduced one with a black pigment; I must say I have come to like this, simply for being more visible on the parts you have applied it to while you are building your model.
Generally superglue sets very quickly. Bear in mind that a thin layer is generally better than a thick one and sets faster. Sometimes you can find the drying time is a bit slow, and holding parts together accurately while a thicker application sets can be awkward. To help with this, there are hardeners available, which, when applied to the glue, will make it set instantly, providing a good, solid joint. An advantage of this is that you can progress with building the model very quickly, rather than perhaps waiting overnight for a join to dry.
White Glue
White glue, PVA or wood glue is a popular craft product for youngsters and general crafting work. For the modeller it also has some very handy uses. First, and though this is really beyond the scope of this book, I use it for assembling laser-cut MDF-board buildings, which are now widely available from numerous makers, mainly intended for the many structures used on wargames tables, in most popular scales. For the vehicle modeller, it has a couple of particular uses and benefits.
For fixing clear parts, I use Deluxe Materials’ Glue’n’Glaze, a white glue that dries clear.


