28,49 €
Mehr erfahren.
- Herausgeber: The Crowood Press
- Kategorie: Lebensstil
- Sprache: Englisch
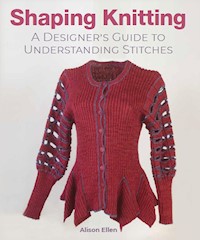
Shaping Knitting delves into stitch structure and how different stitches work together to alter not just the thickness of the knitting but also its shaping, and how this can be harnessed when making both fabric and garments. Written for knitters and designers, it encourages exploration and experimentation with the aim of gaining a greater understanding of knitted textures, patterns and shaping. This book looks at the reasons for knitting in different directions and at the advantages of beginning at the top, the side or at any point, as well as the traditional bottom edge. It can also be used as a reference book or as a starting point on a journey into knitting. Alison Ellen takes a special approach to designing, playing with stitches and the direction of knitting to allow the structure of the fabric itself and the three-dimensional form of the garment to emerge seamlessly together.
Das E-Book können Sie in Legimi-Apps oder einer beliebigen App lesen, die das folgende Format unterstützen:
Veröffentlichungsjahr: 2023
Ähnliche


First published in 2023 byThe Crowood Press LtdRamsbury, MarlboroughWiltshire SN8 2HR
This e-book first published in 2023
© Alison Ellen 2023
All rights reserved. This e-book is copyright material and must not be copied, reproduced, transferred, distributed, leased, licensed or publicly performed or used in any way except as specifically permitted in writing by the publishers, as allowed under the terms and conditions under which it was purchased or as strictly permitted by applicable copyright law. Any unauthorised distribution or use of this text may be a direct infringement of the author’s and publisher’s rights, and those responsible may be liable in law accordingly.
British Library Cataloguing-in-Publication DataA catalogue record for this book is available from the British Library.
ISBN 978 0 7198 4136 1
Cover design: Maggie MellettPhotography by Colin Mills (unless stated otherwise)
CONTENTS
Introduction
1 Construction and direction
2 Shaping with simple stitches
3 Knitting with bias
4 Twists, turns, cables and crossovers
5 Shaping with colour
6 Creating curves
7 Building blocks
8 Projects
1 Rib-welt shaped waistcoat
2 Entrelac jacket, shaped by stitches
3 Modular swing-back jacket
4 Ribbed jacket with inserts and ‘slashed’ sleeves
5 Waistcoat in modular knitting with shaped back
6 Rib-and-welt modular jacket
7 Modular jacket, scallop shapes
Abbreviations and glossary
Acknowledgements and thanks
References
Index
INTRODUCTION
‘Knitting can be solace, inspiration, adventure.’
Elizabeth Zimmerman
Knitting is a wonderful technique for ‘building’ a fabric or textile with minimal equipment. Not only can you make a piece of cloth, but you can also make a whole garment or item without seams, and you don’t need to be tied to a machine or a desk – it’s portable. Comparing knitting with other constructive textile techniques such as weaving, it has enormous freedom. In weaving, you are restricted by the need to have warp threads stretched under tension on a loom in order to weave a straight strip of cloth – so, to make clothing, the cloth must be cut. In knitting, any shape can be designed and made with no waste; the fabric and the garment are created in one process, and made to measure.
Looking at some different constructive textile techniques such lacemaking, tatting, and even other single-thread relations of knitting such as crochet, Tunisian crochet and nålbinding, knitting has one unique characteristic: its stretchiness. Formed using two needles and a single thread, the rows of stitches drop from the needle down in columns, one above the other, in a way that enables them to stretch out, particularly sideways, so the finished piece can form itself comfortably around the body.
In many ways crochet and knitting are very similar, and they are indeed closely connected, but looking at crochet from the point of view of a knitter, although it also uses a single thread, it’s actually formed from continuous ‘casting off’ (binding off) stitch; each stitch is locked over its neighbour, which prevents the stitches from stretching out sideways, thus creating a firmer fabric than knitting. Tunisian crochet incorporates rows of both knitting and crochet, with the crochet again firming it up and restricting stretch.
The reason to look so closely at how knitting works is that if we can understand it and go with its natural strengths, it illustrates the design advantages, and reveals what knitting can achieve. This book will look in detail at what happens to the stitches (or combination of stitches) in each pattern, as the more completely you understand, and the more quickly you can see what is happening in the structure, the better placed you are to make design decisions and see opportunities, or spot an error. If there is a mistake, the sooner you see it and understand where it originated, the better, so you can find an efficient way to go back and correct it – or maybe learn something from it so that a ‘mistake’ turns into a new design opportunity. When you become familiar with stitches, you can recognize the way an increase or decrease makes a particular mark and how it sets all the stitches off in a different direction; then you can choose the most appropriate increase or decrease for your pattern. The more you experiment, the more you learn, so although there will be more trial, there should be less error.
As this book is mainly concerned with the structure of knitting, it won’t go into every aspect of designing and pattern-making as surface decoration or visual impact, but will be looking particularly at how different stitches affect the thickness, drape, length and width of the fabric produced.
There are some characteristics and quirks of knitting that can be seen as downsides and disadvantages, and some restrictions in the action of knitting itself, but can we turn these to our advantage? If we look at the best-known knitted stitch, stocking stitch (or stockinette stitch in the US), this is made by knitting one row plain and one row purl. In other words, pushing all the loops to one side of the fabric, leaving a smooth vertical-faced texture on one side, usually referred to as the right side, and a bumpier, horizontal-textured reverse side where the tops of the loops lie. You get the same result by knitting in the round in knit stitch only: all loops fall to the back. Something happens to this stocking stitch fabric. It behaves in a way that can be very irritating: it wants to roll and curl; the sides curl away towards the purl side, and the top and bottom edges do the opposite, rolling forwards towards the knit side, and we need to examine this tendency. It poses the question ‘Why?’ and ‘How do we make it lie flat?’. The next chapter looks more closely at this, but perhaps this curling tendency shouldn’t be a problem but rather something to work with – an advantage of the technique itself for the designer to examine and use in a design.
This may sound simplistic, but why not make things as simple as possible? This is the approach we’ll be taking in this book: knitting by hand is a slow process, so any tricks or short cuts to simplify the process are welcome. On the other hand, there is no denying the freedom of knitting, which also gives the opportunity to be as complicated, ornate and intricate as you want. It can not only create its own designs, but imitate other techniques as well. Knitting can play with and reproduce coloured patterns in the same way as embroidery, weaving or many other techniques. Anything is possible. Thinking of each stitch as a dot, patterns and pictures can be built with great freedom, as can be seen in knitting patterns and designs through the twentieth century and before: not just geometric patterns, but any picture can be translated into knitting. However, this book is more concerned with understanding how the structure of knitting works best and letting it guide our designs, rather than imposing designs on the fabric which could be made equally well in a variety of ways. So, even though a picture can be produced or copied in textiles in weaving, embroidery or knitting, what can knitting do that other techniques can’t? And why not find the easiest or most logical way to carry out an idea for a design? For instance, if you want a pattern with vertical stripes in different colours, of course you can knit this. You could knit in a Fair Isle technique using two colours in a row, one for each stripe, carrying or weaving the unknitted colour behind. You could use the intarsia method, with a separate yarn for each stripe, each travelling within its own area. But isn’t the simplest way of making stripes to knit them across the row, change colour every few rows and make them horizontal? So how about knitting the design in this logical way, rather than trying to produce a vertical stripe: when you turn it on its side, the stripes fall vertically when finished. Again, this might be a bit unsophisticated and may not fit your requirements of drape and thickness: knitting does hang differently when used sideways, but it’s worth considering and searching for the easiest and most suitable option. Other changes to the fabric occur with different techniques in colour knitting and these need to be considered: we’re not just looking at surface decoration. Some methods will give a warmer, thicker, less stretchy result, so there are several factors involved as well as the visual impact of stripes or pattern running horizontally or vertically.
Another character of the knitted stitch is the grid formation of the structure; if you think of representing each stitch on a chart, there are then obvious limitations in creating curves in a coloured design, in the same way as curves might be difficult to represent in cross stitch embroidery or weaving. Again, there are ways of working round this by looking at how you can adapt the stitches to fit your ideas, such as using knitted stitches that curve and flow naturally, and incorporating these to produce a more elegant, smoother design with the curves created by the stitches. When you understand what the knitting is inclined to do and how the stitches naturally lie, you can use their ‘abilities’ to design for, or with you.
Most of the samples or ideas illustrated are concerned with how the stitches affect the knitted fabric, so the edges are not masked for the photographs but shown with all their idiosyncrasies, and often pieces are worked with borders of plain stocking stitch or garter stitch knitting to compare the width and length. Without a ‘live’ piece of knitting to handle, the thickness and weight and amount the stitch pulls up or inwards must be imagined, so the photographs and text aim to describe this as much as possible. They are mostly knitted in strong 4-ply-weight wool1, and unless the text discusses the yarn, any good-quality wool will behave like the illustration, as the main influence here is the stitch itself, not the yarn. However, some stitches relying on a lively yarn will be affected by yarns of different character: flatter, softer or more ‘drapey’ yarns will behave differently, producing texture but not so much stretch, and this will be described in the text.
This book begins with a chapter looking at different ways of constructing a sweater or garment, using the different directions to influence the design, and following chapters will explore different types of stitches and ways of using them to shape the fabric or garment. Hopefully, you will be inspired to explore, experiment and discover new and wonderful ways of using this versatile technique.
CHAPTER 1
CONSTRUCTION AND DIRECTION
‘All things are possible in knitting. Women knit almost by instinct, men now for pleasure, though not so long past it provided him with a means of livelihood.’
Mary Thomas’s Knitting Book (Hodder & Stoughton, 1938)
Knitting from bottom up
The only equipment you need in order to knit is a pair of hands and knitting needles. This gives great flexibility and freedom for the knitter, who can move around while knitting, and allows freedom in the designing and the knitted fabric. Without being dictated to or limited by a machine, a hand-knitted item can be created in any direction, and although the fabric grows from the bottom up, the starting point could be anywhere on a garment by knitting in different directions. Although we are used to beginning at what becomes the bottom edge, it’s worth looking at the pros and cons of this conventional method and whether there are advantages in using any other starting point, including whether to knit in the round or in separate pieces. Having designed and knitted garments in one piece all my life, I would need a strong argument to persuade me to choose to knit pieces separately. Why would you want seams to sew when you can knit something that doesn’t need joining? Working in the round is so intuitive and labour saving, and something that is made possible by the natural inclination of yarn. By knitting in different directions (from different starting points), any three-dimensional shape can be knitted, picking up stitches rather than joining top or side edges with a sewing needle, and by invisibly grafting (joining by Kitchener stitch2).
All the ideas in this chapter are directed at designing your own knitwear, but if you are planning to follow a knitting pattern designed in separate pieces, you can still adapt many designs for knitting in the round, just by being aware of a few adjustments that might be needed, listed below.
The simplest T-shaped garment
One of the simplest and oldest ways of making a garment is based on the simple T-shape with a tube for the body, and two tubes for the arms. Taking this basic shape (as used in a traditional Guernsey – or gansey) as a model, the body is knitted in the round to the armholes, separated to knit the back and front, travelling back and forth up to the shoulders. These are cast off placing back and front together to join them, and the sleeves picked up round the armhole and knitted downwards, thus closing all the gaps and finishing the garment. Knitting the sleeves from the top down has the practical purpose of making it easy to repair worn-out cuffs as well as doing away with the need for sewn seams. There is another, traditional way of knitting garments in the round to the top, while ‘steeking’ and cutting the fabric at the end to make the openings, for example, a jacket or cardigan front opening, or sleeve openings. This eliminates the need to purl or work on the wrong side, but it seems somehow counter-intuitive to cut through knitting. Any shape can be knitted with a neat selvedge, enabling a perfectly flat join, whereas cutting necessitates either binding or bonding the edge to make it safe so it can’t unravel. There are two things knitting is really good at: first, creating either a flat or a three-dimensional piece of fabric with ready-made finished edges, and secondly, unravelling if the thread is broken. Knitting with selvedges obviously prevents this, and even though traditional steeking also ensures that it won’t unravel, it still goes against the grain to cut knitted fabric, which might result in a thick seam instead of a clean edge.
The simplest T-shaped garment knitted as a tube, with shoulders cast off together and sleeves picked up and knitted downwards.
T-shaped sweater showing the direction of knitting.
The basic T-shape is not necessarily contoured to the body, but it can be tweaked for more fit by doing a set-in sleeve, raising the sleeve top onto the shoulder rather than the more casual dropped-down sleeve join. The nature of knitted fabric accommodates the fit up to a point, and it can also be shaped with different stitches, as will be explored in later chapters. So, what are the other considerations in knitting in this way?
The same construction with set-in sleeves to make a more fitted shoulder seam.
The downsides of knitting in the round
Style of knitting
Depending how you hold your knitting needles (on top or underneath) and whether you are used to using circular needles, you may find knitting in the round less comfortable, but this is probably to do with unfamiliarity and not a technical problem.
Bulk and weight
Knitting a whole garment can become heavy to handle as it grows larger, and you have the bulk of a garment to keep turning as the knitting progresses. Whether this is too impractical to manage depends on the weight of yarn and size of the garment.
Narrow stripes
As knitting in the round means working in a spiral, there is a danger of a small step in the colour change at the beginning of each round, which is particularly visible in a thick yarn. However, there are ways to overcome this. One option is when you change colour; knit one round then when you get back to the colour change, slip the first stitch in the new colour. Now carry on knitting round, and you will see that the little step or ‘hitch’ has been smoothed out. There will be one less row in your stripe at this point, but it will be a smoother join. There is more information on this and some neat ideas at Helical knitting tutorials, ‘different ways of knitting a spiral with no hitch’.3
Uneven textured knitting
If you find you have a different tension with your knit and purl stitches, a stocking-stitch garment would show a difference between an area knitted in the round (where only knit stitch is used), and the area above the armholes knitted back and forth with alternating knit and purl rows, so a difference to the texture would then show up. It should be possible to eliminate this by knitting (or purling) more firmly: the needle should dictate the size of the stitch unless the knitting is loose.
Intarsia
In intarsia knitting, each colour has its own yarn working in a particular area, linking with its neighbouring colour, and producing a colourful pattern or design which has the thickness of a single thread, unlike Fair Isle knitting where yarns are carried along the full length of the row or round. However, knitting round always in the same direction means each yarn is left at the ‘wrong’ end of its area of colour, so when you get round to the beginning again, you can’t reach the yarn you want. Each intarsia area has to be knitted back and forth, but you can still work the whole piece in the round. There are some useful YouTube demonstrations with clever solutions for this problem.3
Translating a knitting pattern written for back-and-forth knitting
If you are working from written instructions for knitting back and forth and decide to knit without seams, the most basic point to remember is that any stitch pattern involving knits and purls will have to be rewritten or rethought for knitting in the round, as you are never working on the wrong side, but always from the front. If your pattern is written for separate pieces knitted back and forth, the ‘wrong’ side rows won’t work: the knits and purls have to reverse on alternate rows. The instructions will have been written to be worked the opposite way on the wrong side. Following a stitch chart would solve this problem, as it illustrates the stitch pattern visually and you can follow each row from either direction, but any shaping instructions would need to be rethought if knitting in the round.
This may sound confusing if you are not used to working in the round, but if you step back and remember every round is a right-side ‘row’, it makes sense.
The upsides of working in the round
• There is no sewing or joining!
• The satisfaction of casting off the last stitch and holding a complete finished garment.
• It does not have to be a sweater: a long circular needle still works for cardigans and jackets that are knitted back and forth but otherwise all in one piece as for a jumper: no side seams are needed.
Although this is a longer list of downsides to seamless knitting, some of them are surmountable, and the advantages are many, especially if you make your own designs; knitting in the round or at least on a circular needle makes perfect sense.
Simple shapes versus tailored knitting
Having described knitting as being the ultimate flexible way of creating a garment, we need to look at shaping. I can hear one distinct argument against the simple T-shape – what about style and shaping? Back in time, ‘simple’ shapes meant traditional clothing or basic workwear. Instructions for traditional, simple-shaped garments were probably passed on verbally and by demonstration. Written knitting patterns and books came about when knitted clothing became more popular and the shaping was based very much on pattern cutting for dressmaking. Woven fabric has no stretch, so it is essential for a fitted garment to have shaping around the sleeve and under the arm to allow for movement and give. There is a huge amount of stress on the fabric around these areas, and when fashions dictate close-fitted clothing, this must be allowed for. Historically, working clothes fall into a different category, worn by a different class or section of society. The first knitted clothing was worked in a simple T-shape, but as it began life as undershirts, it was not always visible. Then, once knitted garments became fashionable and achieved the visibility of outerwear, it was expected and presumed it should be in a ‘tailored’ style, such as a cut-and-sewn garment. Later into the twentieth century, working clothes gradually reached fashion status, and simple shapes returned along with blue jeans, dungarees, artists’ smocks, and Guernsey and Aran sweaters. Fashions come and go, and the technique of knitting is so flexible and versatile, that it’s perfectly possible to create either simple shapes or to imitate fully fashioned shapes with all the detailing of underarm shaping made by decreasing, increasing and so on. Where there is perhaps a gap in our thinking, is that most written patterns approach shaping knitting around the edges such as a cut fabric, and there is so much more that can be done by using stitches creatively to shape the fabric within, inside the structure, instead of, or as well as, at the edges. So the approach of this book is to look at and rethink the use of simple, basic shapes: an approach led by the technique itself, and its capabilities.
Advantages of the T-shape
The main advantage is simplicity, both in the knitting, and in simplicity of style. It can have a more casual look, related to traditional knitting and to workwear, but simplicity can also be stylish and chic. As we shall see in later chapters, the shape can either be made to fit with use of different stitches, or to be more complicated in structure.
Disadvantages of a T-shaped garment
Sleeve top shaping
You might think the T-shaped garment with sleeves knitted downwards is not really suited to styling a sleeve. What about fully-fashioned sleeves, sleeves with full tops, puffed sleeves, or anything other than a straight-topped sleeve? It is still possible to shape the top of a sleeve, even when picking up stitches at the armhole. One way is to begin with short rows (this could also be a set-in sleeve, as mentioned above). Pick up the stitches all around the armhole, then begin shaping, using ‘short row shaping’.
Rather than knitting round all the stitches at once, start with a few at the top of the sleeve and while working back and forth, knit up a few more at the end of every row, until you have joined them in all the way round the armhole. By this time, enough will have been knitted on the top of the shoulder to angle the sleeve downwards and to give it fullness, rather than it emerging at right angles from the body. You would need to knit samples to work out how many more stitches to knit up each row, as this influences the steepness of the sleeve angle and the fullness at the top. Another approach would be to decrease the sleeve along the top of the arm rather than underneath, so the shaping runs centrally down the top of the sleeve. This could be a decorative part of the design, and again, this slopes the sleeve down at a more natural angle, with less bulk under the arm.
A jacket with an exaggerated set-in sleeve as part of the design.
Sleeve top picked up at the armhole and shaped by knitting short rows to give fullness and set the sleeve at a lower angle than the T-shape.
Sloping shoulders
You may not want a completely straight, square shoulder join, but this is easily remedied: work the shoulders in short rows to step them up towards the neck, but leave all the stitches on the needle. These can then be cast off as before, putting front shoulder stitches and back shoulder stitches together and casting off through both. This method leaves a strong ‘ridge’ on the outside of the knitting, which can be decorative, or it could be made on the inside if you don’t like the look of the ridge; or another option would be to invisibly graft (Kitchener stitch2) the front and back together.
Sloping the shoulder with short rows, with stitches held on needle for joining the back and front by grafting or casting off together.
Short row shaping for shoulders
Suppose you have 30 stitches on the needle for the shoulder:
Beginning at the armhole edge, work to the neck edge.
Next row: : *work back but leave the last 10 sts on the needle and turn*.
Work back to neck edge, then work twice more from * to * leaving 10 more sts behind each time, and you will have knitted 6 extra rows at the neck edge, creating a sloping shoulder.
Designing and sizing
How do you begin to work out a design for a sweater from scratch? There are a few basic common-sense guidelines that are relevant to whatever design or pattern you choose, but the preparation time cannot be avoided. This is where designing your own knitting requires a different mindset from following instructions; it needs more time before beginning the project, but involves the fun bit – experimenting and deciding on your chosen stitch and pattern, as opposed to picking up ready-made instructions, being told needle size and yarn and getting straight into production. It means spending time playing and exploring and using precious yarn in the process, but it also enables and develops a much greater understanding of how knitting works, and is much more creative and satisfying (and the yarn could be undone and re-used).
It may seem daunting, but if you have already experimented with altering a given design, you are on the way there: anyone can invent their own design, at whatever level of knitting skill, as simple or complicated as you like. There may be a decorative stitch you like and want to use, or you may have been inspired by something you have seen to create a design in certain colours or patterns. When you reach this stage, you are ready to work out the detail of how to begin. The main thing is to experiment: try some stitches, patterns, colours and ideas. This bit is essential, especially to achieve the correct size for the project. Knit a sample in your final selected design/stitch, in the chosen yarn and needle size.
Having done all this, there is a simple calculation to discover how many stitches you will need for your project, based on your measurements. This is discussed in detail at the beginning of Chapter 8, so that whatever yarn you use, you can either adapt a pattern or begin your own from scratch.
Pattern and direction
Although the rows usually travel round a garment, if you are working in a colour pattern, this may make more of a striped effect than you want, and therefore create an unexpected horizontal emphasis. Patterns worked in one colour and using different stitches to make a texture can create an overall effect not necessarily influenced by the direction of the knitting. Without colour changes it’s easy to find stitch patterns with either horizontal or vertical emphasis, or diagonal for that matter: for example, ribs and cables break away from the horizontal nature of knitting to make verticals. But if you are working in coloured patterns, especially Fair Isle technique, changing colours immediately draws the eye to horizontal banding, particularly if you change the colours throughout the design. This doesn’t happen in a pattern knitted in only two colours if it stays the same all over, but if you have bands of different motifs or shapes, it can emphasize the horizontal, which is something you may not either want or predict until you see the finished item. Sometimes, it’s hard to detect banding if you are working closely at your sampling; it only shows up from a distance. You might be knitting something as simple and regular as small squares or blocks, two colours to a row, but changing every band of blocks. Changing colour immediately takes the eye across the row. A great exercise in tones and values of colours and how they react next to each other is to stand back or pin up your knitting every now and then; look from a distance, and see how some colours leap out at you, perhaps much more than you expected. Does this matter? It may not; that is up to you, the designer, to decide, but it’s useful to be aware of how the appearance can change from close to far, and think of other alternatives, or consider another way of constructing the garment if you want to avoid stripes travelling across (see below).
Slip stitches (seeChapter 5) are useful in this respect, as although worked in two (or more) row stripes of different colours, slipping the stitches to create a pattern pulls them up across the rows, giving a vertical element that breaks up the stripes. If only two colours are used, the striping disappears altogether. If more colours are involved, then there might be some horizontal stress again. Slip stitches are also useful in the surprising freedom they allow in patterning, ranging from detailed textures of dots and small geometric patterns to large-scale designs of diagonals, verticals and more.
One solution to this would be to knit the whole design sideways, across the jumper or jacket, to tilt the emphasis to travelling downwards instead of across.
Knitting from top down
This is such a practical way to knit, but still not very common. It is counter-intuitive, as we are so used to thinking that the cast-on edge is the bottom of the knitting, and that it grows upwards.
Two ways of beginning a sweater from the top down: increasing at regular intervals to make a circular yoke (right) and increasing at 4 points to separate the body from the sleeves for a square yoke (left).
The main advantages to top-down knitting are how easy it is to adjust the length by trying on the top part and deciding on the length as you go, and any decisions about the kind of edging or welt you want are also much easier once you can see the rest of the garment.
Practical uses
From a practical point of view, knitting from the top down means the bottom could be lengthened if required – for example for a child’s garment – and making a repair is easier too. We have already looked at lengthening or repairing sleeves if they are knitted downwards in the original model of the T-shaped garment, and a top-down construction of the body allows this at the bottom as well as the sleeves.
We are hopefully leaving behind a protracted time of throw-away fashion, and making things by hand gives us the perfect opportunity to make something to last, to imagine it being worn, repaired, and worn to the end of its life. This way of thinking was normal until mass production took over in the twentieth century; before that, repairing was actually a part of the life of a piece of clothing. Mending used to be a regular activity for everyone (although with clothing this probably meant women), and perhaps it can be again now that we need to think hard about the life of each garment, how it is produced, and what will happen to it when worn out. Aside from green issues, we probably all know people who love a particular jumper and want it to go on forever, so a method of knitting that is easy to unravel and reknit edges or completely restyle them, would be useful. Mending has also become a new art form, with the repairs being a kind of decoration: and why not, if it prolongs the life of the garment?
Square yoke sweater sample knitted from top down, creating raglan sleeves by increasing twice at four points.
Top-down raglan sweater sample.
Knitting ‘over the top’, beginning from the bottom up, continuing over the shoulders, and down the other side, leaving sides to be joined.
Apart from the cuffs, another part of a jumper that is prone to wearing out and needing repairs is the neck, so a variation of the top-down jumper would be to cast on below the final neck edging, and pick up and knit the neck at the end, thus making it easy to unravel and repair.
The recent fashion for Scandinavian and Icelandic sweaters has resulted in huge popularity for circular yokes knitted top down, but square yokes with raglan sleeve lines can work as well, working in a square or rectangle and increasing (double-increases) at each corner for the sleeves. You would need to work out the widths for the back, front and sleeve tops before beginning, and the rate of increase. The simplest way to begin a sweater in this way would give a neck the same height all round, which usually means the back of the neck is too low; but if you needed it higher at the back, this could be achieved with a collar or neckband knitted later, giving height and warmth at the back of the neck, and short-row shaping could be used to build the back of the neck higher than the front.
Knitting up and over
Another idea for knitting with minimum seaming is to knit from the bottom up one side, and continue over the shoulders and knit down the other side, with no shoulder join. With this construction, the side seams will need to be sewn at the end. Two points to watch for here are firstly the fact that the bottom edge is being cast on on one side, and cast off on the other side. This may not matter, but cast-on and cast-off edges look different and are discussed more below. The other point is the small detail of the stitches being upside down on one side: the difference shows up particularly in a colour pattern. There are subtle differences to the look of knitting when it travels upside down. Knitted stitches have a definite shape, a top and a bottom, and in stocking stitch this looks like a V. So, in a geometric pattern such as triangles or zigzags of colour, it’s easy to get a clean sharp point at the bottom of the motif where the bottom of the V points down, but the top of the shape will have less of a clear outline. Consequently, if coloured patterns and motifs are used, it’s easy to tell which way up the knitting travels. This may not be important or matter very much, but this book is taking a magnifying glass to how knitting works, and the difference is certainly visible if you search. This traditional sweater from the Norsk Folkemuseum in Norway also shows this effect of the pattern being upside down4.
The start of the raglan square yoke sweater sample shown earlier, beginning with the neck and increasing between the body and sleeves, showing how the increases ‘hitch’ the stripe.
Top-down circular yoke showing the marks made by the increases, exposed by the coloured stripes. Here the increases are knitted into the front and back of a stitch: different increases would make different marks.
The back of a coat knitted from the top down with regular increases either side of a slip stitch, spreading the shape until it is cast off at the bottom edge. The structure of the increases fits into and becomes part of the overall design. (Photo: Abb Nazari)
A (well-worn) traditional sweater from Norway knitted downwards, with the colour pattern showing the upside down stitches. (Photo: Author)
Detail of a colour pattern comparing how stitches look different going up one way and down the other, with each stitch showing either ^ or v: knitted up on the right, down on the left.
Increases and decreases
If you are knitting top down in one piece with raglan sleeve shaping, you will be increasing at four points as you go round, to separate the sleeves from the body. Another detail to look at is the many different ways to increase, as each makes a different ‘mark’ in the fabric, as with different types of decreases. Working conventionally from the bottom and decreasing for a raglan-style armhole, you can knit 2 together either with the right or the left stitch on top, dramatically changing the look of the decreasing line; K2tog decreases two into one with the left stitch on top; SSK (or S1, K1, psso) does the opposite, with the right stitch lying on top. Or, working the yoke of the garment in the round, you could decrease 3 stitches into one to make a single line of one travelling stitch by S1, K2tog, psso, which gives a slightly jumbled decrease; or S2 (as if to knit them tog), K1, p2sso, which produces a clear central stitch running up the decrease.
Working downwards and increasing, a ‘yarn over’ would make a lacy hole, so this would be a clear decorative increase, with a hole either side of a central stitch or two, for example, YO, K2, YO. A ‘make 1’ (M1) may indicate knitting into front and back of stitch, which makes a definite ‘blip’ that then needs to be placed carefully: the blip appears following the stitch, so to match it in mirror image, right with left, you need to increase in the previous stitch, then the central stitch. For example, working in the round, there will be four points of increasing to create the raglan sleeve line. To make each increase, you could try M1 (by knitting into the front and back), K1, M1. This will appear as a blip (the increase), then two central knit stitches followed by another blip. This makes a neat line of 2 travelling stitches with the increases on either side (see the start of the raglan square yoke sweater sample, pictured), but the first M1 comes before the central travelling stitches.
Another increase, also sometimes written as ‘M1’ could be made by lifting the bar between the stitches to make a new stitch. This works neatly, but interestingly as we see in the top-down circular yoke sample (pictured), the coloured stripe becomes hitched out of line by the regular increases round the yoke. It’s the designer’s decision whether this is a problem or an attractive design feature: you must be sure it looks right or how you want it to look, and if not, use a different increase sympathetic to your stitch and pattern.
Note
In this book, see individual instructions and charts for which kind of increase is meant.
Knitting sideways
This is equally possible, but not so common. The main advantage of this structure is if you want a vertical accent to a design that has a horizontal emphasis in the knitting: a simple example being stripes of colour which are easier to knit horizontally in rows, but if the piece is then tipped on its side, the stripes become verticals. As before, there are options about where to make your starting point. If you begin at one front edge, you can knit all the way round a jacket or cardigan, casting off at the second front edge and joining shoulders and knitting the sleeves afterwards: or with a jumper, join or graft the final edge to the cast-on at the end. Alternatively, knit it as a flat piece beginning at a side seam but knitting back and front as one piece, so the rows travel from the base of the back over the shoulder to the base of the front, so eliminating the shoulder join. In this case, cast off at the front edge, and cast on again for the second front. The side and underarm seams would then need joining.
So the visual aspect is the first thing to think about, and whether there is an advantage in making something from side to side, every variation in direction will affect the pattern, and the drape. Another starting point could be the centre, casting on down the centre back and knitting out towards the sleeve and cuff, then mirroring the other side by picking up from the cast-on stitches to knit the second half. If this is a jacket, the cast-on edge could travel from centre back over the shoulder and down the centre front, leaving the front edge open.
Jacket (sample) knitted sideways; the side seams and underarm seams will be joined at the end.
Plan of sideways-knitted jacket, beginning at the cuff, increasing up the first sleeve, casting on stitches for the front and back, casting off then on again for front opening, casting off at the second side seam and decreasing down the second sleeve.
The second consideration is the way knitting drapes or hangs. We know knitted fabric is much stretchier sideways across the rows than vertically: this is very helpful for squeezing shoulders through a jumper knitted in the usual bottom to top or top-down way. A sweater knitted sideways would be less stretchy to put on and take off. So, it follows that something knitted plain without textured stitch patterning or colour patterns, but used on its side would have a tendency to drop or droop, especially in a heavy yarn, a yarn without much spin and strength, or a yarn without much bounce and stretch. For example, alpaca, silk, cotton, linen, hemp or other plant fibres that don’t have any spring would be more inclined to stretch. There are ways to counteract and prevent this by using non-stretchy stitches: cables, crossovers, anything with increasing and decreasing within the pattern; Fair Isle or slip stitch colour patterns. All these are firm stitches that keep their shape, and there are many more.
Other knitted items have different stresses and strains compared with garments, but it’s always worth thinking about the direction of the knitting and strength of fabric needed. Knitted bags, for example, would have quite different requirements, where firmness is more important than stretch.
Front edges
The edges of a jacket are really important whichever way you knit. Edges can make or break a design if they don’t sit comfortably and look right. In any stocking-stitch based pattern, there is a tendency for the edges to curl inwards in vertical knitting, whereas knitting sideways they will curl the other way, curving outwards. As always, this depends on the yarn and stitch, but finding a good edging to help the edge lie flat is another consideration, unless you can use this curling tendency as part of your design.
Options for knitting from side to side:
• Knit from cuff to cuff, all in one piece so it folds over on the shoulders (this works well for batwing designs).
• Knit from cuff to cuff, front and back separately, making it easier to shape the shoulders.
• Knit from one side, round the body, casting off then on again to leave armhole openings, so the sleeves are then picked up and knitted downwards.
• For a jacket, knit from the front edge, all the way round to the other front edge.
A detail to think about here is matching the two front edges. If you knit cuff to cuff, one sleeve and cuff will be knitted ‘upwards’ and the second ‘downwards’, so again you need to match the two cuffs, otherwise one will be cast on, and the other cast off, and they look different, and often have different amounts of stretch.
For either cuffs or front edges, you could use a provisional cast on, picking up the stitches later, knitting downwards and casting off to match the opposite edge. Another option would be to use a cast-on stitch that looks identical to casting off, so edges could be matched in this way (seeFurther Resources).
Knitting diagonally
Two main reasons for knitting diagonally would be firstly visual, for design purposes, and secondly for the feel and behaviour of the fabric – the drape.
If your design has a diagonal feel to it, or you want a diagonal emphasis, it might be easier to knit it on the diagonal rather than create a diagonal design within straight knitting. The simple example is, again, stripes: it’s much easier to knit these across the rows than knit diagonal, coloured stripes in ‘straight’ knitting.
As for drape, this direction opens a new door, as any fabric (woven or knitted) used on the diagonal means you have a ‘bias’ fabric and it can drape and fit wonderfully. This is explored in Chapter 3.
Modular knitting
Modular knitting is a different way of constructing a knitted piece; this is looked at in detail in Chapter 7. Modular knitting means building the fabric in blocks or modules, rather than knitting the full width across the garment. Each module is knitted individually, but with the stitches picked up from the previous module. In the introduction to her book Domino Knitting, Vivian Høxbro explains how this alternative name came about, and the origins of this method of knitting5. It is an intriguing way of knitting and opens up a completely new way of thinking and designing. How it works in its simplest form of a square module is by casting on stitches and decreasing in the centre of the row, losing 2 stitches on alternate rows until all the stitches are used up. In effect, this means that the cast-on edge for each block turns a right-angle corner at the point of decrease, becoming two sides of the square: the other two sides are the length of knitting the block. The maths of this action means you knit as many rows as you have stitches and, worked in garter stitch, this forms a square.
Detail of modular knitted jacket, made from blocks or squares without seams, picked up from one square to the next.
In a mitred corner or in modular knitting, all rows (and stripes of colour) turn a corner at the decrease point.
A sample for a jacket design with a mitred corner, with the cast-on edge travelling along the bottom edge and up the front. The stripes also turn a corner, but are hidden by the welting stitch, which also shapes the jacket by drawing in the front.
Entrelac stitch, where the fabric is made from blocks zigzagging one way then the other, all joined by knitting.
This is intriguing, and so different from straight-across full-row knitting. The decrease creates a strong, textural emphasis within each square, varying according to which method you choose, as each way makes notably different marks, all explored further in Chapter 7.
Building shapes in modular knitting can be done in different ways, so that the simple square could be placed to give a straight edge with a diagonal decrease, or tipped up to make diamonds with a vertical decrease. Or, of course, if you build the blocks sideways as diamonds, the decreases will make horizontal lines across. Any design can be built from any starting point – what freedom!
The rows all turn a right-angled corner, so if a coloured stripe is knitted, it immediately forms an L-shape, or a block or small square in the corner. This concept can be expanded as a way of making a whole garment, with one decrease running diagonally through and creating an L-shaped body. The cast-on edge runs down the front edge and along the bottom, with the corner at the edge6.
Entrelac is another way of building knitting in blocks, but is technically quite different to construct. Here, the blocks are knitted straight across with no decreases, but lie on the diagonal, and the stitches are all held on the needle throughout. Blocks or modules are knitted back and forth sloping one way in one row, with subsequent rows of blocks sloping the opposite way. This is also explored in Chapter 7.
CHAPTER 2
SHAPING WITH SIMPLE STITCHES
‘It is here that even the shyest beginner can catch a glimpse of the exhilaration of creating, by being a creator while at the same time he is checked by irrevocable laws set by the nature of the material.’
Anni Albers Black Mountain College Bulletin, 5 November 1938
How do you shape knitted fabric? The way that first comes to mind may be by increasing and decreasing the numbers of stitches, or the number of rows, which can take place at the edges, making a flat fabric with shaped sides by increasing or decreasing at the side edges, and at the top and bottom, including short-row shaping where only part of the row is knitted. This method evolved when knitting patterns began to be written down, rather than passed on from knitter to knitter. Each separate piece can be shaped like a cut and sewn garment. Shaping doesn’t always have to be at the edges. You can also increase, decrease and shape the rows within the fabric, with different results, as these then manipulate all the surrounding stitches, pushing them one way and the other, and sometimes up or down from the surface even into three dimensions.
There is another way of shaping – by using the combinations of the stitches themselves to push and pull the fabric into shorter or longer lengths and widths: in other words, not altering the numbers of stitches or rows, but using the stitches to shape the fabric.
Shaping with stitches: each piece is knitted on the same-sized needle with the same number of stitches and rows.Top row: piece shaped by ribs and welts (left); stocking stitch showing its natural curl at the edges (right).Row 2: Moss stitch (left); Garter stitch (right).Row 3: K1, P1 rib (left); 2-row welting stitch (right).Row 4: 3-row welting (left); K2, P2 ribbing (right).
So what do we mean by stitches? It’s a term that covers both individual loops and also combinations of stitches. Really there are only two stitches in knitting, but these can be combined in endless different ways. In fact, you could say there is only one stitch, but it can be formed with either the knit side facing, or the purl. This basic stitch is made by inserting the needle to catch a new loop of yarn and pull it through the ‘old’ stitch, making a new one, either working through the front to form a knit stitch with the loop falling to the back, or bringing the needle through from the back towards the front, so the loop is dropped to the front of the work. These two actions produce stitches that look quite different, with the knit side being smooth, and the purl creating a rougher texture. Forget about colour – endless patterns can be made in textures alone with these two stitches in a plain yarn, and can be seen in historic pieces in museums (several examples are in the V&A collection in London) in traditional Guernsey and gansey sweaters made around the coast of Britain in the nineteenth and early twentieth centuries, and really in any knitting patterns from a time when fancy yarns were not available and knitting was patterned by stitches alone.
We are used to the familiar look of textured stitches, but perhaps less aware of the second thing that happens when you combine knit-face and purl-face stitches, especially when they are in groups, which is a push and pull of movement. Where the knit and purl lie next to each other, a tension occurs between them, which is a great tool for designing. We know that ribbing pulls in widthways, making columns of knit and purl stitches where the knit stitches come forward, and the purl go back, looking the same on both sides of the fabric as the opposite happens on the reverse. This forward-and-back movement can also be achieved across the rows horizontally with two or more rows of knit-face and purl-face stocking stitch, but then the purl rows push forward, with the knit areas falling back. It’s the combination of these two effects that becomes interesting for shaping; one pulls in widthways, the second pulls up lengthways.
Later in this book we will explore how else stitches can be manipulated: they can be crossed over each other, knitted at different angles and in different directions, and combined in different colour techniques to alter the fabric; but in this chapter, we are going to look at the basic knit and purl stitches and different effects of combining the two to shape the knitted fabric.
Altering the width
This piece shows four stitches or combinations of knit and purl to compare the width of the fabric. The number of stitches remains the same, and the number of rows in each band is the same.
Four different patterns worked on the same number of stitches to compare width:a) K1, P1 moss stb) stocking stc) K1, P1 ribbingd) K3, P3 ribbing
a) Moss stitch
Row 1: on an uneven number of sts, *K1, P1*, rep to the end, ending K1.
Row 2: as row 1.
This stitch is wider and shorter than stocking st.
b) Stocking st
Row 1: K.
Row 2: P.
c) Ribbing
Row 1: *K1, P1*, rep to the end, ending K1.
Row 2: *P1, K1*, rep to the end, ending P1.
d) 3 st rib
Row 1: *K3, P3*, rep to last 2 sts, K2.
Row 2: P2, *K3, P3*, rep to end.
Any rib with two or more stitches to each knit or purl pulls in more than K1, P1 rib, although a point will be reached when the groups of stitches become too large to react with each other: some tension will be lost and it will not pull in so much, or only where knit meets purl.


