11,49 €
Mehr erfahren.
- Herausgeber: The Crowood Press
- Kategorie: Lebensstil
- Serie: Knitting Techniques
- Sprache: Englisch
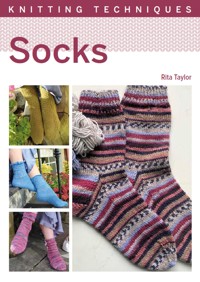
Socks are a quick, portable knitting project, but with numerous ways to create the heels and toes, they can seem complex. This accessible book breaks down the key construction techniques with step-by-step tutorials and examples, to demystify the process for new knitters and inspire more confident knitters with new stitch patterns and finishes. Measuring guides, yarn advice and design considerations also ensure you can produce socks that are not only well-knitted, but fit well and are comfortable too. Topics covered include: types of yarn, needles and equipment, including how to use circular and double pointed needles; sock construction techniques for different heels and toes and finally, sizing and measuring with consideration to different sock styles and purposes. There are thirteen complete sock patterns to practise the different construction techniques.
Das E-Book können Sie in Legimi-Apps oder einer beliebigen App lesen, die das folgende Format unterstützen:
Seitenzahl: 117
Veröffentlichungsjahr: 2022
Ähnliche


First published in 2022 byThe Crowood Press LtdRamsbury, MarlboroughWiltshire SN8 2HR
This e-book first published in 2022
© Rita Taylor 2022
All rights reserved. This e-book is copyright material and must not be copied, reproduced, transferred, distributed, leased, licensed or publicly performed or used in any way except as specifically permitted in writing by the publishers, as allowed under the terms and conditions under which it was purchased or as strictly permitted by applicable copyright law. Any unauthorised distribution or use of this text may be a direct infringement of the author’s and publisher’s rights, and those responsible may be liable in law accordingly.
British Library Cataloguing-in-Publication DataA catalogue record for this book is available from the British Library.
ISBN 978 0 7198 4063 0
Cover design: Blue Sunflower Creative
Photographs: all photographs are by the author, with the exception of those on pages 2, 10, 18, 34, 38 (top photo), 40, 50–55, 57 (bottom two photos), 58–61, 62 (left and right photos), 63, 65 (top two photos), 66–71, 73 (bottom photo), 74 and 76, which are © The Crowood Press
Contents
Acknowledgements
Abbreviations and Chart Key
Introduction
1 Materials and Measurements
2 Techniques
3 Heels
4 Toes
5 Projects
6 Now Create Your Own
Index
Acknowledgements
My thanks go to Hilary Clunes for helping me to knit some of the pairs of socks that feature here and for her valuable comments on some of the projects. Thanks to Mary Hawkins for sharing her knowledge of sock heels and thank you to the members of North Norfolk Knitters, Pauline, Trenna, Lesley, Jenn, Co, Jackie and Geraldine, who patiently did the hand modelling for some of the techniques, and to the members of my family, Liho, David and Harvey, who modelled some of the socks for the photographs.
Special thanks to my husband who has had to put up with the constant clutter of yarn, needles, piles of notes and chatter about socks. And thank you to the people at Crowood who are always so encouraging and helpful when answering my queries.
Abbreviations and Chart Key
alt
alternate/alternating
approx.
approximately
beg
beginning
dec
decrease
inc
increase
k
knit
k2tog
knit 2 together
k2togtbl
knit two together through back loops
m1L
make 1 stitch in the left leg of the stitch below
m1R
make 1 stitch in the right leg of the stitch below
p
purl
pm
place marker
RS
right side
rem
remain(ing)
rep
repeat
rnd(s)
round(s)
sk2p
slip 1, knit 2 together and pass slipped stitch over them
sl1
slip one stitch
ssk
slip each of the next 2 stitches, independently, return them to the left needle and knit them together through back loops
tbl
through back loop
tog
together
WS
wrong side
1/1 RC
slip next stitch to cable needle and place at back of work, k1, then k1 from cable needle
1/2 LC
slip next stitch to cable needle and place at front of work, k2, then k1 from cable needle
1/2 RC
slip next 2 stitches to cable needle and place at back of work, k1, then k2 from cable needle
2/2 LC
slip next 2 stitches to cable needle and place at front of work, k2, then k2 from cable needle
2/2 RC
slip next 2 stitches to cable needle and place at back of work, k2, then k2 from cable needle
2/2 LPC
slip next 2 stitches to cable needle and place at front of work, p2, then k2 from cable needle
2/2 RPC
slip next 2 stitches to cable needle and place at back of work, k2, then p2 from cable needle
CHART KEY
Introduction
STEPPING INTO SOCKS
If you’ve never knitted a sock before but always wanted to try, you will find here all the information you need to help you create that well-fitting sock. What might at first seem like a complex piece of knitting is actually simpler than you might think. A sock is just a tube of knitting, closed at one end and with a right-angled bend somewhere near the middle to create the foot. There are numerous ways to finish the closed end that pockets the toe and a number of ways to create the right-angled bend for the heel. Some of them might feel more comfortable on your foot than others. The patterns included here will describe these ways of customizing the basic shape to create a variety of different socks.
A BIT OF HISTORY
There has always been a need for something to keep the feet warm and the earliest piece of knitting so far discovered is a pair of blue and white cotton socks, found in Egypt and dating from around the eleventh century. The flexibility of knitting makes it ideal to create the complex shape that is a sock or stocking. Cloth cut on the bias was used to create the long stockings worn in Europe but, as the technique of knitting was spread around the globe, so it became obvious that the shape of the leg and foot could be more easily accommodated by the more elastic knitted fabric. Over-the-knee stockings, often made from silk and known as hose, were worn by men to go with their doublet or, later, with their breeches. Women’s stockings were long and usually in a patterned lace but by the nineteenth century they were ankle length and usually plain black. Styles changed at the beginning of the twentieth century and men’s stockings were often patterned, especially those that were to be worn for various sporting activities. Sometimes just the cuffs were patterned and the legs were ribbed; other styles had an all-over pattern of diamonds, known as Argyle. With the invention of Nylon, women took to wearing machine-made stockings in various shades of light brown. But with the trend in fashion towards wearing jeans or plain trousers, patterned socks became de rigueur and now there are thousands of patterns available in as many styles as you can imagine.
This book
The main part of the book will show you how to perform a variety of techniques and methods of construction for heels and toes that will create a pleasing and perfect fitting sock. You will also find thirteen patterns here using some of the different techniques to illustrate the various methods of construction.
CHAPTER 1
Materials and Measurements
MATERIALS
Socks are very portable projects. The quantity of materials required doesn’t take up much room and will fit easily into a small project bag. The essential items are about 100g of suitable 4-ply yarn, appropriate needles, either double pointed or circular, and a tape measure.
TIP
If you plan to do a lot of sock knitting, then buy the best tools and yarn that you can afford. Socks made from synthetic materials won’t be as warm and comfortable as those made from natural fibres, nor will they be as durable.
EQUIPMENT
The most important pieces of equipment are yarn and needles but, while some additional items are not essential, there are some that will be useful.
Needles
Double-pointed needles (DPNs) come in sets of four or five (occasionally six). It is a matter of personal preference how many you decide to use, bearing in mind that the fewer the needles the greater the stretch between them, which can sometimes cause ladders at the changeover point. The needles can be of different lengths and made from various materials, such as:
• smooth metal, often with sharp points, useful for lace work
• wood, which can be plain or coloured, and is lightweight and warm to the touch
• bamboo, the lightest in weight and also warm and slightly flexible, useful for cables
• plastic, which comes in a range of colours and is also light and flexible but can get sticky, making it difficult to slide the stitches along
• carbon, lightweight, smooth and warm to the touch with tapered brass tips that work easily with the yarn.
Different types of needles for circular knitting: interchangeable, double-pointed, trio and fixed circular.
Not all needles are round in shape: there are also square ones, and some people find these easier to use. The points of needles vary from the sharp-tipped, often called lace needles, to more rounded and blunt versions. The different materials can affect the gauge of the knitting, so stick to the same type throughout the project. Bamboo and wood needles are useful for slippery yarns as they will grip the yarn more tightly making the stitches less likely to fall off.
Circular needles
These can be fixed, with the cable section permanently attached to the tip, or interchangeable, where the tips screw or click into a length of flexible cable. Different brands of needle often have different lengths of tips but 4- or 5-inch needles are the most manageable for sock knitting. The cable section of circular needles also comes in different lengths and it is best to choose the length that is slightly shorter than the circumference of the sock. A short circular needle can sometimes be uncomfortable and awkward to manoeuvre on a small sock, which is why some people prefer to use a set of double-pointed needles, especially when knitting children’s socks. However, it is worth trying different types and lengths of circular needles yourself, if possible, to see which feel the most comfortable to work with in the hands. The needles with long tips can be awkward when knitting socks with anything less than forty stitches.
Some people prefer to use two circular needles, with the instep stitches kept on one needle and the foot stitches on the other but working the complete rounds over both needles.
Interchangeable needles
These needles come in two parts: the tips and the cable of varying lengths. The tips attach to their cables by different methods and some stay more firmly attached than others. Again, they are made from the same materials as double-pointed needles. Cable length varies from 20cm to more than 100cm, although for socks it is unlikely that you would need more than 80cm. These latter would seem much too long for knitting socks but the longer lengths are suitable for the ‘magic loop’ method of working. Again, the different brands have different lengths of needle tips; some brands have a choice of two.
Trio needles
These are a recent innovation that can be useful for working items with a small diameter. As the name suggests, they come in a set of three and are double pointed (some with a sharp tip at one end and a more rounded one at the other). In between the tips is a short length of flexible cable. They have the advantage over double-pointed needles in that there are only two needles holding the stitches while the third needle does the knitting. This helps to avoid the ladders that can sometimes appear when using four needles and also avoids that annoying tendency for the needle not in use to slip out of some of the stitches.
Working in the round on the set of trio needles.
MAGIC LOOP
Working this method requires a long circular needle, at least 80cm, where half of the stitches are held on different sections of the cable. The cable is pulled out between the two halves to form a loop on the left. The stitches from the front half are pushed forwards onto the tip of the needle at the left while the other tip, holding the stitches at the back, is used to knit them. These stitches are moved onto the cable, another loop is pulled out, and the second group of stitches is then knitted.
Straight needles
Socks can also be knitted flat or sideways on straight needles. The construction is quite different, and the socks will require seaming when the knitting is finished. After casting on the required number of stitches and knitting the cuff and leg, the stitches are divided in half with the first quarter placed on a holder and the next half knitted for the top of the foot. The remaining stitches are placed on another holder. When the foot is the required length, the toe is shaped in two halves by decreasing at the beginning and end of every alternate row until these stitches are also reduced by half (or more if you have long toes). Next, increase at the beginning and end of each row until you are back to the original number of stitches for the foot. Work the bottom half of the foot to the same length as the top half then shape the heel as for the toe. When the shaping is finished, graft the heel stitches to the two quarters that were left after the leg was finished. Sew the seams at the back of the leg and along the sides of the foot.
Socks knitted in an Argyle pattern are often knitted flat because the required colours would not be in the correct position for circular knitting.
Yarn


