22,49 €
Mehr erfahren.
- Herausgeber: Crowood
- Kategorie: Lebensstil
- Sprache: Englisch
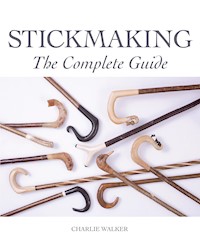
Sticks are essentially practical aides but are also works of art that often become integral to the owner. They have to be strong and reliable, but are beautiful too. This essential book covers all these qualities - it explains the traditional principles and methods of stickmaking, but also celebrates the designs and ideas behind these creations. Written by an award-winning stickmaker, it provides a full acount of this age-old craft. Topics covered include materials, equipment and tools required to make a variety of sticks from timber, antler and horn; stick types and shapes; preparing timber to make handles and shanks; straightening shanks; making joints and exhibiting and competing. This new book will be an inspiration for all stickmakers, both new and old and will be of great interest to countryside enthusiasts, shepherds, farmers, woodworkers and working dogs owners. Superbly illustrated with 349 colour photographs.
Das E-Book können Sie in Legimi-Apps oder einer beliebigen App lesen, die das folgende Format unterstützen:
Veröffentlichungsjahr: 2018
Ähnliche


STICKMAKING
The Complete Guide
CHARLIE WALKER
THE CROWOOD PRESS
First published in 2018 by
The Crowood Press Ltd
Ramsbury, Marlborough
Wiltshire SN8 2HR
www.crowood.com
This e-book first published in 2018
© Charlie Walker 2018
All rights reserved. This e-book is copyright material and must not be copied, reproduced, transferred, distributed, leased, licensed or publicly performed or used in any way except as specifically permitted in writing by the publishers, as allowed under the terms and conditions under which it was purchased or as strictly permitted by applicable copyright law. Any unauthorised distribution or use of thistext may be a direct infringement of the author’s and publisher’s rights, and those responsible may be liable in law accordingly.
British Library Cataloguing-in-Publication Data
A catalogue record for this book is available from the British Library.
ISBN 978 1 78500 414 8
Frontispiece: Colin Mills
Contents
Introduction
1 Fundamental Information
2 Tools and Equipment
3 Ideas and Inspiration
4 Collecting, Selecting and Storing Timber
5 Straightening Shanks
6 Jointing
7 Making One-Piece Sticks
8 Making Wooden-Handled Sticks
9 Making Antler Sticks
10 Equipment for Working Horn
11 Making Buffalo Horn Handles
12 Making Sheep and Cow Horn Handles
13 Showing and Competing
Appendix: A Tribute to Gordon Flintoft
Acknowledgements
Further Information
Index
Introduction
I have been very fortunate to receive a lot of help from stickmakers around the UK who have willingly given me their advice, time and encouragement. In this book, it is my intention to pass on some of the information that I have gained about stickmaking to any reader who is interested in this absorbing pastime and would like to make a range of walking or working sticks using different materials and techniques.
A plywood handle on spiral shank - Photo by Colin Mills
The book provides extensive advice and information about the materials, equipment and tools required to make a variety of sticks from timber, antler and horn. The early chapters provide general information about stick types and shapes, advice on tools and equipment and where and how to get ideas and inspiration on stickmaking. The book continues with a list of timbers that are often used for stickmaking. Many stickmakers prefer to collect their own timber to make handles and shanks; guidance is given on cutting and collecting green timber and methods of storing and protecting the timber from pests. A chapter is dedicated to straightening shanks; it describes how to make simple jigs and equipment to enable bent sticks to be straightened. One of the most important aspects of making good-quality walking and working sticks is creating strong and reliable joints between the handle and shank, but the most essential part is fitting a ferrule onto the tip that will protect the stick for many years. Several jointing methods are detailed which will provide the reader with some options for making first-class joints for various types of sticks.
There are several projects for the reader to work on using step-by-step guides that describe the processes and techniques used, which are supported by numerous photographs. Each stickmaking chapter begins by making plain versions and progresses through to making more complex sticks, culminating in using a variety of methods to decorate and enhance the sticks. In order to avoid too much duplication, some of the repetitive steps required when making the featured sticks have been avoided; however most of the techniques and methods that I use are included within the various projects featured throughout the book.
Some guidance is given on exhibiting and competing in club and national competitions and gives pointers to some aspects an experienced judge will be looking for in a prize-winning stick. The book concludes with a short tribute to one of the very best stickmakers I had the pleasure to know; Gordon Flintoft, and includes pictures of some of his excellent sticks.
Apart from Gordon, the sticks featured in this guide have been made by the author using the materials, tools and equipment described throughout the book.
The equipment and methods used here are based on tried and tested designs and methods that have been and continue to be used by many stickmakers throughout the country. Some stickmakers use different designs of presses to bulk sheep and cow horn that work well for them, others may use different manufacturers and types of tools. There is an abundance of tools, timbers, adhesives and finishing products to choose from, however stickmaking follows a few basic principles and methods that are described throughout the book. There is no right or wrong way of making a stick but there are expectations and standards we should all strive to maintain when making sticks for others to use.
I hope you enjoy your stickmaking and find the information in this book helpful.
Charlie Walker
1
Chapter 1
Fundamental Information
Two traditional types of handles that are regularly used in stickmaking are shown in the sketches; the first is a shepherd’s crook shape and is often referred to as a ‘nose-out’ handle. The second shape is a ‘nose-in’ handle, used regularly for walking and commonly known as a market stick. Both the handles are drawn full size and the dimensions replicate a finished handle, enabling readers to make their own templates of the shapes. The sketches also include a hatched former reproducing the inside shape of the handles, which is useful for anyone wishing to bend and shape a horn. The parts identified in the sketches are used throughout the book to describe some of the steps used when making most styles of handles. The full-size patterns are intended to be used as guidelines for making handles; the finished size, appearance and shape of any handle is decided by the maker, who may well produce variations of the examples. The two most popular methods of fixing handles onto shanks are shown in the sketches; the first is using a joint cut directly onto a shank, which is commonly called a peg or dowel joint, and the second is a stud joint using threaded rod; both these joints are featured in the book. Shepherd’s crooks are often joined onto a shank using an angled joint rather than a flat joint. The reason an angled joint is used is that it is less prone to twisting on a shank when used as a working crook to catch and hold a sheep. Examples of angled joints are shown in later chapters. Other jointing methods that allow stick handles to be removed or replaced are also included in later chapters. A very important joint is the one used to fit a ferrule on the tip of the shank to protect the stick from abnormal wear and tear and is described in detail later.
Sketch of a shepherd’s crook
Collars are used between the handle and shank for two principal reasons; the first is to strengthen this crucial joint and the second is to provide a means of decorating a stick. Collars can be made from horn, timber and metals such as brass, nickel or silver. A well-fitted collar can satisfy both of the principal purposes of strength and decoration. The ideal position when fitting a collar to strengthen the joint is shown on the sketch. Occasionally decorative collars are added after the stick is made, the collar is simply slipped up the shank until it is a tight fit onto the handle or shank; this method is not recommended. Strong, close-fitting joints are one of the most important aspects of making goodquality and serviceable sticks.
Traditional-shaped handles are generally made with a round or square heel and both types are shown in the sketches. There is a contradiction with a square heel as it should look square but feel round; in other words the heel must be comfortable to hold and use - avoid leaving a sharp, uncomfortable surface on the heel.
Older stickmaking books often refer to stick components and their size in inches; because we now live in the metric world a small conversion chart is shown below for reference, with some of the most common measurements used by stickmakers. Please note they are rounded to the nearest number; the tolerances quoted are acceptable.
48in =1,220mm
Sketch of a nose-in market stick.
There are very few exacting measurements used in stickmaking, although there are several guidelines as to the shape, size and appearance of different styles of sticks that have been established over many years. These principles are helpful to stickmakers in getting the correct ratio between the handles and shanks, so the appearance of a stick is in proportion and is an attractive shape. Too often sticks are made with their appearance being spoilt by inappropriate sizes and shapes being included, which makes the stick look unsightly and feel unbalanced, therefore difficult to use.
These characteristics are not as important in unconventional (sometimes referred to as novelty) sticks that are very popular; there is a considerable market for these interesting and unique sticks. The makers are not confined by the conventional standards and expectations that have developed over many years with traditional sticks. Many stickmakers prefer to make these as they allow the maker to use their imagination, flare, skill, dexterity and mastery to produce some amazing and stunning sticks that many people love to own. If you have the vision and talent to make unusual and interesting sticks, have a go and you will be surprised and encouraged by the amount of interest shown in them from inquisitive potential buyers.
People’s choices vary considerably and they select sticks of different weights, heights, styles and sizes for personal reasons. Never assume what type of stick an individual will choose; often people will seek your advice on what height, weight and style of stick will suit them best for their particular circumstances or interests. Be prepared to give guidance on the best stick for them, explain the advantages and disadvantages of the different types of sticks you have available. Here are two examples I have encountered while displaying sticks in local fairs. A petite lady selected a tall, heavy thumb stick, which seemed far too big for her size; however, she explained it was required to support a branch of a fruit tree that was laden with pears! Another person wanted a stick of a particular length so it would fit across the boot of the car; the type and price of the stick wasn’t a major concern as long as it would fit behind the seats in the car boot. If you intend to make sticks to sell, make a selection of sticks so there is plenty of choice for any potential customers and be prepared to negotiate the cost and modify the length of a selected stick.
Sticks and canes became extremely popular and fashionable around the turn of the twentieth century; almost everyone carried a stick wherever they went. Poorer people would use a simply made wooden stick while the wealthiest would have several sticks and canes made from exotic woods, with elegant carved handles made from precious materials. Some sticks contained swords and guns while others would have a small container for the owner’s favourite tipple. It was around this period when unconventional and novelty sticks became very popular and different materials were used extensively to make magnificent and well-crafted sticks and canes. Large stickmaking companies employed hundreds of workers and a few produced catalogues of their extensive range of sticks. These old catalogues are very interesting and informative, as they show many examples of types and styles. A fascinating example is the crook; there are several shapes of handles displayed including a Brighton crook, a round heel crook, a Tam O’Shanter crook, a square heel crook, and a leg cleek. The crooks also have several types of noses such as a half-curled nose, a curled nose, a looped nose and a decorated nose.
There were many styles and types of walking sticks and canes made during this era demonstrating how many variations are possible in stickmaking, which is why it is impracticable to set precise measurements for the many variations of just one style. The period during and after the First World War resulted in the rapid decline of owning trendy and expensive sticks; many workers lost their jobs as large stickmaking companies closed. A few independent skilled workers continued making basic walking and working sticks. Following the Second World War, as people have become wealthier, the demand for well-made traditional and unorthodox sticks has steadily increased and there are a few professional stickmakers selling their work. Also an increasing number of people have taken up the absorbing hobby of stickmaking. Sticks have been and continue to be used as an aid for walking; such a stick must be strong enough to support the user and be cut to the correct height.
People who enjoy hiking will often use a tall stick for support while climbing or descending steep slopes and pathways, or for testing the ground conditions. Sticks are a useful aid when walking along overgrown paths and tracks, as they can be used to knock down stinging nettles, thistles and thorns. Shepherds and farmers often use sticks when herding sheep or cattle; beaters use sticks to test the ground conditions and tap trees to raise game birds for shooters. Fishermen and bailiffs will often use a stick to test the depth of water and check the bottom of the lake or river to ensure it is safe.
There are several institutions and organizations that use sticks in their workplace or business; some are based on tradition and others are a requirement. Military officers and personnel carry various styles and types of sticks especially when participating in formal pageants and parades. Mining deputies traditionally used sticks a yard long to measure progress and test the surrounding conditions of the mine. In the early days of railways, track inspectors used sticks to check that the distance between rail tracks was correct. Sticks are used by tribal leaders as a sign of their authority and are often decorated with symbols. Senior clergy frequently carry a crozier as a sign of their position, which is usually in the form of a crook with religious decorations built into the handle.
Working shepherds will often choose an uncomplicated, plain stick for everyday use and will use a more expensive, elaborate stick when attending shows and sheepdog trials. Shepherds and farmers choose different sizes and shapes of working sticks and crooks depending on the breed of cattle and sheep and the type of terrain they have to contend with on a regular basis. Countryside workers such as bailiffs, stewards, gamekeepers, forestry and estate managers regularly use sticks as aids when working or traversing the land – again, their choice and style of stick will vary considerably. Pig breeders can be seen at shows using a ‘stockmans’ stick in conjunction with a board to move the pig from the pens into the show ring and back again following the judging. These examples demonstrate the diversity of stickmaking and indicate why there are so few hard and fast dimensions.
Sketch of a leg cleek.
Despite the lack of precise measurements, several guidelines and standards have developed over time and should be considered when making a traditional walking or working stick. Some generally acceptable standards are: The width of a gape of a crook is about four fingers, which is approximately 90mm (3½in). The nose should be about 10–12mm (½in) above the joint line. The inside line of the heel should be a continuation of the inside line of the shank. The outside line of the heel may very gently slope outwards. These details may seem insignificant, but they help to improve the appearance of a handle by giving the impression that the handle stands up rather than drooping towards the nose. Protrusions or decorations should not interfere with the functionality of regularly used walking or working sticks, therefore avoid carving an object onto the crown or heel that will interfere with the viability of these working sticks. Carving letters into a handle (for example a name) or inserting an object so it doesn’t protrude is acceptable, as it does not interfere with the practicality of the stick. Notwithstanding, carvings that protrude can be made on the crown of taller staffs and sticks that are normally held by the neck or shank, as they do not hamper the use of the stick.
Shanks of traditional sticks should be perfectly straight, bends and kinks are not acceptable in exhibition sticks. It is also important that a shank is in keeping with the type and style of handle, the complete stick should feel balanced in the hand. A parallel shank on a crook improves the balance of the stick better than a shank with a severe taper when used in its working position (held by the handle). Short, light-handled walking sticks are more suited to a tapered shank. Avoid using timber that is too springy on shanks; a shank must feel firm and have sufficient strength to provide adequate support for the user. Joints should be strong and close fitting. The complete stick should have a smooth and durable finish. Generally the handle must be in perfect line with the shank when viewed from either the nose or the heel; an exception to this is a leaping trout handle where the tail is curved. Complying with these traditional guidelines will enhance both the appearance and the feel of most sticks. A working shepherd is very particular as to the size, weight, balance, strength and appearance of a crook and it may take some time to choose the stick that is most suitable for their particular environment and breed of sheep.
A leg cleek is a term used for smaller and lighter crooks. Their handles are shaped with a tighter gape than a full crook and the shanks are often shorter than a standard crook. Shepherds use them to catch sheep and lambs by their legs; they are often used to separate an individual sheep or lamb from a flock of enclosed sheep in a pen, which is why some shepherds prefer to use a shorter shank in an enclosed area. They have to be used carefully as twisting the stick can result in breaking a lamb’s leg as it tries to escape.
Poultry farmers also use leg cleeks to catch poultry such as geese and turkeys by their necks. Leg cleeks are the only sticks to have set measurements for the handle and not all shepherds agree with these sizes; some believe the mouth is too small. The traditional measurement used for the mouth (gape) is an old half penny, and for the inside of the crown loop it is an old penny. These equate to 25mm (1 inch) for the mouth and 30mm (1¼inches) for the inside of the loop; some judges continue to use these sizes when examining show sticks.
Commercially made aluminium leg cleeks are regularly used as working sticks and their measurements have a mouth and loop of the same size which is 27mm (1⅛ inches). Again, this highlights how measurements can vary in the same type of stick.
Stickmakers will often make sticks longer than normal to accommodate some clients who prefer them taller than a standard height, therefore ferrules are not always fitted until the stick is finally selected and the height agreed. A longer shank is easily shortened should a customer request a short stick, whereas it is often impractical to lengthen a shank.
If you make sticks to sell it is advisable to have an adjustable version to help people choose their preferred height before finally cutting a shank to length and fitting a ferrule. It is especially helpful for people who want a shorter walking stick for support, the height is very important to the user who relies on a stick. When making walking or working sticks, it is most important that they feel balanced in the hand and are functional and comfortable to use; they must be well finished and have an excellent appearance. Some people will request a thick, heavy handle while others choose a lighter handle that they can grip with ease.
Everyone has a different interpretation of what makes a good conventional stick and even experienced show judges’ opinions of sticks will differ, although they will all agree that certain standards must be achieved. Some requirements are that the stick must have a straight shank and a strong, neat joint; the shank and handle should be aligned; the handle and shank should be balanced and there must be no scratches, marks or defects on either. Decorations must be an accurate representation of the subject and be of a suitable scale. An excellent finish is essential. These are standards that all stickmakers should strive to achieve when making walking and working sticks, as they demonstrate that the maker is skilful and makes good-quality and reliable sticks. It is not necessary for unconventional or unorthodox sticks to fully meet all of the standards expected in traditional sticks, nevertheless it is important that the workmanship is of a high standard and features such as joints are neat and strong, there are no scratches or defects and the stick is well finished.
Having considered some of the fundamental information, decide on the type of sticks you wish to make and obtain some tools and equipment.
2
Chapter 2
Tools and Equipment
Some useful tools
A selection of useful tools.
Always try to obtain good-quality and reliable tools that will last for years. Several types of simple wooden sticks can be made with a few tools to begin your journey into this fascinating pastime. The following tools will get you started; a sharp retractable bladed knife, a couple of sharp carving knives, a small hand saw, a small hacksaw, a coping saw, a few different sizes and shapes of rasps, some carving chisels, a wooden mallet and a combination square with a ruler. A means of holding a stick while working on it is helpful; a portable vice that clamps onto a table or a Workmate or similar will get you started.
The stickmaker’s workshop.
A suitable space
A most important requirement to make sticks or to carry out most hobbies is to have a suitable space to carry out the various tasks. This may range from a corner in a room, a small garden shed, conservatory, garage or a dedicated workshop, ideally that has lighting and a power supply available. The amount of space available will also determine the type of tools and equipment you decide to obtain; some power tools require a significant space whereas most hand and portable tools can be used in a relatively confined area.
Types of tools and equipment
Most of the tools used for stickmaking can be used for other DIY projects and hobbies, which helps to mitigate some of the initial expense. As you progress with stickmaking, you will undoubtedly begin to collect a wider range of tools and equipment. The type of sticks you decide to make will determine the variety of tools you will require. Stick handles made from antler and horn will require tools generally designed for engineering work. A large variety of sticks can be made with a few carefully chosen tools.
The following list of tools and equipment includes a selection of those most commonly used in stickmaking.
Woodworking tools
The type of material you choose to use for making sticks and handles will determine the type and extent of tools you require. For example, if you intend to make sticks using timber alone, a range of woodworking tools as shown will get you started. As with most hobbies the range and number of tools used will generally increase and for stickmaking, this is no exception – we always seem to want another tool. Woodworking cutting tools must be kept sharp and it is important to obtain good-quality implements that will remain sharp when in use. There are various sharpening stones and rotary machines available to keep all types of tools sharp. If it is intended to carve decorations on wooden handles, small hand-held carving knives and chisels are ideal. A selection of small woodworking rasps are particularly useful for making curved surfaces on handles, as they do not clog up as much as engineering files do when used for woodwork.
Tools suitable for antler
Antler is a hard material and working antler will require a range of engineering tools such as files, rasps, hacksaws and engineering-quality drills. Most woodworking tools will not cope with antler, although the soft pith in an antler can be removed with a flat woodworking bit. If it is intended to carve antler, rotary carving machines and some suitable burrs will be beneficial; these machines can also be used to carve timber with the appropriate burrs fitted.
Tools suitable for buffalo horn
Buffalo horn is quite hard and engineering-quality tools should be used as far as possible, as woodworking tools will soon lose their edge and sharpness when used on buffalo horn. Specialist equipment is required to bend and shape buffalo horn and is described in more detail in Chapter 10, ‘Equipment for Working Horn’.
Tools suitable for sheep and cow horn
Sheep and cow horn is softer than antler and buffalo horn and most good-quality tools used for working timber and antler can be used to dress sheep and cow horn. Some types of tools, such as rasps, are best suited for working with horn handles as they won’t clog. Cow and sheep’s horn can be successfully carved using good-quality carving knives and chisels, although rotary machines are more popular. In order to bend, bulk and shape sheep and cow horn, additional specialist equipment is required and is dealt with in Chapter 10, ‘Equipment for Working Horn’. The cost and difficulty in obtaining this equipment may preclude many people from beginning this particular aspect of stickmaking, which is why it is dealt with separately.
Power tools
Air, battery or mains power tools are most useful and there are many accessories that can be used with these machines that will save time and energy. There is a vast range of power tools available. They fall into three main categories; portable, corded or fixed. Portable tools work off batteries and have the advantage that they can be used in many locations, with or without a permanent power supply. Many modern portable tools have two or more batteries giving a longer period of use. Some tools are extremely powerful due to improving battery technology and sets of battery-operated tools are now available that operate from a single bank of batteries, which helps to keep costs down.
Corded tools require a power or air supply close to the point of use, although extension leads and air lines can be used to increase the distance from a fixed power point. Mains electric tools are generally more powerful than battery-operated versions. A disadvantage with most mains-operated equipment is that they should not be used in wet conditions unless they are designed for the purpose; it is important to have a residual current protection device that will trip and isolate the power if a fault develops in the machine or cable.
Fixed tools are static and are usually fixed to a floor or workbench, making them more stable for some activities where accuracy is important. There is a vast range of power tools available and it is very much an individual choice as to the manufacturer and type of tool to use; again try to obtain good-quality tools that have been recommended. Some typical static tools are lathes, drilling machines, planers, band and circular saws, sanders and thicknessers. Bench or floor-mounted drilling machines, sanders and band saws are probably the most popular fixed tools used by stickmakers.
Tool sets
It is not imperative to buy full sets of tools, as often only a few from the set are regularly used. Most tools can be obtained singly therefore carefully choose individual items that will definitely get used which will help keep costs to a minimum. Consider buying good quality second hand tools that are considerably cheaper than the equivalent new ones. Car boot sales or second-hand tool dealers are often worth a visit, there are some excellent bargains to be had providing you choose carefully. Occasionally when someone retires from stick-making they will sell their equipment which may be worth considering if the opportunity arises as you may find exactly what you have been looking for at a reasonable cost.
Abrasives
Abrasives are used extensively in stickmaking to shape and provide a smooth surface prior to applying a finish. There are numerous types and qualities of abrasives to choose from and they are available in many forms such as liquid, paste, paper, cloth, plastic, rolls, sheets, pads, discs and wire wool. Abrasives are designed to be used by hand or machine. Abrasives used with power tools will quickly remove material, saving time and effort, but they must be used with care as they are severe and too much material can easily and quickly be removed by these machines. Personal protective equipment (PPE) should always be worn when using any abrasive with powered machines to prevent grit and debris from causing harm or injury – it is essential to wear eye protection and suitable dust masks to avoid inhaling harmful materials. Abrasives applied by hand require more effort and are slower than using powered equipment but mistakes will be significantly reduced and your patience will often be rewarded when using this method to produce a final smooth and scratch-free surface.
Paper and cloth-backed abrasives are graded according to their ‘grit’. The most aggressive grits are the lower numbers and the higher numbers are the least severe. For example 30 to 100g are coarse, 120 to 320 are medium, and 400 to 800g are fine and 1,000 and above is very fine.
Waterproof abrasive sheets commonly known as ‘wet and dry’ are used to provide a very smooth finish, the paper can be used dry but is best used with a drop of water that forms a fine abrasive paste which is carefully rubbed onto a surface. The paper can be obtained in a range of grits up to 2,500g, which is extremely fine. Take care when using this type of abrasive on absorbent pale-coloured surfaces as the dirt generated during the smoothing process may contaminate and discolour the material, especially light-coloured wood.
Wire wool
Wire wool is graded by a series of 0s (zeros); coarse wool is 0 rated and 0000 is the finest. Wire wool works well when it is used with a liquid or paste abrasive and will provide an excellent surface prior to applying a finish. Wire wool can also be used to apply oils, giving a lovely sheen to the surface of timbers and horn. It is used to de-nib (remove the gloss from) a finish such as varnish or lacquer so that additional coats can be applied if required. It is often used to make a smooth matt finish, which some people prefer. A word of caution; wire wool does break up during use and particles of wire can be left on the surface and will rust if exposed to wet conditions, so it is important to ensure that all particles of the wire are removed from the surface of your stick before applying a final finish.
Avoid placing any type of battery in the vicinity of wire wool as strands coming into contact with both terminals may overheat and cause a serious fire, especially in a workshop environment that may contain flammable materials. Wire wool can be mixed with vinegar to make a stain for colouring timber. Drop the wire into a glass jar containing vinegar and leave for two or three weeks – the wire wool will slowly dissolve in the vinegar. Strain the mix into a container to remove any remnants of the wire. The mixture will darken oak and other woods; it is worth experimenting with the mixture before applying it to a finished handle or shank.
Liquid abrasives
Liquid abrasives are used to remove very fine scratches and marks; some are designed for use on vehicles and metals, however they can be used on a range of stickmaking materials such as horn, metal collars and brass ferrules. A popular black abrasive (T-Cut) designed for use on vehicles is useful for smoothing buffalo horn as the black dye is absorbed into the material, which helps to darken some of the natural markings that occur in buffalo horns. Brasso and T-Cut are regularly used for final finishing of horn handles and can be used to polish metal ferrules and collars. Avoid using liquid abrasives on timber as the dirt generated can be absorbed into the grain of the timber and will stain the surface: always test on a sample piece of material before using liquid abrasives on any absorbent material.
Files, rasps and rifflers
Files, rasps and rifflers are used for shaping most of the materials used in stickmaking.
Files
Files are generally used for engineering work on metals; they will cut most materials and are useful for working horn and antler, although the teeth may become clogged when used on some soft materials such as timber. A stiff wire brush will quickly remove most of the debris from a file. Files are graded according to their coarseness – rough and bastard cut files are the most severe, then going through second cut and down to smooth and fine. They are available in a many shapes and sizes; flat, half round, round, square and three-cornered and in a variety of lengths from 12in down to 4in in the standard ranges and are sold individually or in sets. Miniature, midget and needle sets of files are also available for very fine work.
Rasps
Rasps are similar to files but the teeth are designed to work best on softer materials such as timber, leather, horn and animal hoofs and their teeth are less likely to choke during use. Farriers use large double-sided rasps to dress horse hooves during re-shoeing and they are excellent for removing waste material from cow and sheep’s horn, but are too large for finer work. It is well worth buying good-quality files and rasps, as they will retain their sharpness longer than inferior-quality ones that soon lose their edge. Millenicut rasps are designed for shaping aluminium and are excellent for using on horn; they are available in a range of shapes and sizes and have different cuts from a coarse to a smooth finish. Woodworking rasps are made especially for removing waste from timbers and using them on metal must be avoided. Traditional ‘Surform’ and modern stainless steel rasps ‘Microplane’ are used because they are very sharp and leave a reasonably smooth surface on the timber. These rasps are available in a variety of shapes and sizes and some models allow blades to be interchanged with a single handle. Japanese double-sided rasps are popular. The blade is designed not to clog up during use and they will cut most stickmaking materials such as horn, plastics and timber.
Rifflers
Rifflers are a type of rasp used to shape materials in difficult places on a carving. The end sections of rifflers are made in various shapes and profiles that enable them to reach into the most awkward positions, enabling detailed shapes to be made in tricky places. They are very useful for stickmakers who decorate handles as they will cut horn and timber and will survive for a time if used on antler. Most rifflers are double-ended and are normally sold in sets; the costs vary depending on the size and quality of the tool.
Adhesives
There are numerous types of adhesives available for general and specialist applications. Popular epoxy resins require mixing, they usually come in two equal parts and are popular with stickmakers as they provide a strong bond and can be used on most of the materials used in stickmaking; they will successfully glue timber, antler and horn and many other materials together. They are available in small or large quantities with setting times that vary from five minutes to several hours, making them very versatile for stickmaking.
Polyvinyl acetate (PVA) is an adhesive formulated principally for use with timber. It is strong and waterproof and is ideal for use with wooden sticks. Some timbers require specific adhesives because of their oil and chemical content, so when using exotic wood or some hardwoods check the suitability of the product before use.
Cyanoacrylates are commonly known as superglue and are available in a range of thicknesses and setting times from instant to several minutes. Thin superglues can be used for strengthening timber and horns as it penetrates deep into the fibre of the material, the thicker types can be used to fill small gaps. Superglues must be used with care as some types will instantly bond skin – take precautions to ensure it does not come into contact with eyes and fingers. It is advisable to have a debonding solution at hand when using cyanoacrylates that can be applied in the event of an incident.
Fillers
Two-part fillers can be obtained in a few colours that are useful for setting eyes into carved birds and animal heads. The filler can also be used to fill voids and gaps as it can be smoothed with files and abrasives and then covered with paint on a decorated handle. Coloured wood fillers are available in small tubes to match different timbers and are applied directly to cracks in the timber; they can be sanded and over-painted when fully set.
Always check manufacturer’s instructions because most fillers have to be used within a particular temperature range and some are very slow or may not set if the temperature is too low.
It is possible to improvise by making your own filler by using fine sanding dust and mixing it with epoxy resin to fill cracks in the same material. Another option is to drop fine sanding dust into cracks and cover it with thin superglue, which will soak into the filings and give a strong filler that can be dressed as soon as the superglue sets. Lids from empty jars and milk containers are ideal for mixing small quantities of two-part adhesives, fillers and paints; they save making a mess on your work table or bench and can be thrown away after use. Packs of lollipop sticks can be purchased from craft shops and are ideal for mixing epoxy glues. Their straight edges are also perfect for aligning handles and shanks.
Types of finishes
Always check the manufacturer’s instructions before applying a finish as some may adversely react with a particular type of primer or sealer. Some finishes are applied directly to the surface while others advise using a primer or sealer prior to the application of a finish. Oils are often applied directly to the surface, especially on timber. Several types of sealers are available and they are often referred to as sanding sealers. Cellulose and acrylic sealers are popular varieties and can be applied by brush, with a cloth or aerosol spray. The sealer is applied and when it has dried, it can be rubbed down with fine abrasive making a perfect surface for a finishing product. Sealers help to raise the grain of wood which when smoothed off with a fine abrasive, makes a smoother surface in readiness for the final finishing coats. Some manufacturers advise that additional coats of sealers can be used until a satisfactory surface is achieved, while others suggest applying a single coat.
It is good practice to apply a finish to a stick as it will help to protect and preserve it for many years, and there is a huge range to choose from. Some are designed specifically for interior use only and are not suitable for outdoor applications. Suitable finishes are acrylic, cellulose, enamels, spirit- and water-based lacquers, paints and varnishes that can be obtained in gloss, satin, or matt finish depending on the individual choice, and established stickmakers all have their preferred brands and types. As mentioned it is very important when applying finishes to ensure that they are compatible with sealers or base coats – if there is any doubt try the products on a small test area first.
Always apply a finish in a dust-free, warm and dry environment to get the best results. Dust, dampness and the wrong temperature will adversely affect the finish.
Lacquer
Lacquers are generally fast setting and can be applied by brush, with a cloth or from an aerosol spray and are available in gloss, satin and matt finish. Because they are fast setting, additional coats can be applied to the surface in a short period if required. Some lacquers can be applied over paints and stains to provide protection but always ensure that the lacquer is compatible with the previous material before applying and that it is suitable for outdoor use.
Varnish
Varnishes generally take longer to dry than lacquers and should be applied in a warm, dry and clean environment. Some experienced stickmakers thin the varnish, as they prefer to use several thin coats rather than a single thick coat. When completely dry, each coat can be very lightly de-nibbed to give a key for a further coat. Several coats may be required to achieve a satisfactory finish but take care when applying it as the varnish may run if applied too thickly. If it is too thick, varnish may chip off in later use. Water- and spirit-based varnishes are available for outdoor use. When a varnish has fully dried it can be burnished to enhance the finish; burnishing paste is available although TCut or Brasso are often used to improve the finish.
Oil
Oils are a traditional and proven method of finishing sticks. There are several types of oils available for outdoor use and the most common used by stickmakers are linseed, Danish, teak, tung and outdoor furniture oil. Oils are popular because they soak into the timber, which helps to protect and waterproof the wood. Oil takes longer to soak into timber and dry than lacquers and varnishes, so it may take a while to apply several coats as the timber slowly absorbs the oil. When oil is completely dry it can be burnished and a pleasant-looking sheen finish can be achieved. Oils can be over-coated regularly to maintain a protective finish and are an excellent choice for a walking or working stick that is used frequently in all weathers.
Paint
Paint is rarely used as a single finish medium on walking or working sticks; it is used in small amounts to provide a coloured decoration on a carved handle or pyrography work. There are several types of paint available that are suitable for decorating sticks – model and acrylic paints are among the most popular. When the paint has fully dried always apply a compatible finish to protect painted surfaces.
Enamels
Enamels are used extensively by model makers, who only require small amounts for their work. There is a large range of colours available that can also be mixed with a compatible enamel if required, making these paints a good option for decorating handles of sticks. A separate thinner is needed to clean brushes.
Stain
Stains can improve the appearance of a shank or handle with or without bark and will often enhance knots, grains or blemishes that naturally occur in the wood. A word of warning; stains will also highlight any defects in the wood such as scratches or file marks, so ensure the surface is sound before applying. Stains are best used on untreated timber as it soaks deep into the grain, giving a long lasting colour. Most stains are spirit- or water-based and it is important to remember which type you have used so you can select a compatible protective finish that will not react with the stain. If stain is applied to dry timber it is likely to run along the grain of the wood, making it difficult to control if a fine edge is required. Also if it is intended to use a range of stains to colour a piece of timber such as a bird’s head, use the lightest colours before applying dark colours; a pale-coloured stain will seldom cover a dark colour even if several coats are used. It is advisable to test stains on a similar type of timber first to ensure the result meets your requirements, as it can be difficult to obtain the correct colour and shade. Compatible stains can be mixed to provide a wide range of colours and it is advisable to keep a record of the mixing ratio used if you want to copy the colour at a later time. Stains are best used for general colouring; they are difficult to control on intricate work or carvings.
Polish
Wax polish can be used as a final finish; it will give a lovely sheen and feel to a handle or shank. Wax provides limited protection to your stick as it will wear off if a stick is used regularly in outdoor conditions. However, as with oils, it is easily over-coated and if applied regularly a beautiful finish can be maintained. Beeswax and microcrystalline polish work well when applied onto a finished surface, as do some liquid polishes used principally for vehicles and metals. Burnishing creams can be used to revive an old polish.
Top workshop tools
If you are setting up a workshop, there are a few important tools to consider. Some are listed below.
Vice
If you are setting up a workshop, a strong, fixed vice should be among your top items. Mechanics or engineering vices are strong and sturdy and are normally bolted on top of a workbench. They are used for general-purpose work and are suitable for all stickmaking jobs. Woodworking vices are usually bolted onto the side of a workbench leaving a flat worktop and are available in different sizes. Because of the position on the side of a bench, there are some limitations with their use. Swivel-headed vices are useful, especially for carving and shaping handles; some have shaped jaws that are ideal for holding shanks. Portable vices with swivel heads can be clamped onto flat surfaces such as tables and Workmates and are useful when working away from home. Handheld vices are used to hold objects safely when drilling holes – they are especially useful on powerful drilling machines that can suddenly rip an object from a hand.
Hammers and mallets
A selection of hammers is an essential part of any tool kit. The three most common types are claw hammers that can also be used to pull out nails; ball pein hammers, mainly for engineering work and useful for most jobs and cross pein hammers, ideal for driving smaller nails and pins. Most hammers are described and sold by their weight. Examples are 4oz cross pein hammers, used for delicate work; 1½lb claw hammers, used for general joinery work and 2lb ball pein hammers, generally used for heavy engineering work. A 1½ lb claw or a ball pein hammer is a good choice for stickmaking.
Wooden mallets and soft-faced hammers are designed to reduce the risk of damage to all types of surfaces; they are often used in conjunction with woodworking and carving chisels to prevent the chisel handles from being damaged. A wooden mallet is a good choice for general woodwork.
Drilling machines, twist drills and bits
Hand drills are not as popular as they used to be a few years ago; battery and mains electrically-powered drills have taken over and many now incorporate screwdrivers and hammers making them extremely versatile but there are times when a hand drill or a brace and bit are useful when making a stick. Battery drills are useful tools as they can be used in remote locations and the low voltages make them safe to use outdoors in wet conditions. Bench- and floor-standing pedestal drills are a good option in a workshop if you have the space, as they can be set up to drill very accurately which is important when drilling out a stick handle.
TWIST DRILLS AND BITS
Twist drills, bits and augers are used for drilling and boring holes of different sizes in a wide variety of materials. Like most other tools, some are designed for a specific task while others can be used for general-purpose work. A set of good-quality general-purpose twist drills ranging from 1mm to 13mm will cover most stickmaking requirements; they will drill timber, horn, antler and steel. Flat spade bits are intended for cutting holes in timber and are available in a range of sizes. They are ideal for cutting the ‘pith’ out of antlers, ready for jointing. A blunt spade bit will tear timber, therefore always keep them sharp – they can be purchased individually if you don’t require a full set. Forstner bits are designed to cut clean, accurate holes making them a perfect choice for drilling holes into wooden handles ready for jointing; they can be obtained in sets or individually. Auger bits are designed for cutting deep, accurate holes in timber and can be used to drill the holes in shanks and handles.
Saws
Hacksaw frames will accept a range of blades that will cut most materials, especially metals and plastics. A junior hacksaw is most useful for smaller applications and will cut steel, plastics and timber; it is very handy when fitting ferrules and cutting dowel joints. Coping and fretsaws are designed for cutting shapes. They will cut a tight bend in most materials with the correct blade inserted into the frame and are particularly useful for cutting tight shapes on wood and horn handles. The thin blade performs best when used on the pull stroke, rather than pushing the blade into the material.
Hand, tenon and dovetail saws are used for accurate woodcutting. Japanese saws are becoming popular as they are good quality and are very sharp, giving clean cuts, which makes them an ideal tool for accurate joints. Some of these saws have interchangeable blades for different materials and cuts. A mitre saw is designed to cut accurate angles and is useful for cutting an angled joint or straight joint between a handle and shank. They are also used extensively for picture framing.
A folding pruning saw is ideal for cutting green shanks and branches if you intend to cut and collect your own shanks; a large, sharp pruning saw will cut through a thick branch if you want to cut your own block sticks.
Electric jig saws will cut shapes up to 2in (50mm) deep in a range of materials with the appropriate blade and are capable of cutting wooden blanks for stick handles from planked timber. If space is available, a band saw is ideal for stickmaking; it will cut tight curves in 6in (150mm) blocks of timber at various angles and with an appropriate blade fitted, it will cut most stickmaking materials. They are expensive but are a most useful tool, especially if other DIY work is undertaken in the workshop. Bench-top or floor-mounted versions are available.
Woodworking and carving chisels
There are numerous chisels made for woodworking activities and carving work. They are available individually or in sets; some are designed for use with wooden mallets and others are designed for use by hand, which are popular among stickmakers who enjoy carving small objects onto handles and shanks. It is essential that the blades are kept sharp, so a sharpening kit or stone is essential.
Carving knives
A sharp carving knife is most useful for shaping handles. Carving knives are regularly used for making decorated handles in wood and sheep’s horn. Like chisels, they must be kept very sharp. Carving knives can be obtained individually or in sets with different-shaped blades for specific types of work. There is a wide range of craft knives available, some with fixed or retractable blades. These knives are very sharp and are used extensively by woodworkers and stickmakers. Most of the craft knife blades can be replaced. The Stanley knife is very popular, as it will accept various shaped blades.
3
Chapter 3
Ideas and Inspiration
Over time there have been many types and styles of sticks made; some have become classed as traditional and are generally used as working or walking sticks. There are also numerous ornately carved sticks made around the world that may relate to a country, religion or organization – many examples of these sticks can be found in specialist publications and books that are well worth investigating. Modern technology is advancing at a tremendous rate and social media sites provide a substantial amount of information on sticks that are being made within the UK and many other countries by people who are fascinated with this intriguing and compelling craft. Using books and social media sites will provide anyone with a huge amount of ideas if they wish to make either traditional or specialized sticks.
Double woodpecker thumbstick
Most of this book relates to making traditional styles and is designed to help those wanting to make a range of plain or decorated sticks using timber, antler and horn. Undoubtedly the best way to learn the techniques and methods of making plain and decorated sticks is to watch, discuss, question and learn directly from an experienced stickmaker. A few professional stickmakers give lessons where complete beginners will be taught some of the fundamental aspects of the craft and will generally make a stick to take home in one or two days. There are hundreds of excellent amateur stickmakers who are willing to show others how they make their sticks; some of these are likely to be members of a local organization or club.
Joining a stickmaking organization with likeminded members is a good way of obtaining ideas, inspiration and help. There are some incredibly clever and talented people making sticks and there will probably be a club quite close to you with several members who will be more than willing to help and give advice to any new member. Most clubs place information on the internet about themselves, with contact details for anyone wishing to enquire about membership and so on. The British Stickmakers Guild (BSG) is a national organization with hundreds of members in the UK and several overseas members. The BSG publishes a very informative quarterly magazine with input from its members; it also organizes several stick shows around the country with classes for novice and experienced stickmakers. The BSG also publishes a booklet with a list of all their members, with their addresses and telephone numbers. The list is organized by counties and regions, which helps readers to locate other likeminded people close to their own location. Membership application forms can be obtained online or from the membership secretary of the BSG (see information at the back of the book). The BSG website also gives some information on stickmaking clubs around the UK.
Village, county and large agricultural shows around the country often host stickmaking competitions or have stickmakers on site who sell and display their sticks. These events are well worth visiting to see the types, styles and standard of sticks displayed. Most of these stickmakers are usually very keen to talk and explain their methods.
Specialist books on carving animals and birds are widely available, with detailed drawings and sketches that can be used to make a range of handles. Christmas cards, magazines, newspapers and other media often have excellent pictures of animals and birds that can be used for decorating handles and hundreds of excellent photos can be found on internet sites and downloaded for personal use. A good way to obtain your own pictures is to visit game fairs, country and agricultural shows, zoos and farms where you can take photos of animals, poultry, game and birds of prey from several different angles so that the colouring and positions of eyes, ears, mouth and nose can be accurately reproduced on your stick handle. Modern digital cameras and mobile phones are ideal for taking photos as the images can easily and cheaply be downloaded and printed at home. Modern photocopiers are capable of increasing or reducing the size of pictures to scale, allowing a stickmaker to make an appropriately sized picture that can be transferred onto a blank by tracing the outline using carbon paper or by cutting sections of the pictures and gluing onto a blank, making it easy to mark out all the main features of the object so an accurate replica can be made.
Accurate models of popular animals and birds are very helpful as they show positions of eyes, ears, mouths, beaks, wings, legs and feet. They can be scaled up or down to suit your size and can be purchased from a wide range of shops and suppliers.
As mentioned, social media sites are rapidly expanding and more and more stickmakers and suppliers are using these sites to share information and chat about their sticks. Some stickmakers use the sites to produce guidance and advice on how they make their sticks and most are very willing to answer any questions asked. Sticks and stickmaking equipment are often available to purchase from subscribers. There are some fantastic carved handles and shanks on show, produced by some extremely talented and artistic people who have brilliant ideas that are shared across these sites. Anyone looking for ideas or inspiration should consider joining these forums as there is so much quality information available.
Stickmakers and suppliers are using websites to advertise and can be found by entering some key words into the various search engines that are accessible on smartphones and computers. Modern technology has made a tremendous amount of free information available from around the world; the amount of information is rapidly increasing and is well worth looking at to get ideas and inspiration for any new projects.
WOODPECKER THUMB-STICK FROM A SCRAP PIECE OF TIMBER
Builders, joiners, furniture makers, timber merchants and other commercial users often have surplus pieces of material left over that are usually thrown away. Stickmakers also often cut timber and other materials such as horn to make handles and again will often throw away some material with the potential to make an attractive handle, spacer, cap or even a ferrule.
My timber offcuts are thrown into bin for burning on an open fire which is used during cold spells. While collecting pieces to burn I found a piece of burr elm infested with woodworm around the outer soft wood. I had recently made a wooden thumb-stick from a small piece of timber and it occurred to me that the piece of burr could be made into an attractive and unusual thumb-stick handle. The following steps were taken to make a handle from a scrap piece destined for the fire. The burr was placed into a pan of boiling water (with some horns) to kill off any woodworm.
Step 1 An outline sketch of a pair of woodpecker heads was drawn onto the surface of the burr, the position of the eyes was marked and used as a datum point for each head.
Step 2 Two small pilot holes were drilled through the burr to use as datum points for each head. A 25mm hole was cut into the burr to form the initial opening for the thumb. The infested sections were cut from the outer edge of the burr leaving a solid section of wood to make the handle. Both head shapes were cut out of the burr using a band saw.
Step 3


