11,99 €
Mehr erfahren.
- Herausgeber: CICO Books
- Kategorie: Lebensstil
- Sprache: Englisch
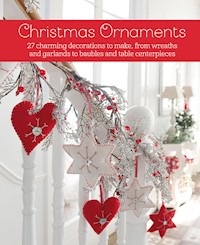
27 charming decorations to make, from wreaths and garlands to baubles and table centerpieces
Das E-Book Christmas Ornaments wird angeboten von CICO Books und wurde mit folgenden Begriffen kategorisiert:
Das E-Book können Sie in Legimi-Apps oder einer beliebigen App lesen, die das folgende Format unterstützen:
Veröffentlichungsjahr: 2021
Ähnliche


Christmas Ornaments
Christmas Ornaments
27 charming decorations to make, from wreaths and garlands to baubles and table centerpieces
Published in 2021 by CICO Books
An imprint of Ryland Peters & Small Ltd
20–21 Jockey’s Fields, London WC1R 4BW
341 E 116th St, New York, NY 10029
www.rylandpeters.com
10 9 8 7 6 5 4 3 2 1
Text © Chris Myers, Catherine Woram, and Clare Youngs 2021
Design, illustration, and photography © CICO Books 2021
Material in this book has previously appeared in Christmas Crafting in No Time, Christmas Crafts, and Scandi Christmas (see page 128 for project credits).
The designs in this book are copyright and must not be made for sale.
The authors’ moral rights have been asserted. All rights reserved. No part of this publication may be reproduced, stored in a retrieval system, or transmitted in any form or by any means, electronic, mechanical, photocopying, or otherwise, without the prior permission of the publisher.
A CIP catalog record for this book is available from the Library of Congress and the British Library.
HB ISBN: 978 1 80065 038 1
PB ISBN: 978 1 80065 067 1
eISBN: 978 1 80065 068 8
Printed in China
Photographer: Caroline Arber
Stylists: Chris Myers, Catherine Woram, and Clare Youngs
Illustrators: Michael Hill and Stephen Dew
Designer: Toni Kay
Art director: Sally Powell
Head of production: Patricia Harrington
Publishing manager: Penny Craig
Publisher: Cindy Richards
Contents
Introduction
CHAPTER 1
Tree Decorations
Felt hearts, stars, and trees
Gingham trees
Curled paper star
Embossed folk heart
Papier maché baubles
Gingerbread saltdough shapes
Silk and sequinned fish
Paper angel
Pompom decorations
Music paper angels
CHAPTER 2
Wreaths and Garlands
Twiggy wreath with hearts
Scandinavian horse garland
Dogwood wreath
Silver wreath centerpiece
Star garland
Crab apple wreath
Heart wreath
Fabric garland
Mistletoe wreath
CHAPTER 3
Table Decorations
Advent gift buckets
Paper pompoms
Pretty beaded hearts
Terracotta pot centerpiece
Scandinavian tea light lanterns
Twig reindeer
Little forest advent candle tin
Tomte or little nisse
Templates
Techniques
Suppliers
Index
Project credits
Introduction
There is no better time to get creative than at Christmas. Trimming the tree, decking the halls, setting the Christmas dinner table—all present wonderful opportunities to get crafty and create a sparkling, warm, and welcoming festive home.
From tree decorations to wreaths and garlands, and impressive table decorations, this book is full of inspiration for the festive season. You’ll find projects in the following pages that you can sit and make with children, and many that will become loved and treasured as they can be stored and brought out again year after year.
You don’t need special skills or expensive materials for any of these projects, just some basic sewing knowledge, which you can learn from the techniques section starting on page 124.
These projects are not just lovely, they are also a great way of recycling materials you may already have in your home. Try to save off-cuts of wrapping paper, ribbons, and fabric to recycle into new decorations the following year. Look out for lovely buttons and ribbons in junk shops and sewing stores, and forage for twigs, moss, and other greenery in your own backyard or on a walk through the park or forest.
Wishing you a very merry Christmas!
CHAPTER 1
Tree Decorations
Felt hearts, stars, and trees
Dress a tree both effectively and inexpensively by making these decorative hearts, stars, and trees in plain felt with simple embroidered motifs finished with pearl buttons. Made in red, green, and white felt, these decorations feature a plain snowflake motif, worked in long and short running stitch, blanket-stitched edges, and a ribbon loop with which to hang them from the tree.
Materials
tracing paper and pencil
green, red, and white felt
scissors
pins, contrasting embroidery thread, and embroidery needle
pearl buttons
narrow ribbon (for the hanging loops)
polyester batting (wadding) for the filling
1 Using the templates on pages 112-113, trace the tree, star, and heart motifs on to the piece of paper with the pencil. Transfer your chosen motif to the green felt and cut out two shapes for each decoration. Draw the snowflake shape on to the front of one of the shapes with a soft pencil. Work the embroidery using long and short running stitch (see page 124) on the front of the decoration, following the design shown on the template.
2 Sew on one or two pearl buttons, depending on the design you’ve chosen. (In order to save time, you could stick the buttons on using a hot glue gun if you prefer.)
3 Pin the two shapes wrong sides together and begin to work blanket stitch (see page 125) around the edges using the embroidery thread. Start stitching part-way along the bottom of the tree first so that the opening for the filling will be at the base of the decoration. Use small stitches, spaced approximately ¼in (5mm) apart.
4 Cut a length of narrow ribbon, approximately 4in (10cm) long, to make the hanging loop. Fold the ribbon in half and place the ends between the two layers of felt at the top of the tree. Continue blanket stitching around the tree, sandwiching the hanging loop between the felt as you stitch. In order to make the loop stronger, make a few extra stitches over the ribbon before continuing with the blanket stitch.
5 Continue to work the blanket stitch around the felt shape until you reach the bottom edge again and then leave an opening of around 2in (5cm) for the filling. Push the filling into the opening—you may find it easier to use the end of a pencil or knitting needle to do this. Fill the decoration well but do not overstuff. Sew up the opening at the bottom of the Christmas tree using blanket stitch to finish.
Gingham trees
You can make these simple tree decorations in pretty red and green gingham fabric and then decorate them with lengths of ribbon to hang from your tree. You could also add some further embellishment in the form of tiny buttons and beads if you wish. If you have time, making enough of these decorations to cover your Christmas tree will create a really stylish look.
Materials
tracing paper and pencil
scissors
pins
red or green gingham fabric
12in (30cm) ribbon, approximately ½in (1cm) wide, for the decorative trim and hanging loop
needle and thread
sewing machine
polyester batting (wadding) for the filling
1 Using the template on page 112, trace the tree motif on to the piece of paper with the pencil. Cut out the tree template, pin it to the gingham fabric, and cut out the tree shape with the scissors.(Fold the fabric in half so that you can cut out two layers at a time.)
2 Lay the ribbon trim along the bottom straight edge of the tree on one layer of the fabric, about ¾in (2cm) from the edge, and stitch into position. You can either sew the ribbon to the fabric by hand or use the sewing machine.
3 With right sides facing, stitch the tree shapes together using the sewing machine. Leave an opening of around 3in (8cm) on the bottom straight edge of the fabric to insert the filling. Trim and notch the corners of the fabric and turn to the right side. Cut a length of ribbon, measuring 4in (10cm), fold it in half, and stitch it to the top of the tree to form the hanging loop.
4 Insert the stuffing into the bottom of the tree shape. Use a pencil or knitting needle to push the stuffing inside the decoration. Stitch the opening closed by hand to finish.
Curled paper star


