3,49 €
Mehr erfahren.
- Herausgeber: BookRix
- Kategorie: Lebensstil
- Sprache: Englisch
The granny square is a classic crochet pattern. It is often one of the first items a person learns to make when first learning how to crochet. Many people use the term "granny square" to refer to any type of crocheted square but this guide will teach you how to make a true granny square. There are lots of variations on this basic design.
This book is ideal for both beginner and advanced crocheters. In here, the crochet basics are taught with step by step instructions with picture illustrations. Once you master the basic crochet granny square method, you can expand upon the design to make various decorative and useful items. From blankets and apparel to accessories like bags and placemats, granny squares are versatile and add color and style to your home and wardrobe.
In this book, you will also learn the materials, tools, skills, techniques and patterns to learn how to crochet granny square. I have also included different granny square projects for you to follow and create amazing projects.
This book contains some of the following;
INTRODUCTION TO CLASSIC GRANNY SQUARE
Tools and Equipment
HOW TO TIE A SLIP KNOT FOR CROCHET
INSTRUCTIONS ON HOW TO MAKE A DOUBLE CROCHET STITCH
INSTRUCTIONS ON HOW TO CROCHET A GRANNY SQUARE
Crochet Granny Square Variations
GRANNY SQUARE PATTERN PROJECTS
Circle to Square Granny Square
Solid Granny Square
And so much more
ORDER YOUR COPY NOW
Das E-Book können Sie in Legimi-Apps oder einer beliebigen App lesen, die das folgende Format unterstützen:
Veröffentlichungsjahr: 2023
Ähnliche


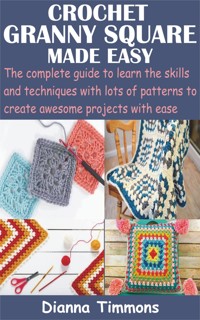
Crochet Granny Square Made Easy
The complete guide to learn the skills and techniques with lots of patterns to create awesome projects with ease
BookRix GmbH & Co. KG81371 MunichTitle page
Crochet Granny Square Made Easy
The complete guide to learn the skills and techniques with lots of patterns to create awesome projects with ease
Dianna Timmons
copyright@2021
Table of contents
CHAPTER ONE: INTRODUCTION TO CLASSIC GRANNY SQUARE
The granny square is a typical and classic crochet pattern. It is regularly one of the initial items an individual figures out how to make when first learning how to crochet. Numerous individuals utilize the expression "granny square" to allude to any kind of crocheted square however this instructional exercise covers how to make a true and accurate granny square.
So many variants exist for this basic design.
When you ace the fundamental crochet granny square strategy, you can develop the design to make different valuable and decorative items. From attires, covers or blankets to adornments like bags, sacks and placemats, granny squares are flexible and add style and color to your home and closet.
What You'll Need
Tools and Equipment
• 1 Crochet hook, size H
Materials
• 1 Skein of worsted-weight yarn
In the following chapters you will be learning how to tie a slip knot and how to make double crochet.
CHAPTER TWO: HOW TO TIE A SLIP KNOT FOR CROCHET
Overview
A slip knot is the initial phase in practically all crochet projects. There are various approaches to make sliding knots, and some can be somewhat complicating. This book shows one basic strategy. It's a great decision for starters who need to learn how to commence their crocheting work.
In addition to the fact that this slips knot produces the knot that you need to start with, yet it additionally begins the musicality and movement that carries on through the remainder of your crochet. When you make the knot, you can proceed to making chain stitches.
On the off chance that you are working from a crochet pattern, utilize the yarn and stitch hook laid out by the pattern guidelines. On the off chance that you are simply working at learning crochet, start with a moderate size hook and yarn, say a size G/6 (4.25 mm) or H/8 (5.0mm) crochet hook and a worsted weight acrylic, cotton, or fleece yarn would be a spectacular decision. Pick a yarn in a light or brilliant tone and that isn't excessively fluffy. Essential or basic yarns are simpler to work with when you are just learning crocheting and have to see the stitches.
Notes
These directives are meant to be followed by right-hand crocheters. In case you're left-handed, if it's not too much trouble, you can check out helpful tips online.
What You'll Need
Tools/Equipment
• Crochet hook in size fitting for yarn
Materials
• Yarn for rehearsing
Guidelines
1. Hold the Yarn and Hook
With a four-inch tail of yarn in front and the functioning strand (the one that goes to the ball) in back, handle the yarn in your left hand between your thumb and forefinger. Permit the yarn to stream openly over your pointer. Backing the strands of yarn with your center and ring fingers.
Utilizing either a pencil grip or a blade grip (the photograph shows a blade grip), handle your hook in your right hand. Your fingers ought to be loosened up enough to move openly, yet they should grasp sufficiently tight to keep up exact power over the hook.
To begin, keep the hook in such a way that it faces upward. Slip the crochet hook between your pointer and the yarn.
2. Make a Loop on the Hook
Try not to relinquish the strands of yarn in your left hand. Lift the crochet hook simply over your left hand; hold the highest point of the hung yarn on the hook with your correct forefinger. Revolve or rotate the top of the hook clockwise (to one side) under your right hand and back to the beginning position. Basically you are turning the hook all around.
This move will bend the strands to shape a free circle on the hook. It's not secure yet, yet it is starting to seem as though the beginning of a crochet project.
3. Yarn over Hook
Change the fingers of your left hand to get ready for stitching. Squeeze the tail of yarn between your center finger and thumb. Supplement your forefinger between the strands of yarn and up to the back, to all the more effectively control the functioning yarn as it loosens up from the ball. In a perfect world, the strand should circle over your forefinger and afterward pass between your different fingers to make appropriate pressure.
Either utilize your left hand to fold the yarn around the crochet hook from behind and afterward preposterous, or utilize your right hand to control your hook to do exactly the same thing. This move is designated "yarn round hook" or "yarn over."
This may all vibe somewhat awkward from the outset, yet the more you practice, the more characteristic it feels. Before you know it, you'll do it without blinking an eye.


