18,49 €
Mehr erfahren.
- Herausgeber: Crowood
- Kategorie: Lebensstil
- Sprache: Englisch
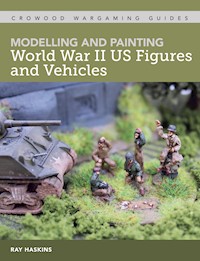
This book covers the modelling and painting of US armed forces in the Pacific, on D-Day and during the liberation of Europe in 1/35, 1/56, 1/72 and 1/76 scales. Historical overviews set the scene followed by detailed step-by-step modelling and painting guides for the creation of accurate and realistic models, whether for display or wargaming. With over 250 colour photography, this book includes the following models for Personnel: infantryman, paratrooper, Ranger, Marine, airmen, combat engineers, tank crew and General George S. Patton. For Weapons: small arms and artillery. For Vehicles: tanks, half-tracks, tank destroyers, jeeps, armoured cars and many more.
Das E-Book können Sie in Legimi-Apps oder einer beliebigen App lesen, die das folgende Format unterstützen:
Veröffentlichungsjahr: 2020
Ähnliche


MODELLING AND PAINTING
World War II US Figuresand Vehicles
MODELLING AND PAINTING
World War II US Figuresand Vehicles
RAY HASKINS
First published in 2020 byThe Crowood Press LtdRamsbury, MarlboroughWiltshire SN8 2HR
www.crowood.com
This e-book first published in 2020
© Ray Haskins 2020
All rights reserved. This e-book is copyright material and must not be copied, reproduced, transferred, distributed, leased, licensed or publicly performed or used in any way except as specifically permitted in writing by the publishers, as allowed under the terms and conditions under which it was purchased or as strictly permitted by applicable copyright law. Any unauthorised distribution or use of this text may be a direct infringement of the author’s and publisher’s rights, and those responsible may be liable in law accordingly.
British Library Cataloguing-in-Publication Data
A catalogue record for this book is available from the British Library.
ISBN 978 1 78500 716 3
CONTENTS
Acknowledgements
IWOULD LIKE TO thank a few people without whom I would not have been able to illustrate this book, or indeed experience building and painting such fine figures and models: Tony Barton, the designer of AB miniatures, Tom Walsh, owner of Milicast Models, Tony Chadburn of Raventhorpe Miniatures, who provided the 20mm figures used in two chapters, Mark Dixon of CP Models and TQD Castings and Matt Hingley of Elhiem Miniatures.
A special thank you goes to Owen Conner, the Uniforms and Heraldry Curator at the National Museum of the Marine Corps, Triangle, Virginia, who very kindly provided the pictures of museum artefacts that feature in Chapter 2. Owen was also kind enough to write the captions for those pictures as well, which describe them perfectly.
Preface
THE AIM OF THIS book is to bring the US Army of World War II to life on the gaming table as well as the display cabinet for both wargamer and collector alike. Practical step-by-step instructions demonstrate how to create realistic models in metal, resin and plastic, using various techniques from hand painting to airbrushing.
My modelling career started in the mid-1970s when, five years old and living in Enniskillen, Northern Ireland, I received my first Airfix kit. This sparked an interest that has grown and developed over the years, allowing me to graduate from modelling with plastic soldiers to modern metal versions. It has been a journey that could be rather trying at times, but mostly it has been engrossing and enjoyable.
I still have very fond memories of taking the weekly Saturday journey into town with my mother while she did her shopping, and waiting patiently until we could, at last, visit the local toyshop, which seemed to stock every Airfix kit available. After handing over my pocket money for the chosen kit, the journey home was filled with anticipation and excitement at the prospect of building my latest prize. At that time painting the models was optional, but the fun I had in building them was boundless.
Many years later, and a lot older, I am happy to say that I still feel that same excitement at the thought of tackling a new modelling subject, no matter what size: from a small kit with only a few parts to one with many hundreds. I am an avid modeller in 1:72 and 1:76 scales, Wargaming is a significant part of my modelling hobby and I enjoy every aspect, from researching a unit to using it on the tabletop battlefield.
Introduction
MODELLING IS A PERSONAL hobby: all modellers like to add their own mark or style to the work they do. Taking this into account, this book provides a guide to show how to achieve pleasing results. As such, the reader is encouraged to take what they need from it, and to add or adapt the techniques shown to their preferred way of doing things. Good modellers continually develop their practical skills and are not afraid to try new techniques. This is part of the joy of modelling.
Modelling products and materials have changed quite dramatically over the last ten years: there is now a wealth of products available that have changed the hobby for the better. It is now much easier for the newcomer to make a start in modelling with just a few select items that will enable a standard-built model to become unique and something to be proud of.
DO YOUR HOMEWORK
When thinking of modelling a tank that fought in Normandy in June 1944, for example, find out about:
the units that operated it, their uniforms and their kit
where they fought and against whom the time of year and/or the predominant weather conditions at that time
the type of terrain/groundcover
the markings it may have carried, such as the names painted on it by its crew
BACKGROUND RESEARCH
An important, and sometimes overlooked, aspect of modelling is research. This should be the cornerstone of any modelling project from the very beginning. ‘What?’, ‘where?’ and ‘how?’ are three questions that provide an important starting point and will help to steer further investigation. Background research at this stage could help to avoid a disastrous end result, so time spent checking up on details, via the internet or through relevant books or television programmes, is always time well spent.
During WWII the US armed forces standardized the equipment they used. The term ‘GI’, which is an abbreviation of Government Issue, arose and is still in use today to describe American soldiers during WWII. (By contrast, US soldiers in WWI were nicknamed ‘doughboys’.) Every soldier, sailor and airman was issued with the same kit relevant to their role and location at that time during the war, from the Central Pacific to the freezing cold of the Belgian Ardennes. A paratrooper who landed in Normandy in June 1944 wore a different uniform to one who fought during Operation Market Garden in September 1944, just a few months later. The difference between the uniforms worn by the Marines who fought on Wake Island in 1941 and those who fought on Tarawa in 1944 is vast. The exception to this is the tank crews, who wore more or less the same uniform, with only minor variations, all through the war.
Then there are vehicle markings: the US Army did not always use a white star on their vehicles; in fact, in the early days of WWII they used a yellow star in North Africa.
Following on from the recommendation to undertake research, there is little point in writing this book without providing some historical context to the models. As such, this book is divided into several chapters, each covering a specific theatre of the war in which US forces were involved. Presented in chronological order, the chapters start in the Pacific from 1941 to 1945 and end in war-torn Germany in May 1945. Features specific to each campaign are modelled, such as the relevant uniforms and equipment, and the main supporting vehicles. Where models could potentially have been included in a number of chapters, they appear in the chapter covering the period during which they had the most impact: the models of tracked landing vehicles (LVT), for example, have been included in the Pacific chapter as they were first used in a combat role at the Battle of Tarawa in 1943 and prior to this they were only used to bring supplies from ship to shore. Similarly, although paratroopers were deployed in the Allied invasion of Sicily in 1943, it was in Normandy in 1944 where they had the most significant impact.
This book covers painting and modelling the service personnel of the United States of America, and also extends to the modelling of some of the combat vehicles they used, including the M4 Sherman tank and some of the various tank destroyers that were used from 1942 to 1945. Both vehicles and figures will be covered in 1:56, 1:72 and 1:76 scales.
Tools and Materials
1
BEFORE YOU BEGIN ANY modelling or painting project, it is important to ensure there is sufficient workspace and the work area is both well lit and comfortable. The lighting should be appropriate for both building kits and painting: using several easily positioned lamps, such as anglepoise, rather than overhead lighting is recommended. Even with good positional lighting, small-scale modelling and the painting of fine details can take their toll on the eyes. A good solution is to use an opti-visor, available in various forms and prices. Looked after, this will be an invaluable investment.
A chair that provides adequate support to minimize slouching and prevent both neck and back pain is essential. The modeller may be engrossed in their work and sitting in the same position for many hours, so a chair that is both comfortable and practical is important and makes the process of modelling more enjoyable and less of a chore. Chairs designed for use in businesses can be bought from commercial office suppliers at reasonable prices.
Finally, the work area should be well organized with everything that is needed in easy reach: after all, spending time looking for something is time taken away from the fun part.
LIGHTBULBS
Warm white lightbulbs cast a light with a yellowish hue and this will affect the perception of any paint colours being used. Daylight bulbs are better as they cast a pure white light that makes it easier to see colours as well as details. They have a colour-rendering index (CRI), the measure of a light source’s ability to render colours faithfully, of around 80 per cent. Full spectrum lightbulbs, which offer a light as close as possible to natural daylight, have a CRI of around 96 per cent, and are the best choice but they are more expensive.
ESSENTIAL EQUIPMENT
Health and safety essentials
Safety cannot be overlooked. Eye protection is vital when cutting something that may, at any moment, fly into the air. Safety glasses do not cost much and so it might be worth having more than one pair to hand.
When using aerosols and airbrushing, or working with anything that creates dust, such as sanding, always wear a good quality mask. This should not be a dust mask but a proper respirator mask with filters, which can be purchased at any good high street DIY store. Dust masks are fine for keeping larger dust particles at bay, but when using an airbrush or aerosol with solvents or similar a good respirator is essential. Make sure that your work area is also well ventilated.
Optivisors come in several types, but they all perform the same task of magnification.
Cutting mat and tools
A good-sized cutting mat is important: it protects the surface underneath as well as prolonging the life of the blade being used. For any type of modelling you will need a few basic tools, starting with a good quality knife. Exacto make fine modelling knives and scalpels, and have a wide range of blades that are both very sharp and strong. A good set of small files is also needed; these are relatively inexpensive and can be found in most model shops as well as online. A couple of pairs of wire cutters are handy to have. These come in two sizes: the larger ones are suitable for cutting wire, for example, to make antennas for vehicles, and the smaller ones are good for removing large plastic parts from sprues. A set of tweezers is handy to have for lifting and positioning small parts, as well as the handling of other tricky jobs.
A small but useful selection of tools: files, scissors, an emery board and a craft knife with a handle that can also hold a razor saw blade.
Power tools
A Dremel, or similar hand-held powered multitool, is highly recommended as it can be used for cutting, sanding, polishing and other tasks. With the circular cutting disc attached, it is possible to remove the finest details of a model without harming it. It is an investment purchase but will soon prove to be an invaluable tool.
A Dremel hand-held cordless power tool. This two-speed model is capable of performing tasks that need precision, such as removing excess resin from models.
Plasticard
It is useful to have a selection of different thicknesses of plasticard at hand. These can be used for basing and conversions, as well as for making items such as stowage boxes for vehicles. Wire, of various diameters, also has many uses, for example making antennas. Both plasticard and wire can be bought from local model shops or on-line.
Two ‘must have’ items are a selection of plasticard and a cutting mat.
Clamps and vice
A selection of clamps is useful for holding parts together while glue sets. A pin vice, available in various sizes, also comes in very handy when drilling out delicate areas such as hands on figures and gun barrels on vehicles. Because they are hand turned, as well as being very accurate, they do not create any heat and so will not melt plastic. They take a variety of drill bits designed for hobby use, from the finest to the largest, and the bonus is they are inexpensive.
Clamps are invaluable when joining two parts together that need to be held while the adhesive sets.
Fillers and modelling putties
Miliput and Green Stuff are two-part putties that once mixed in the correct amounts (50-50) can be used for conversions, adding detail, filling gaps and making accessories such as bedrolls, blankets, sandbags, etc. Always have at least one of these products to hand – it will come in handy. They can be bought either on-line or from any good model shop. In addition, there are plastic putties and fillers that are created for use specifically with plastic kits. These are manufactured by the main plastic kit companies.
Green Stuff is a two-part epoxy putty in yellow and blue that turns green when mixed together in equal amounts.
Glues
A wide variety of adhesives is available. PVA glue, widely available from both craft and DIY shops, is used in modelling and wargaming for scenic work on both figure and vehicle and weapon bases. Cyanoacrylate, otherwise known as ‘superglue’, is commonly used for bonding both resin and metal with ease. Care should be taken when using it as it will also bond skin and should be kept well away from the mouth and eyes. It is available from a host of outlets and as such is a readily available, very useful glue. The traditional and perhaps most widely used glue in modelling is polystyrene cement, which is made by several companies and is available in a variety of types, the most useful one being a liquid that is sold in a glass jar and comes with its own applicator, either a needle or brush.
A small selection of adhesives.
Paints
Paint is best stored in racks, which can be bought from any good hobby shop or online.
Acrylic paints can be used for painting figures, vehicles or aircraft. There is now much more choice of colours and brands than even ten years ago. Vallejo paints are highly recommended for their ease of use and colour range. These are well complemented by AK Interactive paints, which are available in a vast range of colours for figures, vehicles, aircraft and even naval vessels. They have introduced new paint sets that span several periods. Even a basic set will provide the main colours required and is a good starting point. These are the two brands of paint that feature most in this book, although alternative brands are available; Humbrol, for example, also make a good range of military-themed colours.
A paint storage rack ensures that colours can be easily located when they are required.
Tamiya thinner for use with Tamiya paints: a bottle this size will go a very long way.
A small selection of MIG pigments.
The advantage of acrylic paint is that it dries quickly, has little or no odour and the brushes and equipment used can be cleaned with water. The use of a good quality acrylic thinner is helpful for thinning paint so that it can be used in airbrushes. Tamiya acrylic thinner is recommended.
Weathering powders
Weathering powders are pigments in powder form that, when applied to a model, can create the effects of dust, rust, mud, soot and so on. They were initially manufactured by Mig Jimenez, whose superb AMMO range of weathering powders now gives the modeller a wealth of choice as to their desired finish. From replicating the effects of winter conditions or the harsh, arid desert of the Middle East, weathering powders help to achieve the appropriate finish.
Paintbrushes
Paintbrushes come in many shapes and types, from synthetic to high-end natural hair, from size 0000 (smallest) to size 6 (largest), and with a wide range of prices. Natural hair brushes in size 00, 0, 1, 2 are recommended: 00 and 0 for detailed work, size 1 and 2 for larger areas. Whatever type of brush you opt for these four sizes are ideal to start with. Just make sure that when you go to buy any brush you check that the bristles maintain a good point. If they fail to do so this could seriously impair your work and affect the overall finish. Even if you intend to airbrush your vehicles, you will still find a flat brush useful as this can be used for applying paint as well as achieving various effects such as dry brushing, which will be covered later.
Pointed brushes are used for detailed work. Dry brushes are used for dry brushing and applying filters. Cleaning them well after use will extend their life.
Airbrushes
There are many good makes of airbrush available, such as Aztek, Sotar, Badger and Iwata. Before you commit to one, do try out different brands as some may suit your painting style better than others. Buy the best model you can afford, along with a separate compressor. An inexpensive airbrush that uses compressed air can look like a good option, but they are, in fact, a false economy as they provide an inconsistent pressure that has a negative impact on the final result. Once purchased take the time to master your airbrush, this tool will transform the finish of your models.
Using an airbrush will transform a painted finish.
Basing
When used for either wargaming or for display, it is aesthetically pleasing to stage a figure or model on a well-executed scenic base. In addition to the equipment and materials already covered, there are a few things that are specifically needed for making bases or ‘basing’. A sandy and/or rocky terrain can be created using dry builders’ sand with dry cat litter to give extra texture. A realistic effect can then be achieved by painting this.
Dried builders’ sand for use during basing.
Once painted and highlighted, it is possible to add some grass, shrubs, flowers and small bushes. Static grass is good for achieving all-over coverage and comes in a variety of shades. It can be purchased from model shops and the internet. ‘Tufts’ of static grass can be used to create tall grass and small shrubs: these come in various sizes, heights and colours. Some even come with flowers of various colours, helping to add a little splash of colour to an otherwise drab scene.
Inexpensive paints, such as these, are ideal for creating paint effects on bases.
Small twigs taken from the garden and dried can also be used to add interest. The only limit is your imagination when it comes to scenic work. Small bricks can be very easily created for urban environments by cutting matchsticks to size and dying them with paint to the appropriate colour. If thin mahogany hardwood is used it is not even necessary to dye it.
This is a guide to the equipment required for modelling. If your budget is tight, start with just a few basic tools and a selection of brushes. You may not need everything listed above to begin with, but as your skills and confidence develop you will soon be using all the items and more.
A QUESTION OF SCALE
During the course of this book the reader will notice that there are frequent mentions of both figure size and scale. Wargames figures tend to be made to a certain height, such as 6mm tall, 20mm tall, 25mm tall and 28mm tall. Other sizes are available, but this book uses 20mm and 28mm tall figures. Larger figures (1:35 and 1:32 scale) are not really wargames figures, but are designed to complement vehicles of the same scale, so they are categorized by scale rather than height.
This is where some confusion creeps in. The main reason for categorizing wargames figures by height in millimetres and not by a set scale is that wargames figures are seen as playing pieces rather than scale models.
Categorizing wargames figures by height helps the customer to keep their collection consistent; 20mm figures, for example, will be roughly the same height even if purchased from a variety of different manufacturers.
Models, such as those produced by Airfix, are created to accurate scales so that multiple kits and figures can be incorporated together with all the elements at the appropriate size. At 1:72 scale (4.233mm to the foot), a figure of a modern man would stand 24.3 mm tall. This is a popular scale for aircraft modelling and is now widely used for the production of vehicle kits as well. 1:76 scale is a slightly smaller size (4.011mm to the foot) that is nearer to true 20mm wargames figures. This scale, also referred to as ‘OO’ scale, was first used for model railways and has subsequently been used to produce other models, such as the Milicast kits used in this book.


