Erhalten Sie Zugang zu diesem und mehr als 300000 Büchern ab EUR 5,99 monatlich.
- Herausgeber: The Crowood Press
- Kategorie: Lebensstil
- Sprache: Englisch
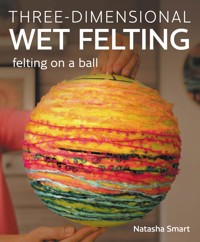
Felting on a ball is an innovative wet felting technique which uses a ball as a mould to create three-dimensional, hollow structures in felt. Following on from its sister title Wet Felting, this beautiful book explains the full process, from choosing and preparing your ball to the most successful techniques to help you produce a varied range of wet felted creations. It is full of practical guidance and showcases the versatility of this technique so you can create your own incredible three-dimensional designs.
Sie lesen das E-Book in den Legimi-Apps auf:
Seitenzahl: 320
Veröffentlichungsjahr: 2024
Das E-Book (TTS) können Sie hören im Abo „Legimi Premium” in Legimi-Apps auf:
Ähnliche


CONTENTS
Introduction
1Equipment and Materials
2Getting Started
3Felting Simple 3D Forms
4Adding Extra 3D Structure
5Nuno Felting on a Ball
6Developing Your Own Projects
7Finishing Your Felt
8Templates and Tables
Glossary
Useful Resources
Main Project Guide
Index
Acknowledgements
INTRODUCTION
Hello and welcome to this deep dive into the exciting world of felting on a ball! If you’ve not heard of this technique before, this is a method of wet felting using a ball as a mould to create 3D, hollow shapes in felt. It’s an innovative way of achieving structure and depth to elevate your finished felt from flat, 2D pieces to functional and decorative 3D items which are seamless and strong enough to hold their shape.
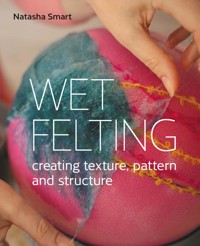
If you’ve read my first book, Wet Felting, which includes a chapter on felting on a ball, you might wonder what’s new or what else there is to say about this technique. Well, since then I’ve been exploring all aspects of using a ball in wet felting. I’ve experimented with different wool fibre breeds and embellishment materials, tested different-sized balls and fibre coverage of the balls, and expanded the felt out from them with the addition of extra structural items like handles and flaps. I’ve also adapted the technique itself to find better ways of achieving the best results. From all of this I’ve developed a range of new projects to make on the ball.
In terms of process, this book follows a logical progression, building from simple layouts utilising the rounded shape of the balls in the first main project chapter through to the addition of extra felted parts like handles, pockets and flaps in the second. We then move on to changing and expanding the surface of the felt through nuno felting on a ball with fabric, before finishing with how to approach your own projects with the inclusion of some different surface design techniques. If you’re new to felting on a ball, I would recommend starting the process from the Embellished Bowl Sample Project in Chapter 2 before moving on to more challenging layouts.
The projects are illustrated with step-by-step photographs, which will help you to keep track of all the felting on a ball stages, and I’ve included lots of tips throughout to help you navigate successfully through them. There are also some useful extra wet felting techniques, such as instructions on how to make felted straps and cords. If you’re a neat freak like me, I hope you’ll also enjoy the chapter on how to give your felted items a great finish, including demonstrations of how to install zips and clasps, and tips on caring for your finished felt.
Although this book is structurally about felting on a ball, the materials and decorative surface design techniques used are just as applicable to flat felting or felting with 2D flat resist shapes, so I hope you’ll be able to use these in your wet felting more generally. They are also adaptable and interchangeable between the projects I’ve included, so I would encourage you to tweak the designs, swap around techniques and incorporate your own ideas about what makes you excited creatively. If, from my own exploration of felting on a ball shared in this book, I’m able to give you some inspiration and confidence to try new techniques in your own felting, then that’s a great outcome for me too. But whether you decide to follow one of the projects completely, or just use it to spark off an idea of your own, that’s really only the start, then it’s over to you to experiment with your own colours and designs.
I would love to see what you make as a result of reading this book, so please do tag me in on your creations on social media @natashasmarttextiles.
CHAPTER 1
EQUIPMENT AND MATERIALS
As this book is all about wet felting on a ball, it makes sense to start off by introducing you to a felting ball, along with the other types of ball we can repurpose for this process. So in this chapter we’ll consider what a felting ball is, how we work with them in wet felting and how to prepare them with useful guidelines. We’ll then look at the other equipment we need for the felting process, as well as materials.
WHAT IS A FELTING BALL?
A felting ball is a round, 3D shape which provides three key functions in felting on a ball:
• Firstly, it acts as a mould or forma to create a spherical 3D shape in felt. By placing wool fibre around the ball we can create a replica of the ball shape in felt.
• Secondly, it acts as a resist to create a hollow form with ‘sides’ which won’t felt together. The ball literally resists or prevents the wool fibre from bonding together wherever the ball is placed in between areas of fibre.
• Thirdly, the ball provides the means to agitate the wool fibre (which is a key stage in the wet felting process) by us being able to push around and bounce the ball when it is covered by fibre.
Any type of ball will work as a felting ball, but ones which will provide the smoothest wet felting experience are made of lightweight rubber, inflate and deflate easily using a plug at the top, and will stretch to be firm and useable at a range of sizes. You can, of course, use other 3D shapes to felt around too, such as a cardboard or plastic box, but they won’t have the advantage of being bounceable or offering flexibility or ‘give’ to the surface like a ball.
As the size range of any ball still has its limits, I’ve used four different balls within this book to create differently sized projects, from a small vessel to a large cat cave. Two of the balls are purpose-made felting balls, manufactured by Living Felt in Texas, USA and covering the most useful mid-range sizes, and the others are a small children’s toy ball and an adult exercise ball. The main ball I’ve used throughout this book is the original large purple (or pink, if you’ve got much older ones like I have) felting ball. It’s the perfect size for a range of items, like decently sized bags, hats and baskets, so it would be the one I’d recommend most.
Measuring the circumference size around the middle is the easiest way of establishing and comparing ball sizes.
Here are the approximate circumference size ranges of the four balls demonstrated in this book:
Ball colour
Blue
Green
Purple
Yellow
Size description
Small
Medium
Large
Extra Large
Circumference size range(approximate minimum to maximum)
40–53cm(16–21in)
63–76cm(25–30in)
76–94cm(30–37in)
112–122cm(44–48in)
Note that the size ranges are all approximate, due to variance between the balls, so yours may differ slightly.
Small blue children’s toy basketball with marked guidelines, inflated to 51cm (20in).
Medium green Living Felt felting ball with marked guidelines, inflated to 76cm (30in).
Large purple Living Felt felting ball with marked guidelines, inflated to 86.5cm (34in).
Extra large yellow exercise ball with marked guidelines, inflated to 117cm (46in).
You don’t have to use the same balls as these, however, and once you start felting on a ball you’ll start spotting all sorts of items that might work: I’ve repurposed rugby balls and other children’s toy balls equally successfully. Here are the main features of an ideal felting ball to look out for:
• Made of durable rubber, so is thick enough to firmly hold its shape, to withstand being pushed and bounced around and to be reusable.
• Made of stretchy material, so is firm enough to use at a range of sizes (most rubber balls seem to offer a circumference variance of 10–15cm/4–6in).
• Surface made of slightly tacky or textured rubber, as opposed to completely smooth, which helps the wool fibre and materials grip to it more successfully.
• Bounceable, which is important for the felting on a ball technique and is why I wouldn’t recommend balloons (good stretch but not hardy or bounceable) or beach balls (hardy but no stretch and not bounceable).
• Inflates and deflates via an easily removable top plug, as opposed to a valve, which requires a specific pump attachment.
Obviously the felting ball’s most important function is as a starting size mould/resist to create the felt around, but it can also provide a useful function as a finishing size forma for shaping the finished felt. If you re-inflate the ball inside your wet, finished felt it will stretch it into a rounded shape, smoothing out surface wrinkles and holding the shape whilst the felt dries. Rubber balls which are firm at a range of sizes are useful for this, as the felt will be smaller by the end so the same ball you used to create the felt can simply be re-inflated at a smaller size to shape it. (NB: It’s also possible to use differently shaped finishing formas than just round/spherical, which I cover later in this chapter.)
INFLATING YOUR FELTING BALL
The felting balls come with a top plug which is easy to use – just avoid holding your inflated ball by the plug as there’s a risk of pulling it out! They also come with a straw to inflate them by blowing into it. It is possible to inflate the balls in this way, but I would recommend using some kind of pump (hand, bicycle, foot, for example). There needs to be some kind of nozzle at the end of your pump to insert into the plug hole, but this doesn’t need to be a perfect fit. The hole is large enough for you to just hold a nozzle in place at the opening whilst you inflate it.
Felting balls laid flat, along with a rechargeable electric pump with nozzle attached, plastic straw, top plug and metal valve attachment.
The other type of balls are the ones like a football which have a valve opening (such as the small blue ball). To inflate or deflate the ball you need a special valve attachment for your pump, which usually comes either with the ball or with the pump. When the valve is removed the air stays inside the ball. This style is useful for felting in that there is no plug sticking out, however I’ve found that, with a lot of use, the valve starts to leak air so longevity might become an issue.
CARING FOR YOUR FELTING BALL
It’s also worth briefly looking at how to care for your felting ball. There are a few aspects to this:
• Inflating size. One of the great features of a rubber ball is that it is firm enough to use at a range of sizes. However, this means that when you are inflating a ball, it doesn’t simply stop at the ideal or manufacturer’s advised size, it will keep going. Be aware that you might be pushing the ball beyond its limits by continuing to inflate it. This happened to me when I over-inflated a ball to use as a finishing forma overnight and returned the next day to find it had burst. I would therefore recommend avoiding inflating too far beyond the sizes set out in the table earlier in this chapter (you can generally tell when a ball is going beyond its capacity because it loses its flexibility and becomes hard), and use the same ball as both your starting and finishing size forma within the same project.
• Avoid using sharp objects near the ball. Save all of your amending (with scissors, sewing needle or a felting needle) until prefelt stage when you have removed the ball.
• Cleaning and storage. After use, and once you’ve deflated it, re-insert the top plug and give it a quick wipe with a dry towel. I tend to leave mine to air dry for an hour or two before putting them away, storing them out of direct sunlight.
MARKING GUIDELINES ON THE FELTING BALL
Although you don’t need guidelines on the ball for a simple project, such as a bowl, it helps to have an idea where the top, sides and bottom of the ball are so that you can plan where your embellishment materials and wool fibre colours will end up on your finished item and how big your top opening will be. And with more complex structural projects, such as the Backpack Project in Chapter 4, it becomes more crucial to use set markings to ensure all the elements are felted in the right place. I’ve therefore developed some useful guidelines to mark on the ball which will help you plan and structure your projects.
As an example, let’s mark up the large purple ball, which is the main ball used in the projects in this book. The steps below show you how to create the markings and include a brief explanation of how you can use each one. I’ll then show you equivalent measurements, where relevant, for some of the other balls.
MARKING UP THE LARGE FELTING BALL
WHAT YOU WILL NEED
Equipment
• Large purple felting ball
• Inflating pump
• 25cm (10in) internal diameter round bowl or similar to prop up the ball
• Tape measure
• Permanent marker pen
Step by Step
Step 1: Marking the top circle line
Inflate the ball to a circumference of 86.5cm (34in). To create the top circle line, which denotes the standard top edge for fibre layout for items such as bowls and bags, measure 8cm (3.25in) out from the centre of the plug. Measure and mark points all around the ball and then draw in the line to create a circle.
Step 2: Marking the top placement lines
Measure and draw lines to divide the top circle into four equal quarter segments. Divide each quarter segment in half again with a dotted line. Assign and mark each segment with a letter sequentially from A–D, so that A and C (and B and D) are opposite. These markings help to keep track of the front and back of the item you’re making and provide equal placement for structural elements such as side tabs for a bag.
Step 3: Marking the top edge line
To mark the top edge line, which designates the top fibre layout line for projects with a wider opening, such as baskets, measure 12cm (4.75in) out from the centre of the plug. Measure and mark points all around the ball and then draw in the line.
Step 4: Marking the middle design line
To mark the middle design line, which denotes the centre of the main design area visible on your finished item, measure 21.5cm (8.5in) out from the centre of the plug. Measure and mark points all around the ball and then draw in the line.
Step 5: Marking the base edge line
To mark the base edge line, which designates the typical base edge for projects on the ball with a base or flat bottom, measure 31cm (12.25in) out from the centre of the plug. Measure and mark points all around the ball and then draw in the line.
Step 6: Marking the base centre point
To mark the very bottom point of the ball, which is useful for creating surface designs emanating from the base of the finished item, such as a spiral, measure 43.5cm (17in) out from the centre of the plug. Measure and mark points going right around the ball and draw a small circle to mark this point approximately.
The table below shows the equivalent guideline markings I used for the four balls in this book. Here are some final points to note about the measurements shown:
• I marked up the balls at different circumference sizes (at the most common sizes for the projects, hence I’ve included two sets of sizes for the large purple ball), so the measurements are different for marking the guidelines on each one, however the proportions are the same. So if you were able to inflate all the balls to the same size once marked, which of course you can’t, because each ball has its own size range and limitations, you’d find that the guidelines are all in the same place. The exception to this is the top circle line on the yellow ball, which I created specifically for the Cat Cave Project to give a smaller opening hole.
• I haven’t included some of the markings on the blue ball, as it is so small, or the yellow ball, as I did not need them.
• The measurements will work for any ball, as long as you inflate your ball to the circumference size shown.
• I always measure out from the centre of the plug or opening hole.
• Don’t worry if your measurements are slightly out (up to 1cm/0.5in) as that’s a size tolerance that won’t make any difference to your finished items.
• Avoid following the ball manufacturing lines around the middle to mark your middle design line as they aren’t always reliable, although the blue ball helpfully already had an accurate middle design line marked by the basketball lines printed on it.
• I’ve rounded some of the measurements up or down slightly for simplicity.
• Bear in mind that all these sizes denote the starting size for the felt which, after shrinkage, is likely to be approximately 25 per cent smaller.
OTHER TOOLS AND EQUIPMENT
Apart from the felting ball, most of the other tools and equipment you’ll need are non-specialist items, some of which you may already have around your home. Here are the main items, along with a brief description of each and how you use them.
Typical wet felting equipment you’ll need for felting on a ball.
Measuring Tools
Measuring scales are essential for weighing out fibre, to ensure the right thickness and structure in the finished projects, and for ensuring consistent results.
Digital measuring scales for weighing wool fibre.
Bowls
I use several different-sized bowls for any felting on a ball project, each with a separate purpose:
• A bowl smaller than the ball size, to use to prop the ball up in as you work.
• A bowl just larger than the ball size (when covered with fibre), to complete the push rub stage of the process within (seeChapter 2). This should ideally be a relatively snug fit so that you’re not having to move the ball around within it a lot for the ball to make contact with the sides of the bowl, but you should still be able to move it easily.
• A large bowl of any size to hold the soapy water solution.
Selection of plastic, china and glass bowls, along with a large plastic tub.
Although the propping-up bowl should ideally be round, the other bowls could be round or square. If you use bowls at different sizes it might be worth getting a few options. I mainly use Wham Casa brand bowls at the following approximate diameter sizes (NB: These bowls are sold based on their external measurements, but I have used the internal measurements throughout this book for comparison with whatever bowls you may have):
External Bowl Diameter
Maximum Internal Bowl Diameter and Height
Maximum Ball Circumference Size
28cm (11in)diameter round bowl
25cm × 12cm(10in × 4.75in)
70cm (27.5in)
32cm (12.5in) diameterround or square bowl
28cm × 14xm(11in × 5.5in)
86.5cm (34in)
36cm (14in)diameter round bowl
32cm × 15cm(12.5in × 6in)
91.5cm (36in)
To use the extra large yellow exercise ball, or similar, you will need a large tub of some kind (or use the bath!) to accommodate it. With the yellow ball inflated to 117cm (46in) in circumference I found that a 40-litre tub was a good size (actual external measurement 43cm/17in in diameter × 32.5cm/12.75in high).
Tights/Pantyhose
Tights or pantyhose, with the legs cut off, are a simple way of covering the wool fibre once we’ve completed the layout, to keep the fibre in place and protect it during agitation. Tights also give us something to hold onto to facilitate bouncing. I use a range of sizes with different balls, but if you just aim for a large-sized pair it will be fine for most projects. You’ll need two pairs of each for complete coverage, apart from when using the small blue ball, when one pair will be enough.
I use Pretty Polly Smooth Knit brand, which are 20 denier so very stretchy (the XXL size fits over the large 40-litre tub) and not too delicate, and they can be reused repeatedly:
• Small/medium (86–102cm/34–40in hips)
• Medium/large (102–122cm/40–48in hips)
• XXL (137–152cm/54–60in hips)
Prepared tights/ pantyhose in small/ medium, medium/ large and XXL sizes.
To prepare the tights, turn them inside out so that the seam lines aren’t against the ball when you use them, and tie a knot in each leg approximately 7.5cm (3in) down from the gusset centre join. Cut off the leg excess. Keep the legs when you cut them off, as they come in useful for making straps (see the Backpack Project in Chapter 4) or for covering very small balls.
To get the tights onto the ball, I stretch them over a large bowl first and then place the ball inside, lifting up the tights around the ball and being careful not to drag them across the fibre. Gently pull them up as far as they will go, which will probably leave the top of the ball exposed. Repeat the process with a second pair of tights, placing the ball inside so that the area not covered by the first pair is now covered. You don’t need to tie or knot the tights at the top, keeping them loose is fine and avoids having to continually untie them.
Thin Plastic/Bubble Wrap
Wrapping the fibre in a thin sheet of plastic before putting on the tights helps to keep the fibre in place, helps to keep water next to the fibre and stops the fibre from felting to the tights. I use a roll of DIY/builder’s polythene sheeting, which is thin but holds up well and can be reused, but you could repurpose large plastic bags or similar. Any thin plastic which will mould around the fibre and isn’t too bulky would be ideal. A 100cm × 55cm (40in × 22in) piece would work for most projects (except the larger Cat Cave Project).
Bubble wrap is a handy work surface to use for creating flat felt pieces, such as the flap and strap in the Backpack Project and the prefelt in the Jurassic Basket Project. It’s a bit too bulky to wrap around the ball but if you need to keep elements from felting together you could use it as a resist, as well as a packing material to help shape the finished felt. I tend to use bubble wrap with small bubbles and always have the smooth side next to the fibre, on the basis that this will cause least disruption to any design.
Soap
I like to use washing-up/dishwashing liquid in my soapy water solutions as it’s fully soluble, and I prefer to use solid olive oil soap for hands-on rubbing. I often use it from prefelt stage, on elements such as the inside embellishments and handles, as it adds a concentrated amount of soap to the felt which helps your hands rub the surface more smoothly.
Spray Bottle/Ball Brause (or Brauser)
During the embellishment and fibre layout I use a spray bottle to add extra soapy water, which has a gentle spray so there is less danger of everything sliding off than from the concentrated shower of a ball brause. Once I remove the ball, however, and the fibre has bonded to prefelt stage so won’t be disrupted, then the ball brause comes into its own for me by delivering a much heftier shower of soapy water.
To use the ball brause, make up your liquid soap solution in a separate container, dip the end of the bulb into it, squeeze and release. The bulb will draw up the water which can then be sprayed over the work through the shower head.
Using the ball brause to give a concentrated shower of soapy water.
Using the Mini Wedge Palm Washboard to rub the edges of a felt strap.
Rubbing Tools
When making flat felt, it is helpful to use some kind of rubbing tool to agitate the surface more quickly than your hand alone. There are a range of handmade wooden Palm Washboard tools made in the USA by HeartFelt Silks which work really well for this.
Another option with agitating the fibre is to rub the felt against something like a textured mat or drawer liner. This is particularly useful for final shaping of the felt.
Towels and Trays
As we’re dealing with so much water during the felting on a ball process, having plenty of towels to hand is useful: as a work surface, for mopping up water and for towel drying the finished felt. Another useful option to help contain dripping water from the ball and bowls is to stand them in a shallow tray such as a boot tray.
Resist Templates
Foam resist templates used for several of the felting on a ball projects.
1mm and 6mm foam resist templates.
Tools for making paper templates.
Typical items which can be used or repurposed as finishing formas or shapes.
Some of the projects in this book incorporate additional flat resist templates to create hollow areas within the felt, such as pockets in the Dartmoor Basket Bag and Backpack Projects and the ear shapes for the Cat Cave Project. Thin foam or plastic is ideal to use for these: thin foam is better for inserting between layers, as it’s flexible, mouldable and not too bulky; for an external element which needs to be more substantial and rigid, like the ear shapes, then a thicker 5–6mm foam (sold as Ethafoam) is perfect. You’ll also want paper (graph or squared paper is useful), ruler for measuring, pens/pencil for marking (including a permanent marker pen for marking up the felting ball) and household scissors for cutting out shapes.
Finishing Formas
Felting balls can also be used as finishing formas to shape the finished felt and stretch the surface smooth, along with other 3D items. A hat block is an example of a purpose-made forma to shape and stretch a hat around (although you don’t need to use one for the hat projects in this book), but you can easily repurpose household items such as plastic and cardboard boxes, tins and bowls.
Finishing and Other Tools
Other tools which are essential for felting on a ball include sewing scissors of different sizes and a tape measure for measuring and marking up the felting ball. There are also some specific tools/materials required for completing some of the projects, such as: crochet hook, pompom maker, clothes pegs, textile glue, screwdriver, seam ripper, packing tape, sewing needle and pins. Felting needles are handy for joining wool fibre, and a steam iron and pilling tool (to remove wool pills) are useful for finishing the surface of your felt.
A selection of measuring, cutting and joining tools for completing projects.
A steam iron and pilling tool are useful for creating a smooth finished felt.
MATERIALS
Wool Fibre
Wool is the common term for the natural hair or fibres that form the fleece of animals, in particular sheep. Sheep’s wool has unique properties which enable us to matt the fibres together to make felt (which we’ll cover in the next chapter). Once you start delving into it, you’ll find that wool is a vast subject, covering different animals (such as sheep, goats and alpacas), different breeds (such as Merino, Corriedale and Shetland sheep) and different forms (such as batts and tops, rolags and locks, yarns). There is a confusing amount of terminology, which differs for different countries. In this section, and based on my own understanding, my aim is therefore to simplify what is available and what will work well for felting on a ball, focused on the sheep’s wool fibre and other materials used in this book.
Comparing wool fibre
SHEEP BREED FIBRES USED IN THE PROJECTS
The sheep breed fibres used in this book are all largely similar in terms of microns (apart from Merino), as they represent the slightly coarser and more hardwearing felted items shown in the projects. Here are their approximate micron details, for comparison (and you’ll see that fibres of the same breed can vary in thickness, depending on the supplier):
BreedMicronsMerino19MC-1 (USA sheep)25Finnwool26Corriedale (combed tops)26.5Maori/New Zealand27Kent Romney27-29Maori-Bergschaf27–33Shetland29–31Corriedale(sliver)29–30Bergschaf30–33Preparing wool fibre
Wool fibre is generally processed into three main forms commercially for feltmaking (using UK terminology):
•Carded batt, in which all the individual fibres are intermingled and laid out in fluffy, lofty sheets.
•Carded sliver, which is like carded batt but processed into a long, narrow tube.
•Combed top/tops, which are also processed into long tubes, but the individual fibres are combed in one direction to make them smoother, sleeker and uniform.
To use wool fibre in wet felting, the first stage is to take the commercially prepared fibre and divide it into manageable pieces or wisps, which we then lay out and layer up together to construct our project before beginning to wet felt. Here is a guide to how we prepare the different fibre formats prior to felting. It’s worth noting that, whichever format you are using, you’ll find it easier to pull a wisp or piece of fibre straight from the top of a strip or length with a loose grip (and dry hands). This gives you a piece with wispy edges, which is better for fibre integration in felting. The standard practice for laying out fibre is to overlap wispy pieces, to create even layers which build up into an integrated shape.
Range of dyed and undyed carded wool batt fibre.
Undyed and dyed carded wool sliver fibre.
Plain commercially dyed and variegated hand-dyed Merino combed wool tops fibre.
Step by Step
Preparing Carded Batt Fibre
Step 1: Separating the batt into thin layers.
Step 2: Tearing a layer into strips.
Step 3: Pulling smaller pieces from a strip.
Step 4: A prepared, palm-sized piece.
Preparing Carded Sliver Fibre
Step 1: Dividing the sliver length in half (if necessary).
Step 2: Pulling smaller pieces from the sliver length.
Step 3: A prepared palm-sized piece.
Preparing Combed Tops Fibre
Step 1: Pulling a wisp of fibre from the length of tops.
Step 2: A prepared wisp of tops fibre.
Wool fibre for felting on a ball
Any of the wool fibre forms will felt (as long as they have not been specifically treated to not felt, such as superwash wool tops), but for felting on a ball it is carded wool fibre which we are primarily going to use, in batt and sliver form, using a papier mâché layout technique (seeChapter 2). The basic reason for this is that carded wool fibre, when wet and torn into pieces, maintains a manageable structure which works well for the wet layout technique we’re using, to achieve a tight, even, overlapping layout. In contrast, a wisp of combed tops fibre is very delicate and has little structure to it, which makes wetting and adding it to the ball, and building up the thickness of layers we need, much more difficult. So it is not so much the fibre breed as the format of the fibre which makes the difference to successful felting on a ball.
However, although you can felt anything you like out of any fibre, it is always worth considering the end purpose of your felt and which fibre breed would be most suitable for it. A coarser fibre like Bergschaf, which felts well together in a thick layer and will hold its shape and structure, is ideally suited to creating a hardwearing bag or basket. Whereas finer and softer Merino, which doesn’t felt as well in a thicker layer, is more suited to creating a fine, drapey scarf. The nature of most felting on a ball projects is to create 3D felt which has good structure and thickness, requiring a coarser fibre. So the upshot is that carded wool fibre, of a coarser thickness, is the most structurally suited fibre to use for this technique.
It is, of course, possible to use Merino combed wool tops for felting on a ball, so I have included a project in Chapter 5 to make a Nuno Silk Cowl, a more delicate item with drape which makes best use of Merino’s soft and fine qualities and only requires a single thin layer of fibre. You can also use tops fibres as a decorative layer or area on the ball as part of your embellishments, or you could card the tops fibres yourself or create prefelts from them to use in the layout, which would give them better structure and make them more manageable when wet. Merino is also available commercially in carded wool batt fibre form or as prefelt.
There are other ways we can use combed wool tops fibre too, which seems to be down to the difference between large commercial and smaller-scale fibre producers. With hand-dyed, combed wool tops, I’ve found that the fibres tend to felt together slightly during the dyeing process, giving them a less wispy structure and hence making them easier to use with the wet layout method of felting on a ball. Directionally, the fibres still have a uniformity which makes it harder to achieve a very even layout, but you can compensate for this by laying the wisps on the ball in different directions. You’ll see that I’ve used a Corriedale version in the Sari Silk Bowl Project in Chapter 5. So keep an eye out for different wool fibres, especially at craft markets where you will find more independent small-scale suppliers, as you might find that the way materials have been treated might make them more suitable to use for felting on a ball.
Embellishment Materials
There are lots of surface design materials available that we can use to decorate our felt, but I’m focusing here on the ones I’ve used in the projects and which work well with the felting on a ball process.
Wool yarns
Adding wool yarns is a simple way of incorporating highlights of colour, pattern and texture into wet felting. Because they have the same feltable properties as wool fibre (yarn is spun from wool fibre), wool yarns and fibre will bond happily together, with the yarns being drawn into the fibre and becoming embedded. Aim for yarns with a high wool content, and the hairier the better as this helps the bonding. Mohair yarns are excellent for this reason, and can be found in lots of different textural varieties, such as straight, loop or bouclé, slubby and mixed with sparkly fibres. I also like to use chunky wool yarns, which are either straight thick or thick and thin in structure, which give great coverage on the ball and are reliable felters. Art yarns are chunky yarns available from artisan suppliers which often have interesting twists, slubs and other elements incorporated in them and provide amazing texture.
Mohair wool yarns in straight, loop/bouclé and slub versions.
Mohair wool yarn blends with metallic fibres.
Chunky thick and thin wool yarns.
Curly wool locks
Some sheep breeds have distinctive long locks with a well-defined crimp or curl which is preserved during processing. They are available dyed and undyed and can be used to create great texture and pattern in wet felting, either kept in their defined curls or wisped out for broader coverage.
Hand-dyed Teeswater and Wensleydale long curly wool locks.
Silk fibres
Silk fibres come in a variety of formats (including tops, hankies, caps and bricks), both dyed and undyed, and are perfect for adding colour and a subtle sheen to wet felting projects. Simply peel them apart (in the case of hankies or caps) and spread them out, or cut pieces from them before wisping, lay them on the ball and spray to secure. Although they don’t have feltable properties, their fineness makes it easy for the wool fibre to bond with them. Silk fibres are a type of protein fibre, along with wool, which originates from an animal.
Hand-dyed silk hankies (square layers), caps (bowl-shaped layers) and bricks (thicker pieces of combed silk tops).
Plant fibres
There are lots of plant-derived fibres, such as bamboo and viscose (made from cellulose/wood pulp), which are similar to silk fibres and work in the same way by adding sheen to the surface of the felt. Like silk fibres, they felt easily with wool fibre.
Plain and variegated dyed bamboo tops (left) and plain dyed viscose tops (right).
Wool fibre blends
There is a vast array of wool fibre blends available, in all sorts of combinations, from both large-scale commercial suppliers, where you’ll find repeatable blends such as Merino combed tops mixed with a lustre fibre like silk, and more artisan suppliers, where you’ll find hand-carded blends and one-off art batts (a rolled-up batt) and rolags (a fine carded layer rolled up and shaped into a spiral). A fine, wispy layer of blended fibres is simple to spread out and add to the ball and will bond easily with the main wool fibre, as well as adding interesting colour, texture and pattern to it.
Hand-carded wool fibre blends in batt form, including sari silk blends, art batts and a rolag, and commercial blends in tops form.
Tweed-effect tops blends comprising South American wool and viscose fibres.
Prefelt


