8,39 €
Mehr erfahren.
- Herausgeber: Batsford
- Kategorie: Geisteswissenschaft
- Serie: Learn Quickly
- Sprache: Englisch
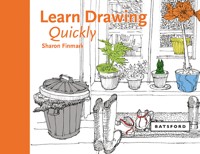
A practical book with simple excercises showing the basics of drawing. Learning to draw is quicker and easier than you might think. This practical and concise book contains simple exercises and techniques to encourage you to start drawing, whether you want to be able to create a sketch, a visual diary of your holiday, or draw for sheer creative pleasure. Sharon Finmark covers the basics of drawing, sharing advice on texture, pattern and form. She shows how to achieve light and shade, solidity of form and how to add simple perspective to your compositions. There is an introduction to working with different drawing media including pencil, pen and ink, charcoal, coloured pencils and watercolour. Subjects covered are still life, flowers and plants, landscapes, interiors and people. By the end of this little book you should be able to draw with confidence and have fun with it!
Das E-Book können Sie in Legimi-Apps oder einer beliebigen App lesen, die das folgende Format unterstützen:
Seitenzahl: 46
Veröffentlichungsjahr: 2016
Ähnliche


Learn Drawing
Quickly
Sharon Finmark
Learn Drawing
Quickly
Contents
Introduction
1. Materials and mark-making
2. Shape and form
3. Tone and form
4. Composition
5. Basic perspective
6. Drawing styles
7. Subjects to draw
Index
Introduction
A drawing may be a swift sketch, a careful study, a visual diary of your life or just something done for sheer creative pleasure. Drawing is all about ways of seeing and methods of translating that on to paper.
This book starts with simple exercises and ideas, encouraging an inventive approach to composition and helping you to develop your own personal style. You will explore the shapes of everything you might choose to draw and the materials that suit both you and your subjects, learning how to build up lively drawings where all the elements combine to make interesting and successful pictures.
Wine bottles in coloured pencils. I overlayed several colours to create the deep reds of the wine and the white of the paper showed up the highlights on the bottles.
Construction site in the City in brush pen and watercolour. The red of the crane was a great contrast to the grey of the sky.
Chapter 1
Materials and mark-making
The range of drawing tools is wide, and it’s exciting to explore what the different media can do. In this book you’ll discover the textures that are possible and their potential use, so that you can build up a vocabulary of marks. Popular and easy to obtain drawing tools include pencils, charcoal, chalks, pastels, pens and paint applied with a brush or pen. You will also need erasers and cartridge paper, both textured and tinted.
A selection of pens, pencils, paints and inks can be acquired inexpensively, along with a few essential accessories. Their familiarity makes it easy to begin drawing.
Drawing materials
Soft-textured drawing tools include square-ended pastel, conté, compressed charcoal, fine charcoal, pencil and fat graphite pencil.
Propelling pencils and dip pens give clean, precise marks.
I use black Indian ink with a wide, soft-haired brush and watercolour with a smaller soft-haired brush. The diluted ink and paint both offer tone but the ink sinks in more quickly and has a slightly different quality of black, with more intensity. Using a pen in combination with a brush is effective.
Watercolour tubes offer more paint than pans (small blocks) and thus stretch to a larger drawing. The paint is exactly the same.
Textures in charcoal and pencil
To begin with, don’t try to draw whole objects that have pattern and textures – just experiment with how to show their surface. Consider drawing the textures of an onion, wire, string, pebbles, shells, metal and so forth – anything that has a surface you like – and enjoy the marks for themselves before you move on to drawing the objects as a whole.
Looking at ordinary fruit and vegetables offers the opportunity to see very simple basic shapes and how to create a texture on them. The textures in the top group are in charcoal, showing the stippling, broken marks, fine lines and blending that you can achieve using this medium. The same objects shown below demonstrate how pencil can more delicately achieve both texture and shadow.
These range from vigorous to more refined marks, using charcoal, charcoal pencil and soft 8B to harder HB pencil marks. The softer, more intense drawing tools are well suited to shading and the lighter ones to detail. Using your finger to smudge the charcoal is a swift way to shade it for a velvety feel.
Textures and marks in hard pencil
The long, wavering line across the page shows the range of soft to hard pencil marks. The other marks are further examples of what you can elicit from the range of pencil grades. Try the various methods of building tone given here and use the ones most suitable for your subject matter. Drawing closely spaced parallel lines, then laying a second set across them at right angles (known as cross-hatching), works well for natural objects such as shells or woven baskets.
Using pen, you can make scratchy lines to show a surface, building up to overlapping lines to indicate the darker tones, such as the interior of these shoes. You may get blobs of ink when you use a dip pen, but these can be interesting marks rather than faults.
Coloured pencils
Coloured pencils are used in the same way as an ordinary pencil, but have the advantage that they give you the ability to overlay one colour with another with a delicate touch.
Pastels
Pastel crayons may be rounded or squared along their length. By using the side of the crayon rather than the tip you can create large textured areas, especially on textured paper intended for pastels. If the drawing has strong contrasts, using tinted paper allows you to add white to show highlights.
Pastels can be smudged and rubbed into the paper to blend colours, though they won’t mix in the same way as paint.
Coloured felt-tip pens
These are usually rather bright in colour, so unless you buy a vast range they don’t lend themselves to subtle representation. For different marks, buy them with tips of various sizes from fine to broad.
Textures in coloured pencils, pens and pastels
The lemons, apples and garlic here are drawn in coloured pencils (top), felt-tip pens (below) and pastels (here


