Erhalten Sie Zugang zu diesem und mehr als 300000 Büchern ab EUR 5,99 monatlich.
- Herausgeber: The Crowood Press
- Kategorie: Lebensstil
- Sprache: Englisch
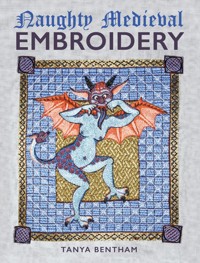
Naughty Medieval Embroidery comes with an adult warning. This practical book explains a range of techniques used in medieval embroidery from simple stem stitch to more complicated silk and goldwork. However, rather than the usual examples of flowers and shields, it includes more colourful aspects of medieval life from cheeky demons to penis-picking nuns. This book is a wonderful romp for embroiderers who dare to enjoy stitching some alternative pieces. Clear step-by-step instructions to over 16 projects which progress in difficulty, Practical advice on design and stitching, and tips on pitfalls to avoid, Informed detail on the projects, plus a lot of encouragement and good cheer. Over 600 illustrations support the text, including templates for the projects
Sie lesen das E-Book in den Legimi-Apps auf:
Seitenzahl: 184
Veröffentlichungsjahr: 2024
Das E-Book (TTS) können Sie hören im Abo „Legimi Premium” in Legimi-Apps auf:
Ähnliche


CONTENTS
Introduction
1 Materials and Equipment
2 Stem Stitch
3 Laid and Couched Work
4 Convent Stitch
5 German Brick Stitch
6 Opus Anglicanum
7 Whitework
Suppliers
Index
INTRODUCTION
Medieval art is full of filthy images… except, is it really?
While I was writing this book I was visiting a primary school in my guise as Claudia Marcia Capitolina, a Roman lady, and one of the teachers was laughing because a delivery van had pulled up outside the office, complete with several penises scratched into the dirt on the back door. He thought this was amusing but completely inappropriate. I thought, ‘It depends on how you look at it.’
The world's first unsolicited dick pic.
Looking at it through modern eyes, it was both offensive and inappropriate. The person who defaced the vehicle could have done it for a laugh or because they thought the driver was a bit of a knob. However, if I looked at it through the Roman eyes of Claudia, I saw that some kind person had been so concerned for the welfare of the van driver that they’d taken the time to decorate his vehicle with some fertility symbols, thus ensuring the driver’s happiness, the good health of his crops and the prosperity of his family.
It could have been done for all three reasons. All art – even the kind involving gratuitous genitalia, nudity and farting – is subjective and has different layers of meaning. Our ancestors (apart from the Victorians, who were such massive pervs they covered it up with a veneer of extreme prudishness) were just as amused by a good knob joke as we are today, but there were other layers of meaning to many of the images. You might be surprised how many of the images that inspired these embroideries have a religious connection… or, then again, you might not.
Some of the images are extremely rude; others are simply silly or a little strange. As with my previous books, I’ve arranged the projects with the easiest first and made each one a little more difficult as the book progresses. This book also offers an brief introduction to some of the other techniques of medieval embroidery – from convent stitch to whitework – all carried out with a rude twist.
CHAPTER 1
MATERIALS AND EQUIPMENT
Unless you count the fact that I have multiple quantities of everything, I don’t have a lot of ‘stuff’ for medieval embroidery. All you need is a simple frame, some scissors, a needle or three, and the right sort of threads.
Three living, three dead – set in an inner city because most young men don’t go out into the country any more. This piece won the Innovative Use of Textiles category at the Fine Art Textiles Awards, 2022.
Obviously you need a pair of scissors, but you probably don’t need this many pairs! I need these because my cat sits on them, forcing me to also have a decoy pair. Sometimes he can sit on the decoy pair and the pair and I’m using both at once, because he huge and fluffy, which is why I need all of the scissors.
If you’re absolutely desperate for more tools because tools make you happy (and, hey, who am I to judge?), this is about the extent of what I’ve got: beeswax for waxing linen; a serrated tomato knife for cutting notches into the side of cardboard thread tubes to anchor threads and stop them unreeling; a pair of pliers in case a needle gets stuck; a stiletto in case I need a bigger hole; a permanent fabric marking pen for patterns; and a buttonhole gauge, which I find quite useful for evenly spacing grid patterns like the one in the Danse Macabre project (seeChapter 5).
FRAMES
Hoops weren’t a ‘thing’ in the medieval era; in fact, they turn up only quite recently in the history of embroidery, despite their current ubiquity. I don’t recommend hoops at all. Even ignoring the difficulty of getting an even tension with a square-grained canvas on a round object, they just don’t hold enough tension for most forms of medieval embroidery, especially for the opus anglicanum projects in Chapter 6, where tension is essential. So, do yourself a favour and ditch the hoop in favour of a frame, even if it’s just a cheap artists’ canvas with the canvas removed.
One of my floorstanding frames. (You don’t have to work four projects at once, but when you’re working on a book, it makes the photographer’s life a lot easier!) My canvases are often chaotic because I doodle and experiment around the edges.
I have a proper slate frame for medieval demos, but to be honest I prefer these simple fixed frames because I’m forever losing the pegs on my slate and the sticky-out corners get on my nerves! My partner makes these by the dozen for when I’m teaching, and I tend to use them for small portable projects as well. Any decent woodworker should be able to knock something similar up quite quickly.
When I’m demonstrating medieval embroidery in costume, I use a pair of medieval trestles with a slate frame on top. The trestles are the same as those used for medieval table legs. They do the job well enough, but I don’t use them at home because I find them too bulky and intractable. I much prefer the Elbesee C frame, with big wooden screws at the sides. These can be folded almost flat, so they’re easily cleared out of the way. The screw sides give excellent tension, and they’re light and easy to move around. I have seven, because simple doesn’t mean you can’t have more than one.
CANVASES
Evenweave Wool Canvas
I use evenweave wool canvas for most of my laid and couched work and Bayeux stitch. There is evidence for wool canvas in period work and it’s an absolute joy to work on – so much nicer than working wool onto linen.
Top row: Evenweave wool canvas; second row: ramie; third and bottom rows: linen.
Ramie
I use this doubled for all of my opus anglicanum work. I like this canvas because it has a very high thread count (around 90), which allows for very accurate stitch placement. Also, it’s very tough and will take no end of abuse. If I could find a linen with this thread count, I’d happily use it.
Linen
I never buy expensive linens. When I want to embroider on linen, I reach into the stash of fabrics that I use to make medieval underwear. They didn’t really have evenweave canvas in the middle ages, they had ‘it’s even enough’.
THREADS
Crewel Weight Wool
I use crewel weight wools that I dye using the same kinds of natural dyes that were available in the Middle Ages. I tend to refer to dark, medium or light madder colours. If you’re using a commercially dyed product, it’s fine to go a couple of numbers either side of the ones I give as equivalents in the Appletons range.
I dye crewel weight wools using the natural colours that were available in the Middle Ages – mainly madder, weld, woad, cochineal and walnut. The colours harmonise better than the modern aniline dyed kinds, and they are every bit as lightfast.
30/2 Silk
For the German brick stitch projects in Chapter 5, I used some 30/2 silks that I’d naturally dyed a few years ago.
The weight of 30/2 silks is a little heftier than a strand of standard embroidery cotton, and they’re much softer.
The same silks can also be commercially dyed, which I’ve used for the Zodiac Man (seeChapter 2).
Flat or Filament Silk
For the opus anglicanum projects in Chapter 6, flat or filament silk is essential. I would go so far as to say it’s not opus anglicanum at all unless you use the right silk, because only filament silk brings light into the work. Japanese silks are also excellent.
The projects in this book are all done with DeVere silks. I use a mixture of 6 and 60, depending upon how many strands are required.
Sometimes you can also find old pirns of mill silks like these ones in flat silk. They’re often cheap and nice to work with, but you have to be prepared to run out and not be able to replace the colours. They’re a fantastic budget option, if you can find them.
Metal Thread
An essential element of opus anglicanum work is metal threads. In the Middle Ages, these would have been made from real gold and silver, but the modern alternative is passing threads, which are constructed in the same way, with a metallic outer wrapped around a thread core. Metal threads are available in traditional golds and silvers, as well as an exciting range of more modern metallic colours, which can be used to add an updated twist to the work.
I used metal threads for my Three Living and Three Dead piece, shown at the start of this section.
Linen Thread
Linen threads have several uses and are not all equal in terms of strength.
The white linen threads here are used for the whitework pieces in Chapter 7. I use the yellow for the ‘under’ part of underside couching in opus anglicanum (seeChapter 6). It should never show on the surface, so the colour is irrelevant; what matters for the underside is the strength of the thread, as it takes a lot of abuse.
Cotton Thread
I use cotton thread for lacing my frames. A strong linen would be the medieval choice (and that’s what I’d use for a demo when I want to be authentic), but cotton is more practical because it’s cheaper and, more importantly, is far less susceptible to atmospheric moisture. (Linen stretches at the slightest damp in the air and I find myself constantly tightening the lacing when I use it.)
This is perle 5 cotton (which is also sold for crochet under the name DMC Petra in bigger skeins and at a fraction of the price of the embroidery version). It’s worth keeping two colours on hand in case you want to overlace a frame – you can lace in a second colour and know which threads to tighten without having to completely unlace the canvas.
CHAPTER 2
STEM STITCH
Stem stitch is one of the world’s oldest stitches, used by some of the oldest-known embroideries, from the Llangors textile of Iron Age Wales to the Paracas mummies of pre-conquest South America.
Modern embroidery makes a distinction between stem and outline stitches on the basis of whether you take your needle to the top or bottom of the line. As someone who struggles with direction, I find this utterly confusing, not to mention pointless, because if you turn the stitch 180 degrees it’s all the same anyway.
The modern witch likes to keep up with the latest gadgets.
STEM STITCH METHOD
When stitching, make sure the stitches are on the same straight line to ensure that the finished row of stitches has a smooth, rope-like appearance.
1 Bring your needle out at the start of your line.
2 Take the needle down about 4–5mm (¼in) along the row, then come back up halfway along the previous stitch.
3 Each stitch should be roughly the same length and should overlap the previous stitch by half its length, so you will only progress half a stitch length with each subsequent stitch.
4 It is tempting to try and make the work go quicker by stretching the stitches out and not going all the way back, but as you can see this makes for a straggly, uneven row.
5 Compare the stretched row at the top with the properly overlapped row at the bottom – the difference is apparent.
Troubleshooting
I’m not one to obsess over the appearance of the back of the stitches, but in many cases, seeing what the back should look like helps us to understand how the stitch works. Here you see the bad stem stitch at the top, which looks like an uneven row of dots. The good example at the bottom looks a lot like conventional backstitch
The difference between the good and the bad become even more evident once you start to introduce some movement to the line.
It’s also important to remember direction with this split. Always go above or always go below; you can’t mix the two or you end up with a wobbly line. The upper line has all the stitches to the same side, making a straight, even rope. The lower line has several changes of direction along its length and you can see how uneven it has become.
STEM STITCH PROJECTS
Wheee!
She looks very po-faced for someone riding an enormous green willy, doesn’t she? This image is taken from a marginal illustration in the Decretum Gratiani of 1340. I’ve worked it in stem stitch in a fairly open, sketchy style to reflect the feel of the original drawing.
Materials
• Linen canvas, 30cm (12in) square
• Crewel needle, size 22
• Silk 30/2nm threads:
– Dark brown
– Green
– Flesh pink
– Pink
– Brown
You'd think she’d be a bit more pleased with herself, all things considered.
Transferring the Design
If you’re using a permanent marker, as I tend to, make sure it has a fine line so you can completely cover it.
Wheee! template, actual size.
Colour map.
The Flying Penis
He’s got quite a friendly face, so try to give him a nice smile. If you met an enormous flying green phallus in reality you probably run a mile (or at least I would) so it’s probably best to make him look as unthreatening as possible.
Really, if you think about it, riding a big green willy isn’t all that different to riding around on any other phallic symbol.
1 Transfer your design to the canvas.
2 Work the outline of the flying penis in a single line of dark brown. It looks nice if you add some little furry tufts to its ears.
3 The next stage is simply a case of working around the inside of the brown with several layers of green, making sure to pack the rows nice and close together. I’ve done between three and four rows, but you can do more or less according to your personal taste (although if you’re currently embroidering an enormous green todger, it might be a good time to question your personal taste, to be honest. I mean, I’ve been a lost cause in that regard for decades, but you might still be able to save yourself if you put this book down right now and run away).
4 In places where you want more depth to the layers of stem stitch, say around the testicles, you can use a layering technique to thicken the line smoothly. I’ve worked it here in two colours so you can see more clearly. Work about two-thirds of the way along the row, then double back over the central portion. This way, the ends will be single rows while the centre doubles in width.
The Rider
Add some shape to the rider’s body by using spirals of stitch to outline the large areas of muscles. This is much the same principle used to fill in the flesh areas in the Hellmouth project in Chapter 6.
5 Outline the rider’s body in a single row of dark brown. Leave her hair.
6 Use spirals of stitch in flesh pink to outline her lovely fat thighs.
7 Use the same spiralling technique to add shape to her lower leg and arms.
8 Bring the needle out right out of the join between the spiral and the outline. It’s important to come out quite far to get the stitches to blend well.
9 Work down the sides of the hand and fingers.
10 Do the same for her feet, before coming out and filling the shadowed rear leg.
11 The rest of the body is simply worked by shadowing the dark outline with a flesh-coloured one.
12 It’s best not to overwork the face, lest it begins to look clunky, so simply outline the apple of the cheek, the brow and the nose.
13 Add just a hint of pink lippy, because it is oh so very important to look one’s best when riding an enormous green todger.
14 Her hair is rather elegant (I suspect she’s used a lot of product to get it to stay put during her exertions), but the braid is really just a series of small interlinked ‘S’ shapes in brown.
15 Off she goes!
Zodiac Man
The Zodiac Man isn’t as rude as his companion in this section on stem stitch, since all his rudey bits are covered up, but I admit I have a soft spot for him and for a lot of medieval zodiac characters. Mine is based on John of Arderne’s fifteenth-century text, Mirror of Phlebotomy & Practice of Surgery (Glasgow University Library, MS Hunter 251 (U.4.9), folio 47v).
Zodiac Man.
Based on a Byzantine zodiac document, I love how the sun in the middle looks so hungover.
The modern world largely regards the zodiac as mythology, but in the medieval world it was an accepted science. The Zodiac Man was a diagnostic tool for physicians and surgeons. He shows which part of the body is governed by which sign, and a large part of his use was to give guidance on whereabouts bloodletting was to be done in conjunction with the phases of the moon. Some versions even cheerily illustrate blood pouring from the various letting points. (Mind you, if he’s meant to be a diagnostic tool, you’d think the first thing any decent physician ought to notice is that there’s a scorpion trying to bite his knackers off.) He’s really little more than a needle sketch and is a great way to practise your stem stitch with an easy weekend project, but you could also use him as the base for a more detailed treatment.
I would urge you to be conservative with the number of colours you use here. I’ve chosen a set of colours dictated by those associated with each sign, but each colour is used more than once throughout the image to create harmony. If you use a colour only once in an image it will stand out. Sometimes that can be what you want, but most of the time it’s just jarring to the eye. Medieval embroidery tends to be very limited in the range of colours used, and sticking to this ethos will help your work look authentic. I haven’t listed exact colours, as I think this is a great stash-busting project to use up odds and ends.
We will work in split stitch throughout, unless otherwise stated. I’m going to work down the body from his head, showing one sign at a time.
Colour map.
Zodiac Man template. Enlarge by 200%. Finished size 30 × 40cm (12 × 16in).
Materials
• Linen canvas, 30 × 40cm (12 × 16in)
• Crewel needle, size 22
• Medium-weight threads – I’ve used silk 30/2 nm threads, but any cotton or silk thread would work in the following colours:
– Brown
– Yellow
– Orange
– Red
– Deep pink
– Black
– Bright green
– Chestnut brown
– Royal blue
– Sky blue
– Pale grey-green
– Purple
Zodiac Man Outline
Notice that I haven’t marked the heads and hands of some of the smaller characters in great detail in this project. Part of the charm of a piece like this is its sketchy nature, which adds a kind of immediacy to the image. Fingers, toes and hair can be indicated by tiny lines that really don’t need to be marked out accurately.
1 Transfer your design onto the canvas. I’ve used a permanent fabric marker, but have deliberately chosen one that’s running out and leaves a faint line because the embroidery will not be very thick. However, you could use a slow-fade or wash-out pen if you prefer.
2 Mark the outlines of the Zodiac Man’s body and face where they will show in brown thread. This really isn’t much, but working it first allows the signs to sit on top of him.
3 My Zodiac Man is going to be a floppy blonde, indicated by alternating stripes of yellow and orange, but you can give yours any colour hair you like. His mouth is worked in red, and I love that it’s an uncertain looking little squiggle, like he’s really none too sure about what’s going on here.
Aries
The little lamb governs the head and eyes, which is why he is pretending to be a rather natty little hat.
4 Start by working some scrolling spirals in deep pink to represent the lamb’s fleece. I haven’t marked these on the template because they don’t have to be accurate. Just have fun with them, keeping your stitches small so the curves are smooth.
5 Outline the lamb in red.
6 Work the hooves and horns in yellow. The hooves are so tiny, you can use a few satin stitches. His eyes are simply little dots of black satin stitch.
Taurus
Taurus is in charge of the neck and throat, so he takes the role of warm scarf.
7 Taurus is an earth sign, so outline him in bright green. Note that the top of his head, where he has a little bit of a wig, is denoted by a simple series of stab stitches where the pattern was blank.
8 His horns and tail are deep pink and his eyes are a nice moo-cow brown.
Gemini
Gemini is in charge of the shoulders and arms. On some zodiac men, this sign is shown as two elegantly clad ladies, but in this book we have the more normal depiction of Gemini as two naked boys. I love the way they’re feeling his muscles – you can just hear them cooing, ‘Ooh, mate, have you been working out?’
9 Gemini’s dominant colour is yellow, which is a bit weak for an outline, so I’ve used chestnut brown instead. Again, note that the fingers and toes are indicated by a few small lines at the open ends of the limbs.
10 Bring in the yellow for the spiky hair, again filling in the gaps at the top of each head.
Cancer


