
7,99 €
Mehr erfahren.
- Herausgeber: Shirish Deshpande
- Kategorie: Geisteswissenschaft
- Sprache: Deutsch
A Pen is mightier than a Sword!
Now discover the true power of a pen in this amazing guide to sketching like a boss.
This one-of-a-kind exercise book will set all your sketching fears to rest and guide you step-by-step in drawing the most awesome illustrations.
Come join Shirish on this amazing journey of discovery.
What will you learn?
-- The concepts of shadows and highlights.
-- Shading techniques using pens.
-- Various 'texture hacks' for drawing objects like glass, stones, bricks, wood
-- Drawing human figures in the landscape.
-- Basic perspective concepts.
And that's not all.
You will learn to implement all these techniques hands-on in twenty amazing step-by-step demonstrations, spanning subjects of various levels of difficulty ranging from simple to complex.
Simple subjects:
-- A Football
-- An Ice Cream Cone
-- A Plain Candle and a Half-Melted Candle
-- A Leaf
-- A Fruit
-- A Mineral Water Bottle
Medium complexity subjects:
-- An Old Wooden Door
-- A Truck
-- The Stairs
-- A Shopfront
-- An Abandoned Car
-- A Small Boat
-- A Banyan Tree Trunk
-- A Shrine
Complex subjects:
-- An Old Victorian Building
-- A Small Temple at the Crossroads
-- An Old Stone Building Converted into an Office
-- An Old Telephone
-- A Church
-- A House in Hawaii
Let’s get sketching like a Boss!
Das E-Book können Sie in Legimi-Apps oder einer beliebigen App lesen, die das folgende Format unterstützen:
Veröffentlichungsjahr: 2023
Ähnliche

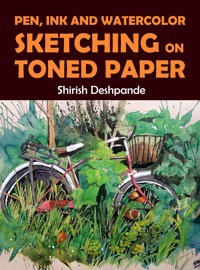
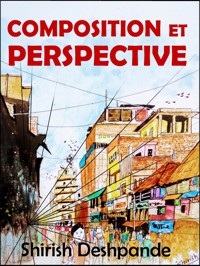


SKETCH LIKE A BOSS!
From Novice to a Boss Illustrator
in Twenty Easy Steps
Copyright ©2019 by Shirish Deshpande
All rights reserved. No part of this book may be reproduced or transmitted in any form or by any means, electronic or mechanical, including photocopying, recording or by any information storage and retrieval system without written permission of the author, except for the inclusion of brief quotations in a review.
All artworks presented in this book are copyright of the artist, regardless of whether they bear the artist’s signature or not.
Table of Contents
Title Page
INTRODUCTION
Who Is This Book For?
What Is This Book About?
Repetition of Instructions
The Fear of Making Mistakes
Some 'Ground Rules' While Reading This Book
The Focus Area of This Book
PART 1 - MATERIALS AND BASIC SHADING TECHNIQUES: Materials
Free Resource – Pen and Ink Shading Materials guide
Basic Shading Techniques
Shading Technique #1: Hatching
Shading Technique #2: Cross-Hatching
Shading Technique #3: Contour Shading
Shading Technique #4: Stippling
Shading Technique #5: Random (Scribbling)
Free Resource – Pen Shading Techniques ‘Cheat Sheet’
PART 2 – SHADOWS, TEXTURE HACKS, HUMAN FIGURES AND PERSPECTIVE: Shadows (and Highlights)
Textures Hacks
Wood
Brick Walls
Stone Walls
Glass
Human Figures (In Landscape Illustrations)
Perspective
One-Point Perspective:
Two-Point Perspective:
PART 3 - SIMPLE EXERCISES
A Football
An Ice Cream Cone
A Plain Candle and a Half-Melted Candle
A Piece of Fruit
A Bottle of Mineral Water
A Leaf
PART 4 - MEDIUM COMPLEXITY EXERCISES
An Old Wooden Door
Some Rustic Stairs
A Small Boat
A Banyan Tree Trunk
A Shrine
A Shopfront
A Truck
An Abandoned Car
PART 5 - COMPLEX EXERCISES: A House in Hawaii
An Old Victorian Building
An Old Telephone
A Church
An Old Stone Building Converted into an Office
A Small Temple at the Crossroads
THE NEXT STEPS
Ready for Some Color?
Ready for Some Perspective?
FREE VIDEO TRAINING
The Twin Trees – Pen Shading Techniques
BEFORE WE PART...
ABOUT THE AUTHOR
GRATITUDE
ENJOYED ‘SKETCH LIKE A BOSS!’?
INTRODUCTION
Who Is This Book For?
The focus of this book is on pen drawing.
Are you interested in learning pen drawing hands-on, from simple to complex subjects? Then this book is for you.
Have you sketched using ballpoint pens/gel pens/technical pens before and want to explore further possibilities? Then this book is for you.
Have you never drawn using pens before and would like to learn this wonderful medium? Then this book is for you.
Do you draw in other mediums, and find pen drawing to be a daunting and unforgiving medium?
Then this book is definitely for you.
What Is This Book About?
Pen drawing is a unique art form. It’s super convenient, requires minimum materials (at least for starting up) and is anytime-anywhere.
One doesn’t need to prepare a lot before starting a pen illustration. A paper and a pen are enough to start. One doesn’t need a lot of space for doing a pen illustration, and there’s no or minimum cleanup after the illustration is done.
This book will hold your hand (metaphorically, of course) and guide you through the process of drawing.
The book is arranged into five parts.
Part 1 is all about basics. It will cover the materials required and basic shading techniques.
If you are familiar with pen shading techniques, or if you have already read my previous book ‘Get-Set-Illustration! Secrets of Pen and Ink Drawing Unleashed!’, you may directly skip to Part 2.
Alternatively, you can download (for free) a handy PDF of Materials for Pen and Ink Drawing from here:
https://HuesAndTones.net/materials
Additionally, you may subscribe to my newsletter from the following link and get the Materials PDF AND a printable PDF of my adult coloring book Dystopian Encounters from here:
https://HuesAndTones.net/signup
I keep updating this list of materials periodically as I learn and try out new materials. If you are subscribed to my mailing list, I will send you the latest copy of the Materials PDF as and when it’s updated.
I also periodically send tips and tricks about sketching and painting, discount codes and the information about the latest releases to my email subscribers (without spamming them!).
Part 2 will introduce you to the concepts of light and shadows, as well as textures. We will deal with only monochrome illustrations in this book. So, understanding shadows is especially important. We do not have the assistance of colors to differentiate between various objects and have only the tool of contrast at our disposal to do so.
Depicting textures is where the true power of pen illustrations comes into play. After learning to create textures, I promise you will never look at the world around you in the same way you do now! We will learn to create textures in the actual demonstrations. But in Part 2, I will show you some hacks that I frequently employ to quickly bring about textures. We will also look at two basic perspective concepts and some hacks to insert human figures quickly into our landscape sketches.
Parts 3, 4 and 5 will guide you in drawing various types of illustrations using pens, step-by-step. We will start with simple illustrations, and gently move towards more complex subjects.
Repetition of Instructions
Within Parts 3 to 5, you will find many pen drawing demonstrations. While reading these demonstrations, you are bound to feel that some of the instructions are repeated.
This is by design.
The book is designed with readers of all skill levels in mind. I totally understand that if you find an exercise too trivial for your skill level, you may want to directly jump to a more challenging exercise. Alternatively, you may want to start with a subject which interests you the most.
To allow this free ‘jumping around’ for the readers, I have repeated several instructions in all the exercises. This will make sure that you can enjoy each demonstration as a stand-alone exercise.
The final illustrations, rough drawings and original reference photographs (if any) are shared on the following web page:
https://huesandtones.net/slabreferences/
Feel free to download these references and use the rough drawings to trace over while starting out with the illustrations.
The Fear of Making Mistakes
When I ask my students what is the #1 reason why they hesitate to start pen drawing, do you know what they answer?
It’s the fear of making mistakes.
Almost everyone starting out with pen drawing is of the opinion that correcting any mistakes is impossible.
Nothing can be further from the truth!
When you see a finished pen illustration like this…
…it’s only natural to think that every pen stroke in the illustration was drawn with a sure hand, and any mistake would have instantly ruined the illustration.
But you will be glad to know, that the above illustration started like this:
If you look carefully, you will notice that the church door is drawn a bit crooked, and the left edge of the church door is almost embedded inside the ground!
But these mistakes are completely covered up in the final illustration.
No artist, however accomplished, can draw without making any mistakes.
In fact, mistakes make an artist… The Artist!
I am not ashamed to admit that I commit many mistakes while drawing all the time. And you will too.
But the most important thing is to not let these mistakes bog us down.
That’s why I proudly showcase all the mistakes I have made while drawing these illustrations within the demonstrations.
The goal of writing this book is not to impress you with my illustration skills. The goal is to instill confidence in you that you will be able to draw… like a boss!
Some 'Ground Rules' While Reading This Book
Throughout this book, we will learn to draw various subjects through step-by-step demonstrations. While you may wish to start imitating the way I do my illustrations, you must keep in mind that the ways I show you are not the only correctways.
There’s only one rule for creating art.
The Rule is that there are no rules!
Every artist starts his/her journey by copying other artists, and so shall you. But after getting the hang of the tools and techniques, you should try different ways of doing things and carve your own path.
In this book, I will show you different ways of drawing using pens. But I do not claim that these methods are the only correct ones or the best ones.
This is the same reason you will rarely find me mentioning the tip size of a pen while illustrating a stroke. I will provide general guidelines, but I want you to draw using your gut feel and intuition, rather than me spoon-feeding you.
In art, there are multiple ‘right’ ways of doing things. So, experiment a lot, make many mistakes, and you are sure to grow as an artist.
The Focus Area of This Book
The focus of this book is drawing expressive illustrations, rather than architecturally accurate illustrations.
Now I will explain that sentence in English!
It means we will strive to draw beautiful and visually appealing illustrations. However, we will not get too constipated about getting all the measurements right.
For this same reason, we will not ever use a measuring scale for drawing any of our illustrations.
Of course, we will not use ‘being expressive’ as an excuse for being sloppy! Our illustrations will still look realistic and believable, but the focus will be on beauty and spontaneity.
I am sure by the time you have finished with the exercises in this book, you will be confident enough to draw some cool stuff using pens.
So, shall we begin?
PART 1 - MATERIALS AND BASIC SHADING TECHNIQUES
Materials
At a very basic level, you will need only two things to start illustrating with pens:
- A pen.
- A piece of paper.
Really, that’s all you need to begin.
However, for drawing more intricate illustrations, we will need more materials than these.
When starting out with the basic illustrations in Part 2 of this book, I recommend that you use a ballpoint pen/gel pen and drawing paper (70 GSM or more).
Keep a paper towel/old (soft) rag handy to wipe the excess ink off the pen tip, as this excess ink can create some ugly patches in the illustrations.
Once you are comfortable with the basic shading techniques and get into the groove of illustration, I will suggest you graduate to the following materials:
Hard Pencil (HB), sharpener and eraser - These will almost exclusively be used to draw initial rough illustrations that will be erased when we complete the pen work.
Paper - Multiple options are available for paper. The paper you choose depends on the type of pens being used for illustration, as well as your personal preferences.
Since we will be drawing exclusively with ‘dry’ materials (we will not use inks or watercolors), there’s no real need for thick paper unless it is your personal choice.
I have suggested a few options below. You may choose any of the types of paper as per your choice and liking. There’s no right or wrong.
a) Poster board paper - This is thick and smooth paper, available in almost any stationary/art/hobby shop. It provides high contrast and pens can move very smoothly over it. This paper is good for all kinds of pens (ballpoint/gel/fountain/technical).
All illustrations in this book are originally drawn on poster board paper.
b) Bristol board paper - This is smooth paper, but not as thick as poster board. All kinds of pens work well on Bristol board.
c) Semi-smooth paper like Fabriano/Canson paper - This is not as smooth as poster board or Bristol board, but still very good for all kinds of pens.
d) Cold pressed handmade paper - Cold pressed paper is thick and rough and is typically used for wet-on-wet watercolor paintings. It can be equally useful for drawing with ballpoint pens. However, drawing on this paper with technical pens can be challenging, and it can even wear out their tips pretty fast.
3. Pens - As I said earlier, we will start with a ballpoint pen/gel pen and then will learn how to use technical pens.
Technical pens are available from various companies like Sakura (Pigma Micron), Stadler, Brustro, Faber-Castell, etc. I use a combination of various types and have no preference for any specific brand. You may want to try out different brands until you settle on one/a combination of several of them.
Technical pens are available in various tip sizes like 0.003, 0.01, 0.03, 0.08, etc. The bigger the number, the fatter the tip size, and vice versa. I recommend buying an assortment of 5-6 different tip sizes so that more variety of strokes can be achieved in an illustration.
4. Brush-tip pens - These are pens with brush-like tips (obviously!). The advantage these brush-tip pens have over a normal brush & ink combination is that they are a ‘dry’ medium but still can provide ink-like effects in an illustration. They have a built-in ink reservoir.
Brush-tip pens are useful when one wants to darken a sizable part of the illustration quickly, or when one wants to create more ‘organic’ brush-like lines in an illustration.
Brush-tip pens are available in various colors from various companies. We will use only the black one. However, this is optional, because you can achieve the same dark effect using a shading technique we will discuss shortly.
Free Resource – Pen and Ink Shading Materials guide
You can download a free Pen and Ink Sketching Materials PDF from the following location:
https://www.huesandtones.net/materials/
If you subscribe to my newsletter, you will keep getting the updated version of this guide as I try out new materials. You can subscribe using this link:
https://www.huesandtones.net/signup/
Basic Shading Techniques
Note: The remaining section of this part is a repeat of shading techniques from my other book ‘Get-Set-Sketch! Secrets of Pen and Ink Drawing Unleashed!’ (https://huesandtones.net/books/gss/). If you have read that book, feel free to skip this part.
Still here? Then read on...
I welcome thee to the dark side!
Pen and ink drawing is all about understanding and exploiting light and dark shades. These are also called ‘values’ in artist-speak.
So, in the rest of the book, we will use the words ‘values’ and ‘shades’ interchangeably.
Since we will be working in monochrome, it’s important to understand how to use values, so our illustrations make some sense to the viewers.
Values are also very important since we are drawing 3D objects onto a 2D surface (a flat piece of paper).
Have a look at the following pictures. Which of these objects look 3D?
Obviously, those where some shading is present. The human eye automatically uses the shadows to perceive the object as 3D.
But before we start learning to shade…
Go back to the list of materials I specified in the ‘Materials’ chapter.
Did I mention a ruler there?
I didn’t?
Why? You may ask.
Because I neither use nor advocate using a ruler while drawing.
The reason will become clear after we learn some shading. Believe me, there’s an airtight reason for this.
But then what is the secret to drawing straight lines as in this picture?
Before learning that secret, let’s see where we normally go wrong.
Most people, while drawing, move their palm using their wrist as the pivot. This severely restricts the range of motion for the hand.
The correct way is to move the hand using the elbow (or even the shoulder) as the pivot.
This enables free hand movement and allows a greater range of motion.
Now try drawing a straight line using the technique shown on the previous page.
Go on, I will be waiting right here.
Was the line straight? No? Did you expect it to be on your first attempt?
What matters is if the line was better than your previous effort.
If yes, that’s good enough. If no, you may be using the hand movement incorrectly.
Does the line even need to be straight? Not necessarily.
Why? Because if the lines are drawn perfectly straight using a ruler, they will stick out like sore thumbs among all the hand-drawn hatching lines (which we will cover on the next page itself).
And if you are thinking of drawing the hatching lines using a ruler, I wish thee luck for your marathon drawing!
Try drawing a straight line one more time. Don’t get hung up on the line if the line is still crooked. You will improve as we go along in the next chapters.
Shading Technique #1: Hatching
Hatching is a very simple shading technique where we draw (almost) parallel lines which are (almost always) equidistant.
That was less of an artistic sentence and more of a legal one!
Why so many disclaimers?
Because the lines need to be neither exactly parallel nor exactly equidistant.
Let’s see how hatching is done.
Have a look at the various hatched areas below:
As you can observe here, the hatching lines are parallel. There are variations in the density of lines in different bunches.
You can draw denser lines to indicate darker shades, or distant lines to indicate light shades.
Now go ahead and practice drawing such hatching lines using a pen. (No, no, no. Not a pencil. Use a pen. No cheating!)
Just one precaution: When doing hatching, at the end of every line, consciously lift your hand before you start illustrating the next line. Otherwise, the lines will end up with these ugly ‘hooks’.
Remember, at this stage, the technique is more important. Speed is secondary.
Now go ahead. Do some practice and go on to the next chapter.
Here’s an example of a part of an illustration which uses hatching:
Shading Technique #2: Cross-Hatching
Cross-hatching means doing hatching in more than one direction over one another. That’s it. Really!
See some examples of cross-hatching below, and you will
understand.
You can do horizontal hatching and then vertical hatching on top.
Or you can do diagonal hatching.
Or you can combine everything.
Are there any rules? Not at all.
Now do some practice of cross-hatching. Then we will explore the next shading technique.
Here’s an example of cross-hatching used in shading.
Shading Technique #3: Contour Shading
This is a variant of all the hatching techniques.
It’s extremely useful to show the objects as 3D.
Let’s see with an example.
Let’s consider a pillar. Assume that the light falls on this pillar from the right-hand side. So, the part of the pillar on the left side should be in the shadow.
But if we use simple hatching/cross-hatching to shade the pillar, will this look 3D? You bet it won’t! It will look flat, like this picture on the left-hand side.
Why? Because the pillar has a horizontal curve, which is lost here.
But what if we draw the horizontal hatching lines along the curve of the pillar? Now does it automatically bring out that curve? Ohh yes!
Just one precaution: When illustrating the curvy lines, pretend that you are covering the whole area from left to right, even if you do not complete them. Else the hatching lines will ‘stab’ the object as shown on the right!
Here’s an example of part of an illustration done with the contour technique.
Shading Technique #4: Stippling
Stippling is a technique where one can create shades using a combination of dots.
The denser the dots, the darker the values.
Make sure the pen is held perfectly vertical to the paper and is lifted after every dot.
Now do some practice with stippling, as shown below. Try doing stippling with dense dots, as well as light dots. Try various combinations. After that, we move to the next technique.


